Managing tasks
- How to complete a task? Who can complete a task?
- How to edit a task? What other actions can be performed with a task?
- How to find the list of tasks of a project (or account)?
- Who can mark task as done?
- How to organize tasks by labels? (Where to configure labels and who can do that?)
- How to change the time frame of a task?
- How can you use the statuses of tasks?
- How to configure a customized list of tasks and save it to favorites?
- How to set priority of tasks?
- If I change a task or a subtask, will all of the subscribed participants be notified about that?
- How to enable/disable display of subtasks in the list?
- How to launch a task's timer?
- How to add a file to a task, subtask, or a comment?
- How to view the history of events in a task?
- How to change an executive of a task?
- Bulk task operations (copy, transfer, delete...)
- How to group tasks by the projects?
- What can be done with the list of tasks (export, print send to email)?
- Can only tasks with a certain label be shown? How?
- How do I see tasks for today? For the next 3 days? Overdue tasks?
- How to set name templates for recurring tasks?
- How to repeat a task with nested subtasks?
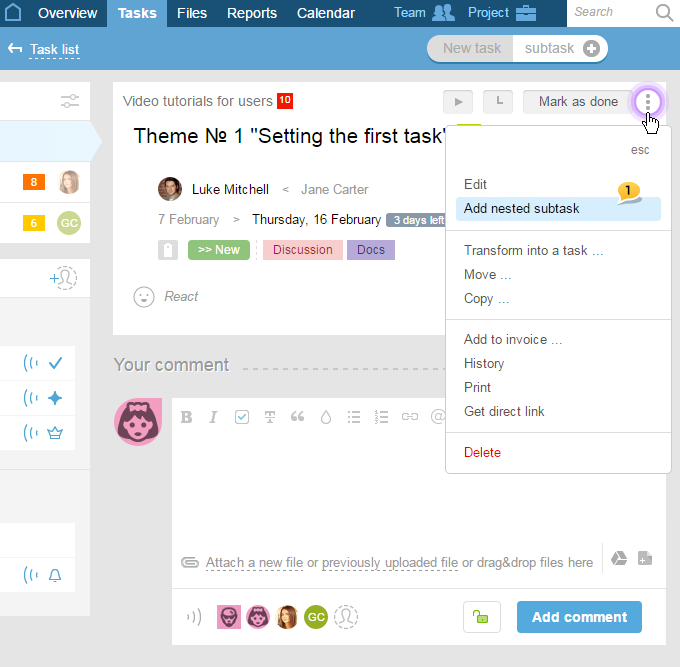
- How to nest/extract a subtask to/from a subtask? Second level subtasks.
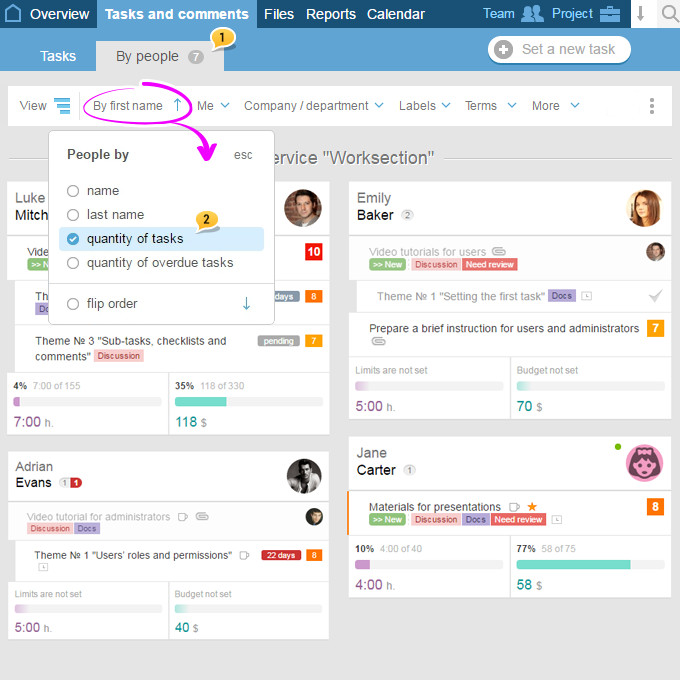
- How to view the work load by people?
- How can I see if a task's executive viewed the assigned task/ subtask?
- How to see who has tasks overdue and how to see the list of all overdue tasks?
- How to view completed tasks of a project?
- How to reassign tasks between the project participants?
- How to copy tasks with dependencies from one project to another?
- Can there be several executives assigned for one task?
- How to check a task before closing it?
- How to copy a task with dependencies within a project?
- How to create & save custom filter on task list / reports / Gantt chart
- How to find a task by ID?
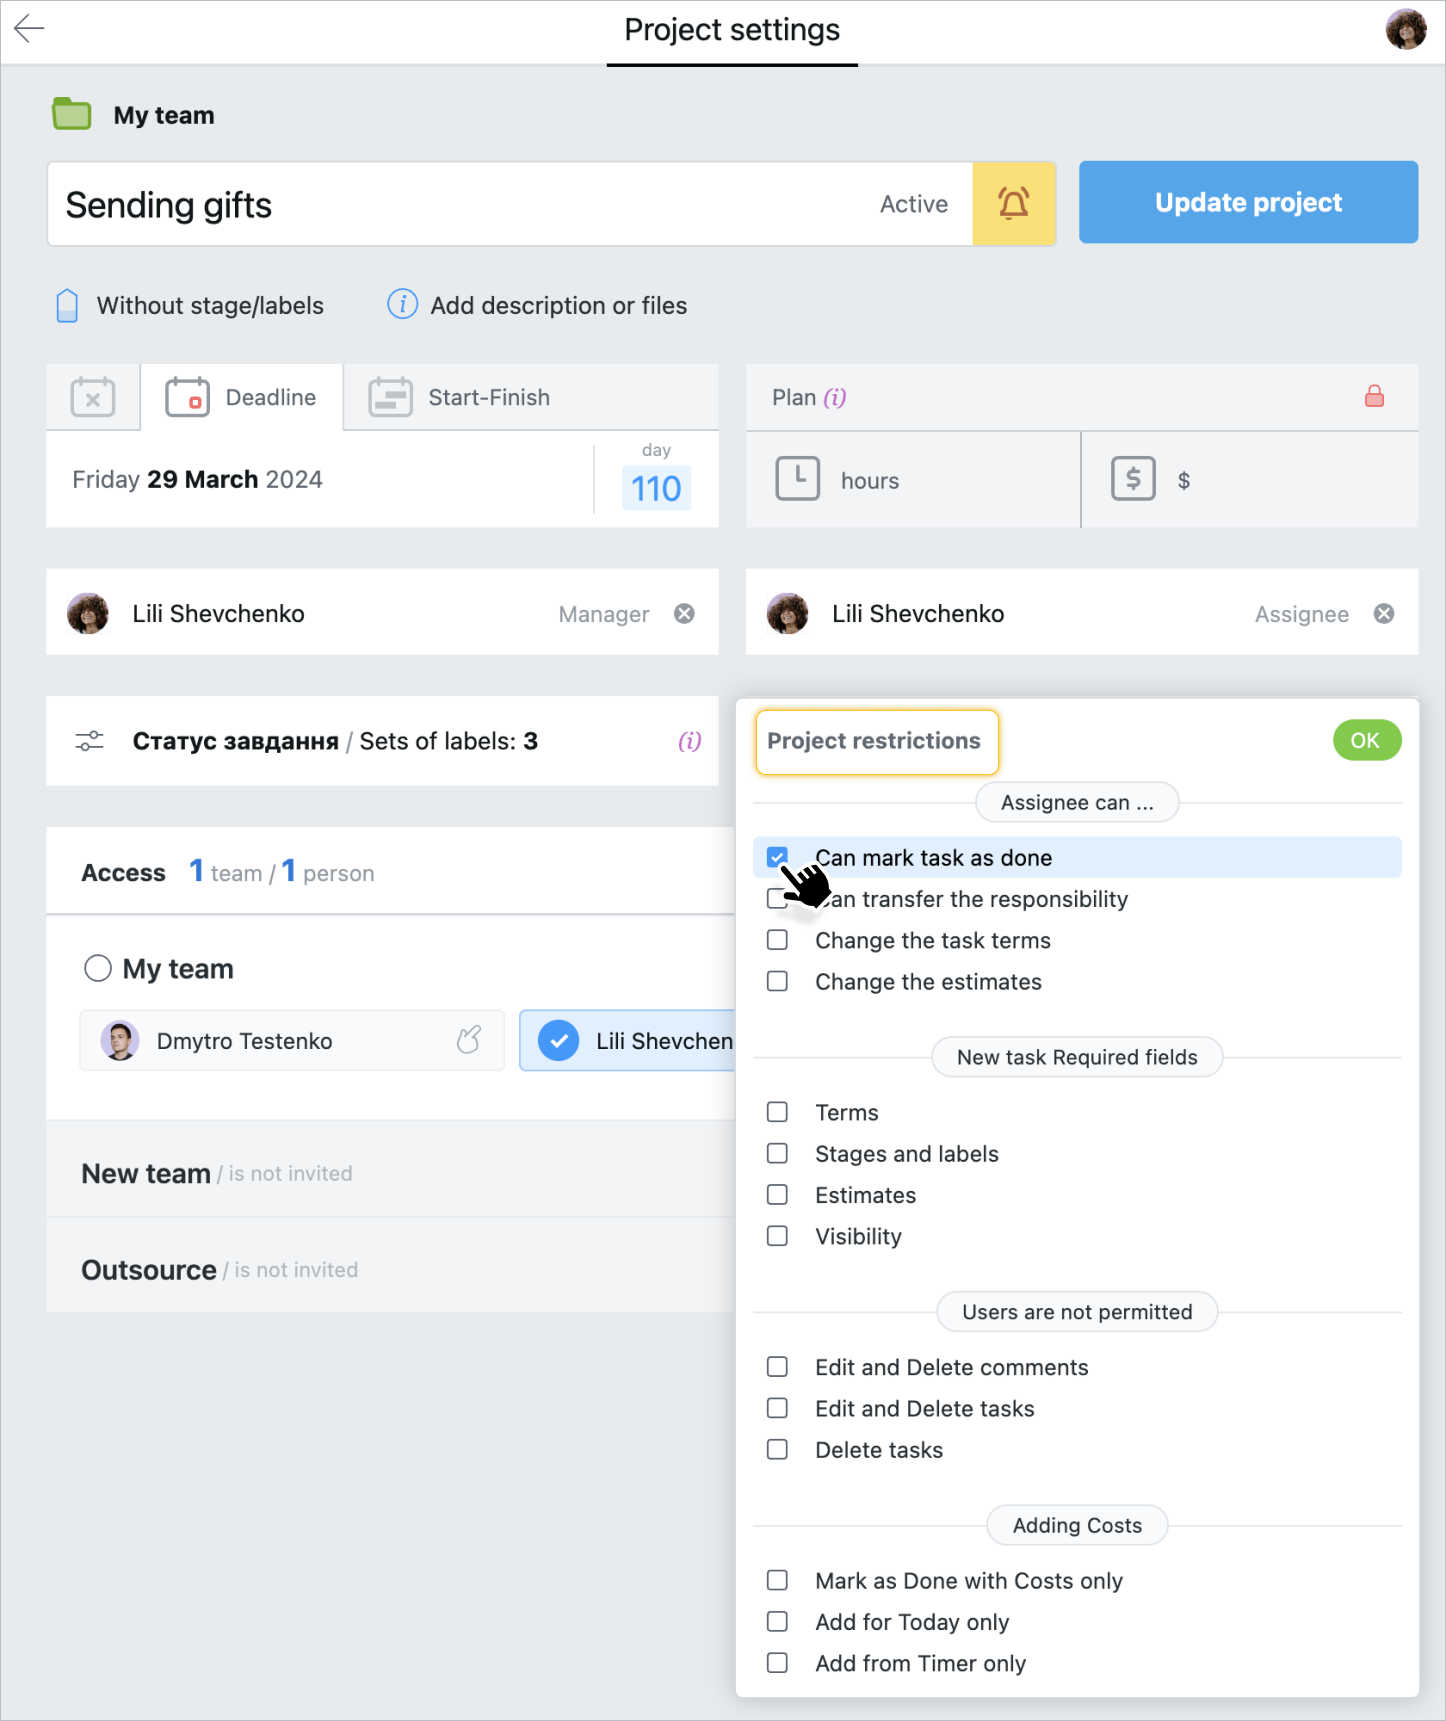
When you create a project or edit a project, you can enable or disable the option "The performer can close tasks".
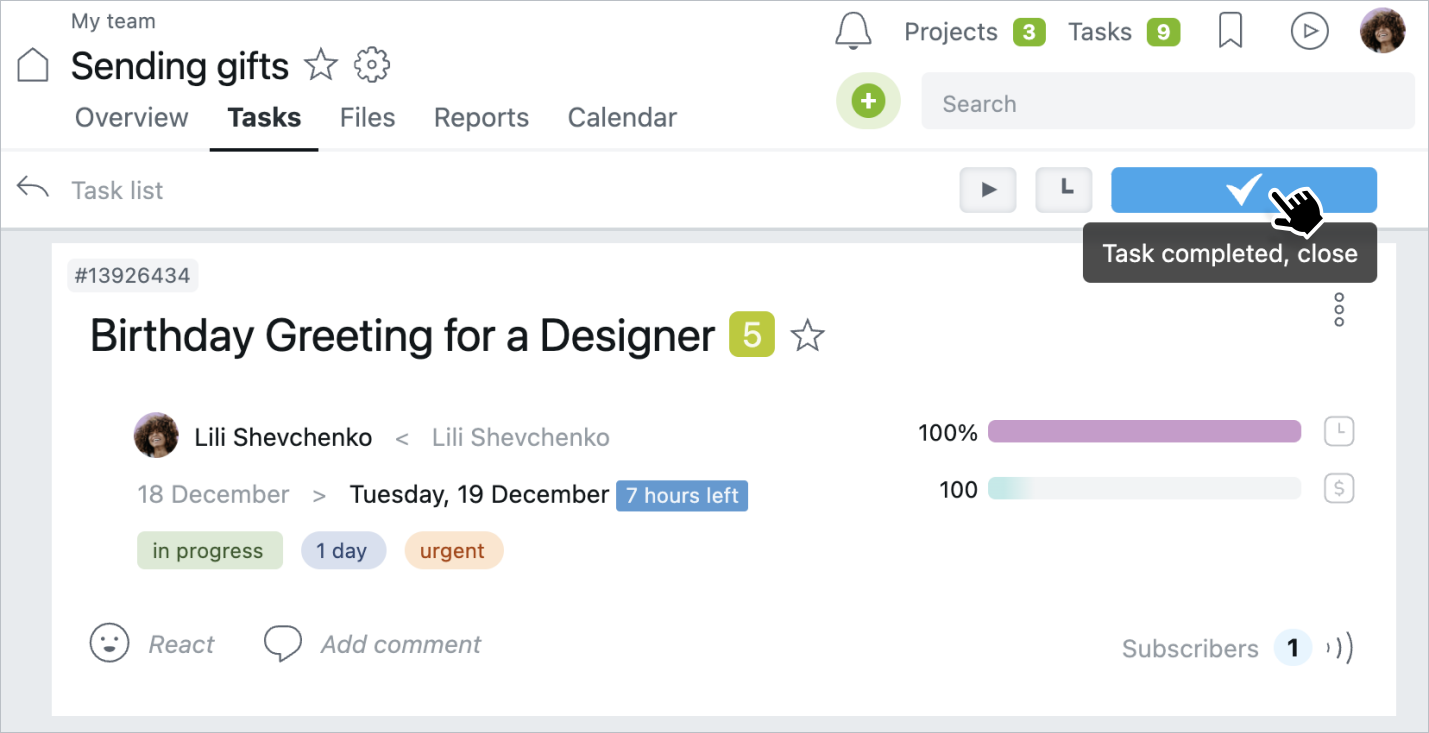
In order to close a task, the person in charge (if this option is enabled in the project settings) must go to the task, hover over the "Done" button, and click on it:
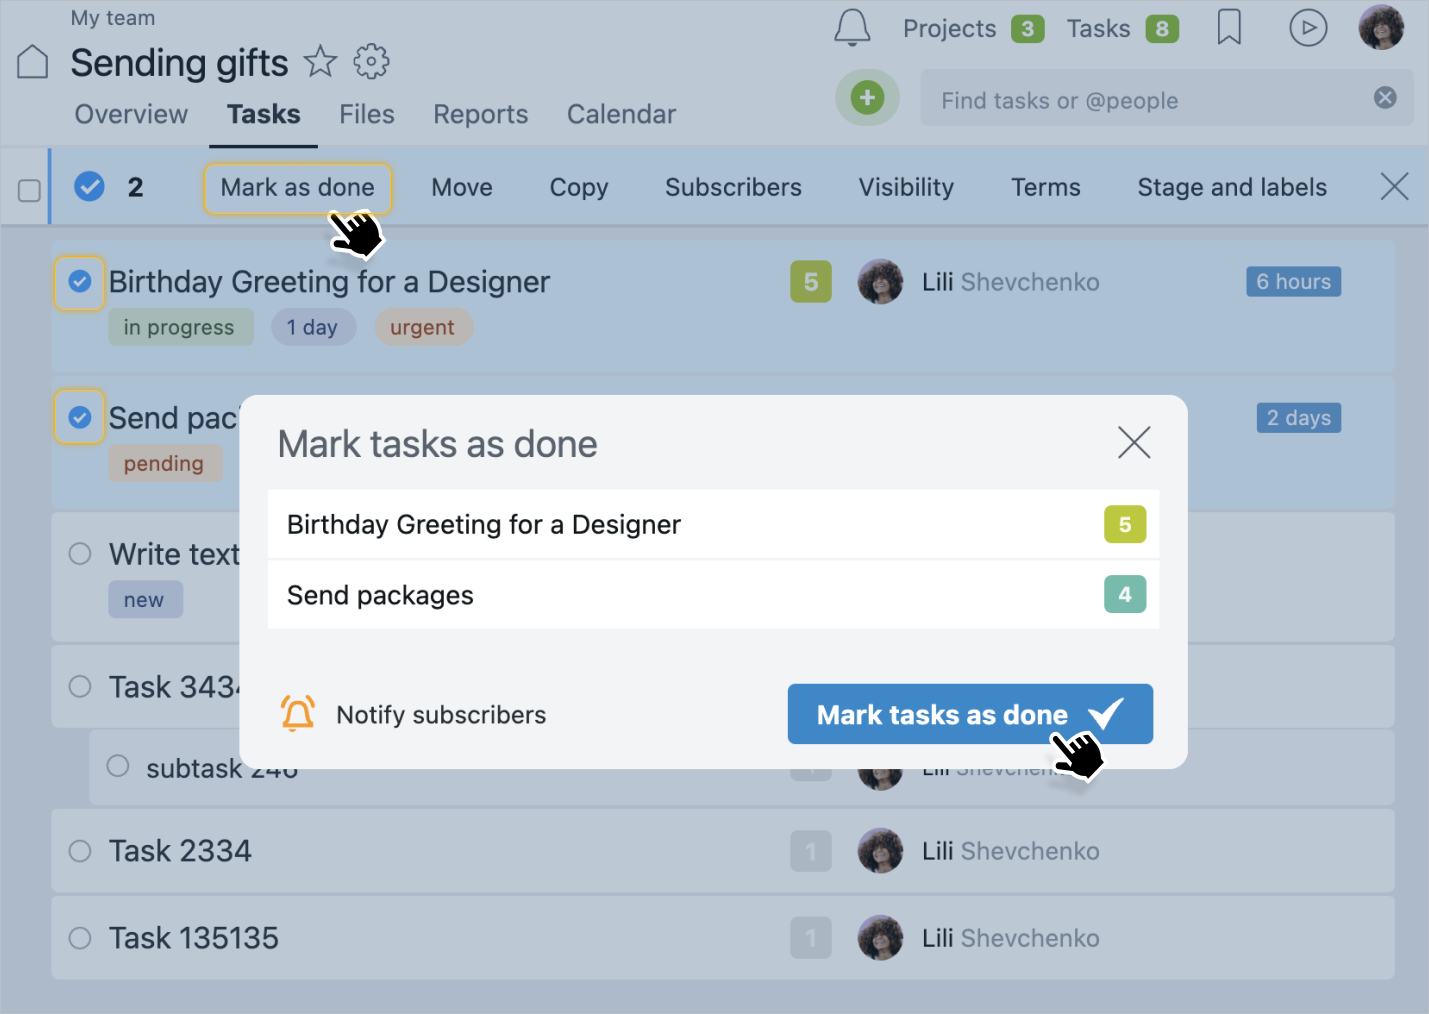
Alternatively, you can select several tasks on the Tasks page and close them as a group using the context menu:
How to edit a task? What other actions can be performed with a task?
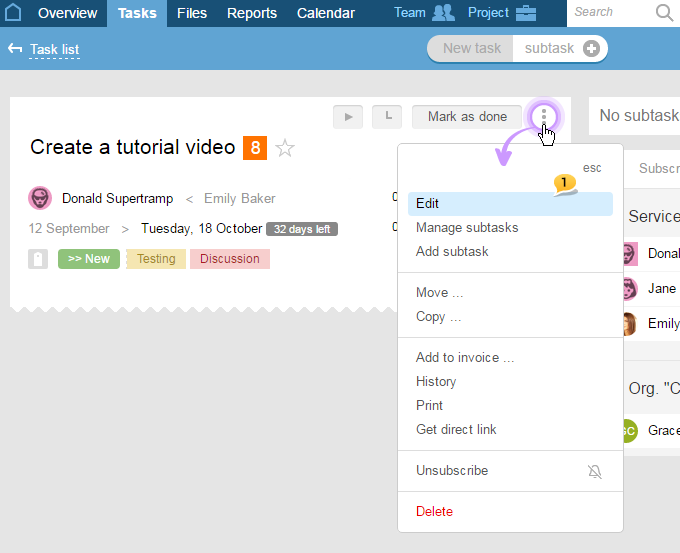
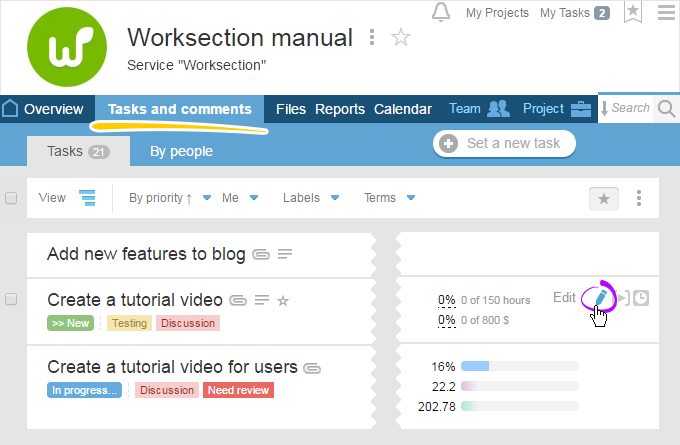
After these actions have been performed, the task is open for editing. Here you can:
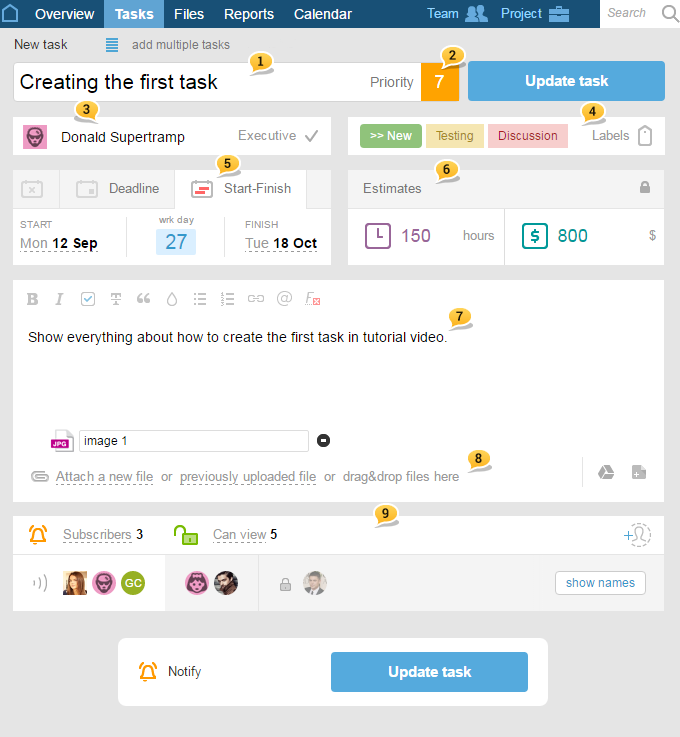
In the task’s menu, there are other actions for the task as well, namely:
- Add subtask — add a subtask to a current task;
- Transfer — transfer a task to a different project, or (also here) transform a task to a subtask;
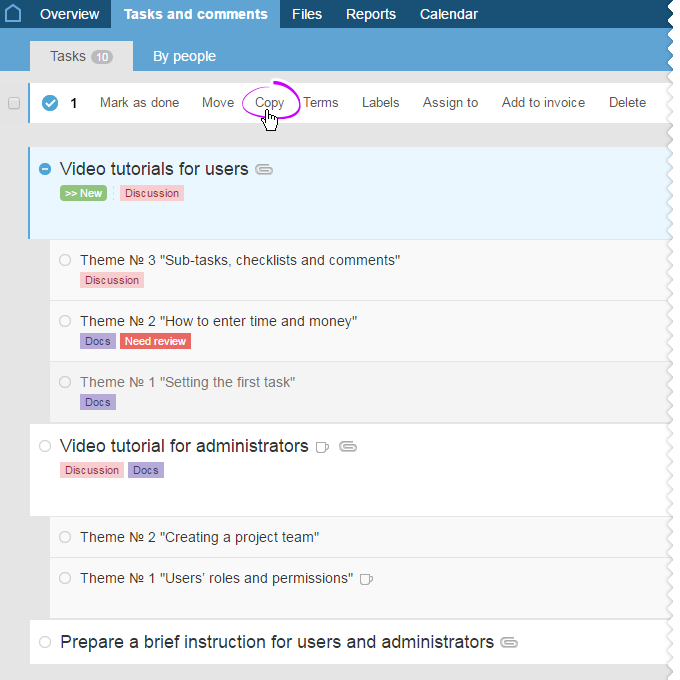
- Copy— copy a task to a different project;
- History — show the history of the events by the task;
- Print — print the task;
- Get the link — get the link for the chosen task;
- Unsubscribe — unsubscribe from the selected task;
- Delete — delete a task with all the subtasks.
In the next questions of this section, you can find more detailed actions that can be performed with a task.
The task can be edited by the task’s author, project manager, and Administrator with the «tasks» permissions.
How to find the list of tasks of a project (or account)?
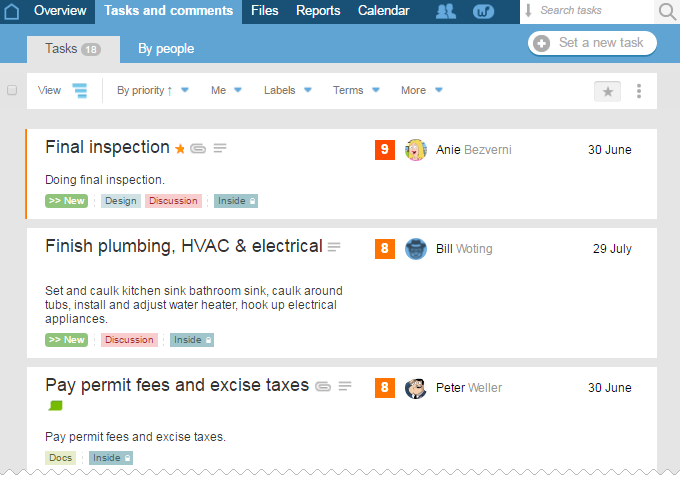
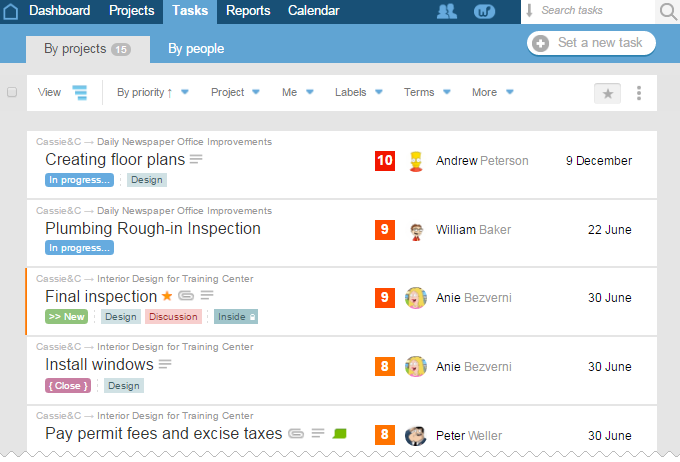
These sections are similar in many ways: they contain tools for group work on projects.
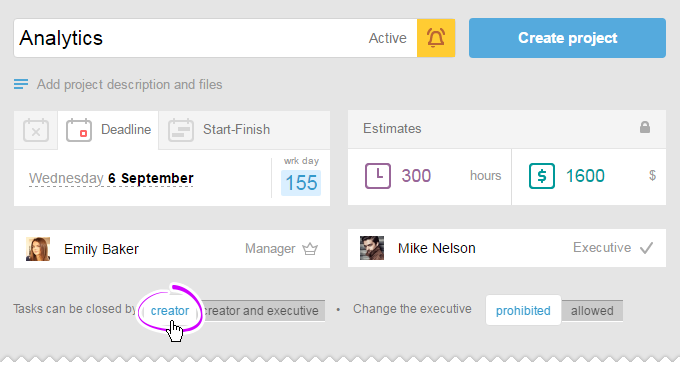
Who can mark task as done?
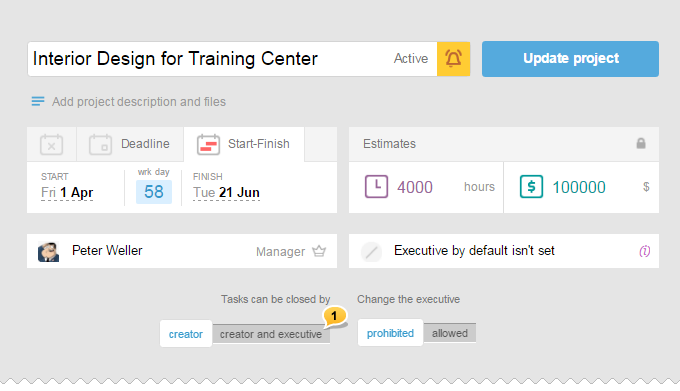
You can specify who can close the task when creating the project. To do this, on the «Create Project» page, drag the slider to the desired position in the respective block1.
Also, you can change this setting later by going to the project settings and changing a parameter and pressing the «Refresh Project» button.
How to organize tasks by labels? (Where to configure labels and who can do that?)
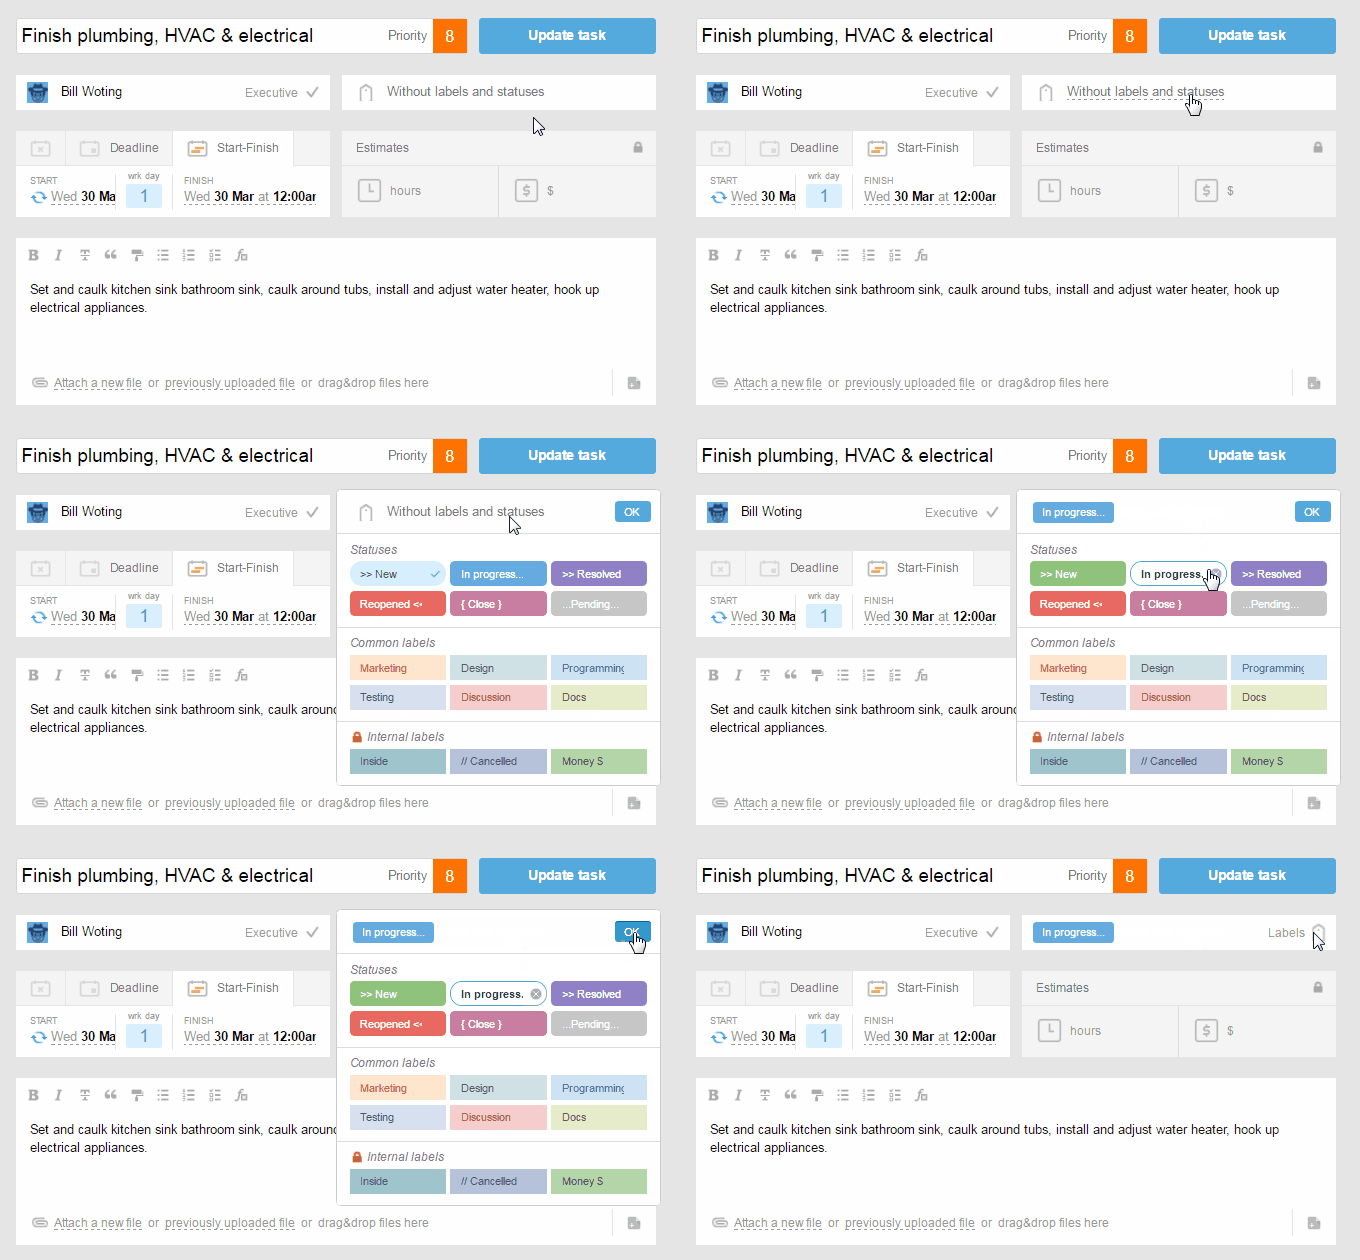
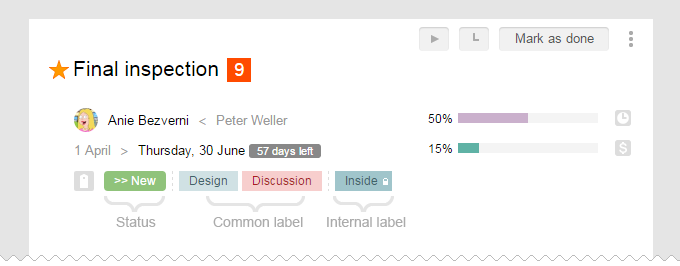
For quick and easy work with tasks in the project, you can use statuses and labels.
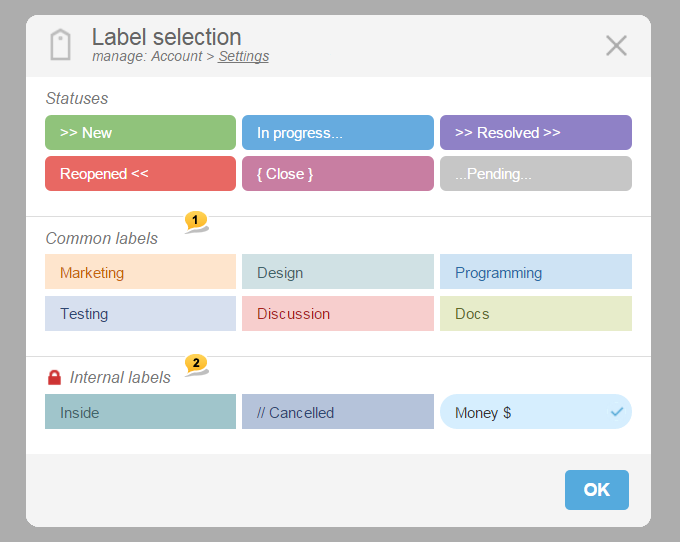
1 — Section of common labels of the account
2 — Section of inner labels (visible only to the company of the account owner)
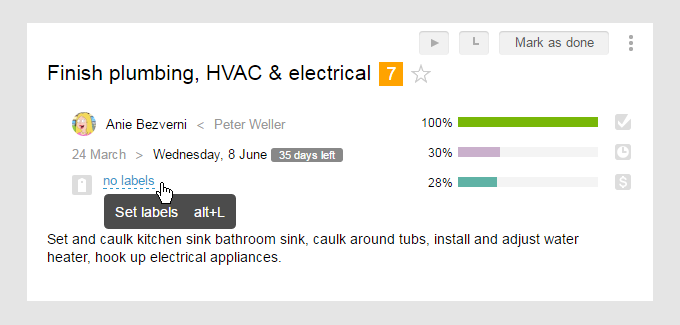
This can be done at the project creation stage as well as when editing it. Besides, you can assign labels on the fly by using the corresponding item from the drop-down menu of a task.
How to change the time frame of a task?
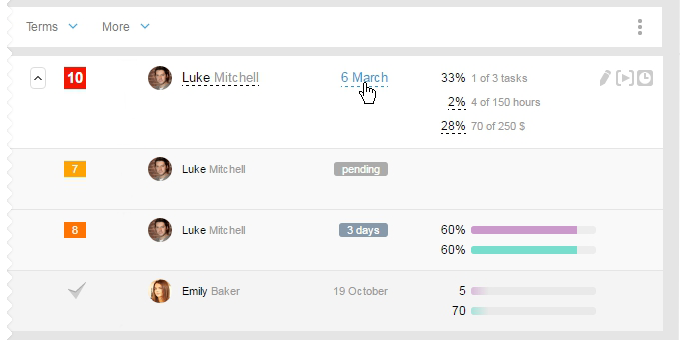
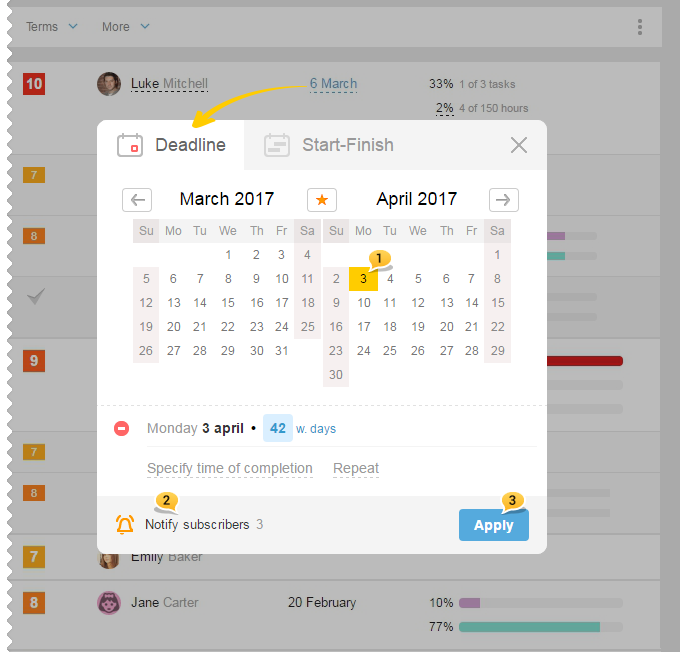
Two types: Deadline and Start-Finish

Everthing on how to set dates:
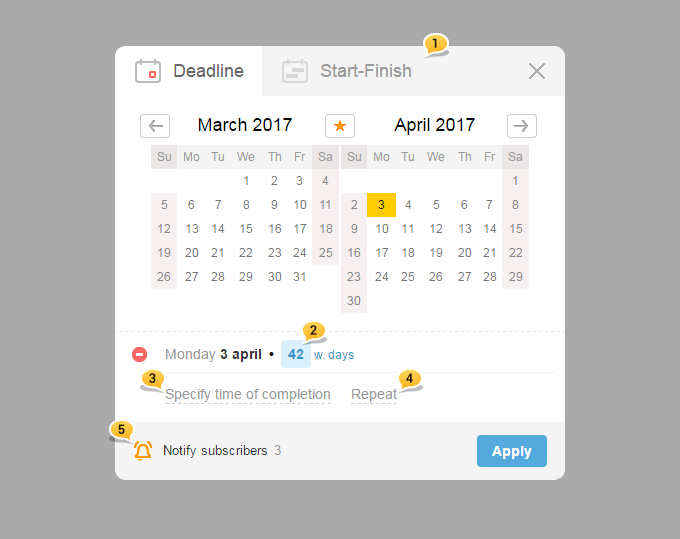
For example, you know that the task needs to be completed in 15 days, then just enter the number, and the system will automatically choose the corresponding date. Definitely, you can indicate the required date by clicking on the calendar: in this case, the system will provide a prompt on the number of days left until the indicated date.


How can you use the statuses of tasks?

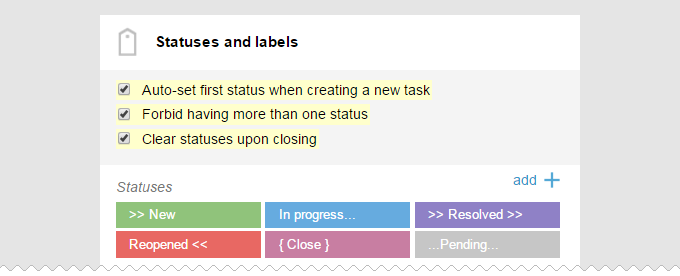
- Automatically insert the first status from the list when creating tasks and subtasks.
- Disallow the existence of more than one status at each specific task. When inserting the next status, the previous one turns off automatically.
- Disable all statuses after complete closure of tasks and subtasks.
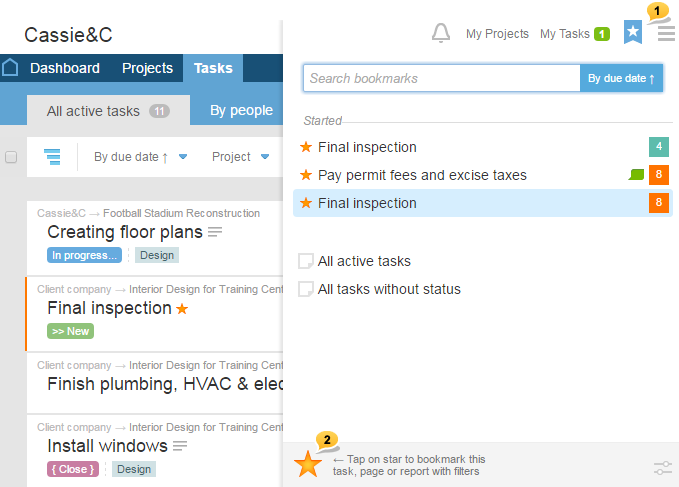
How to configure a customized list of tasks and save it to favorites?

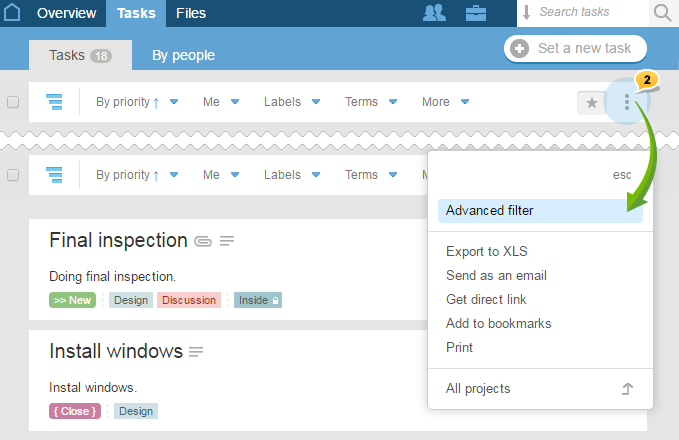
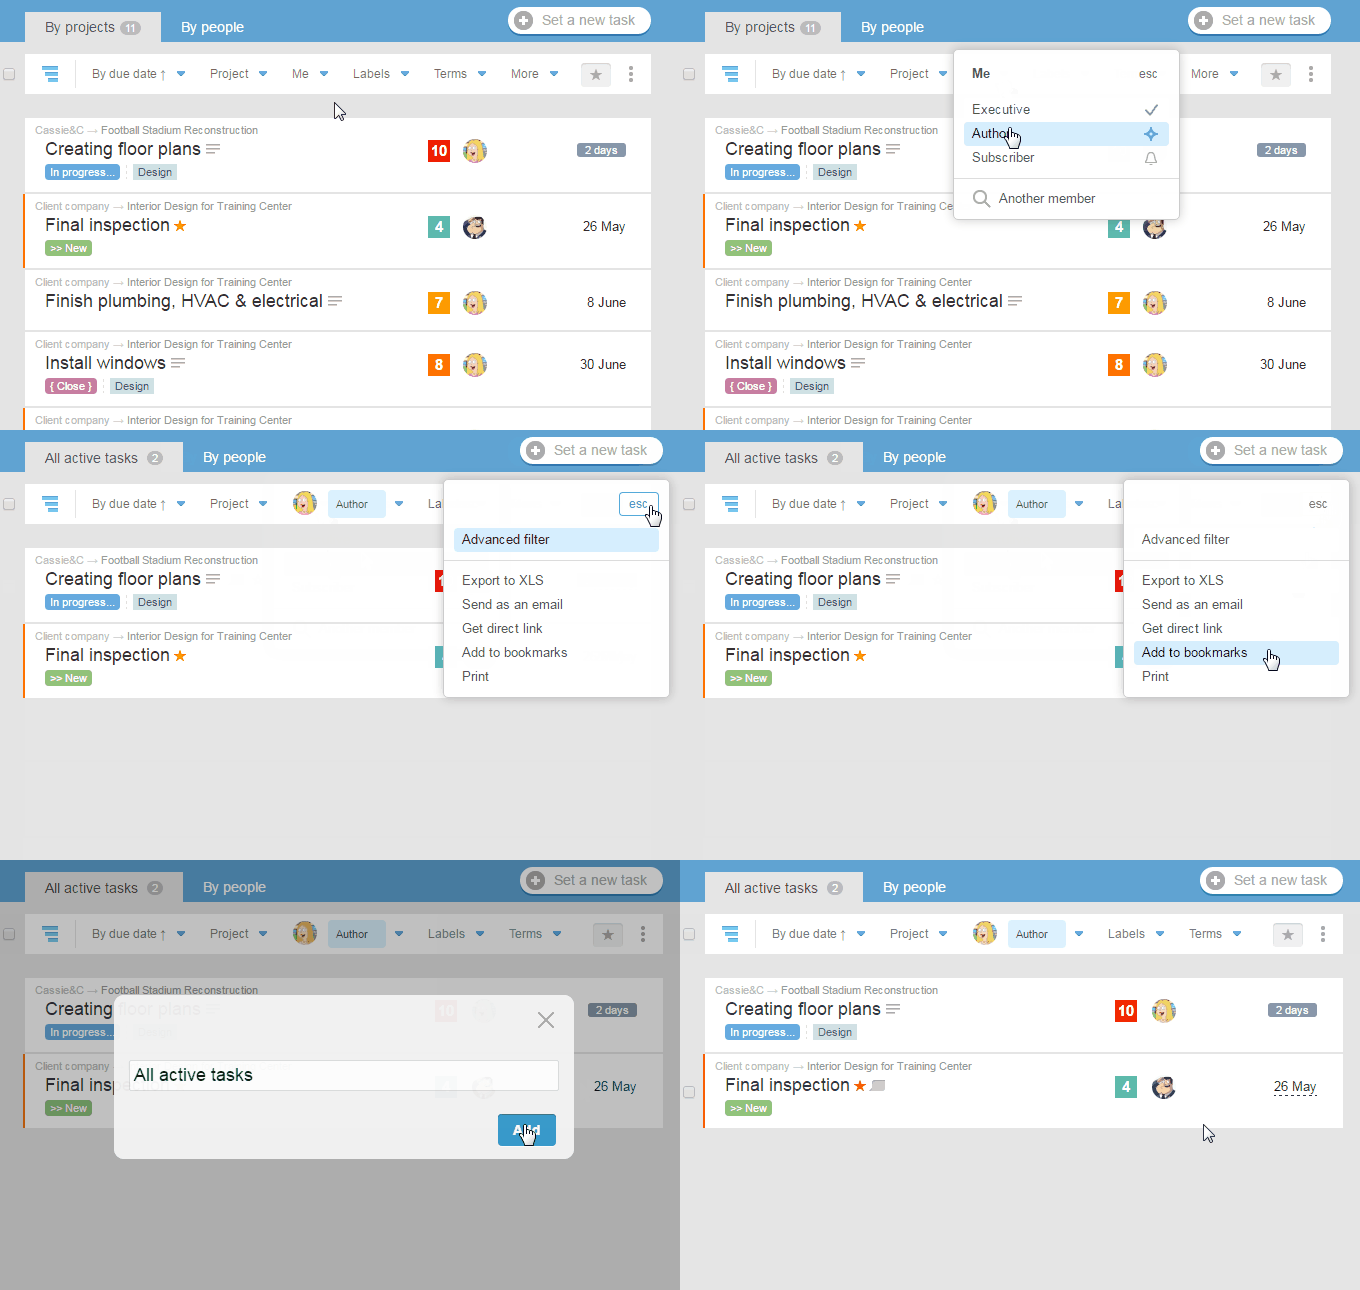
Open the
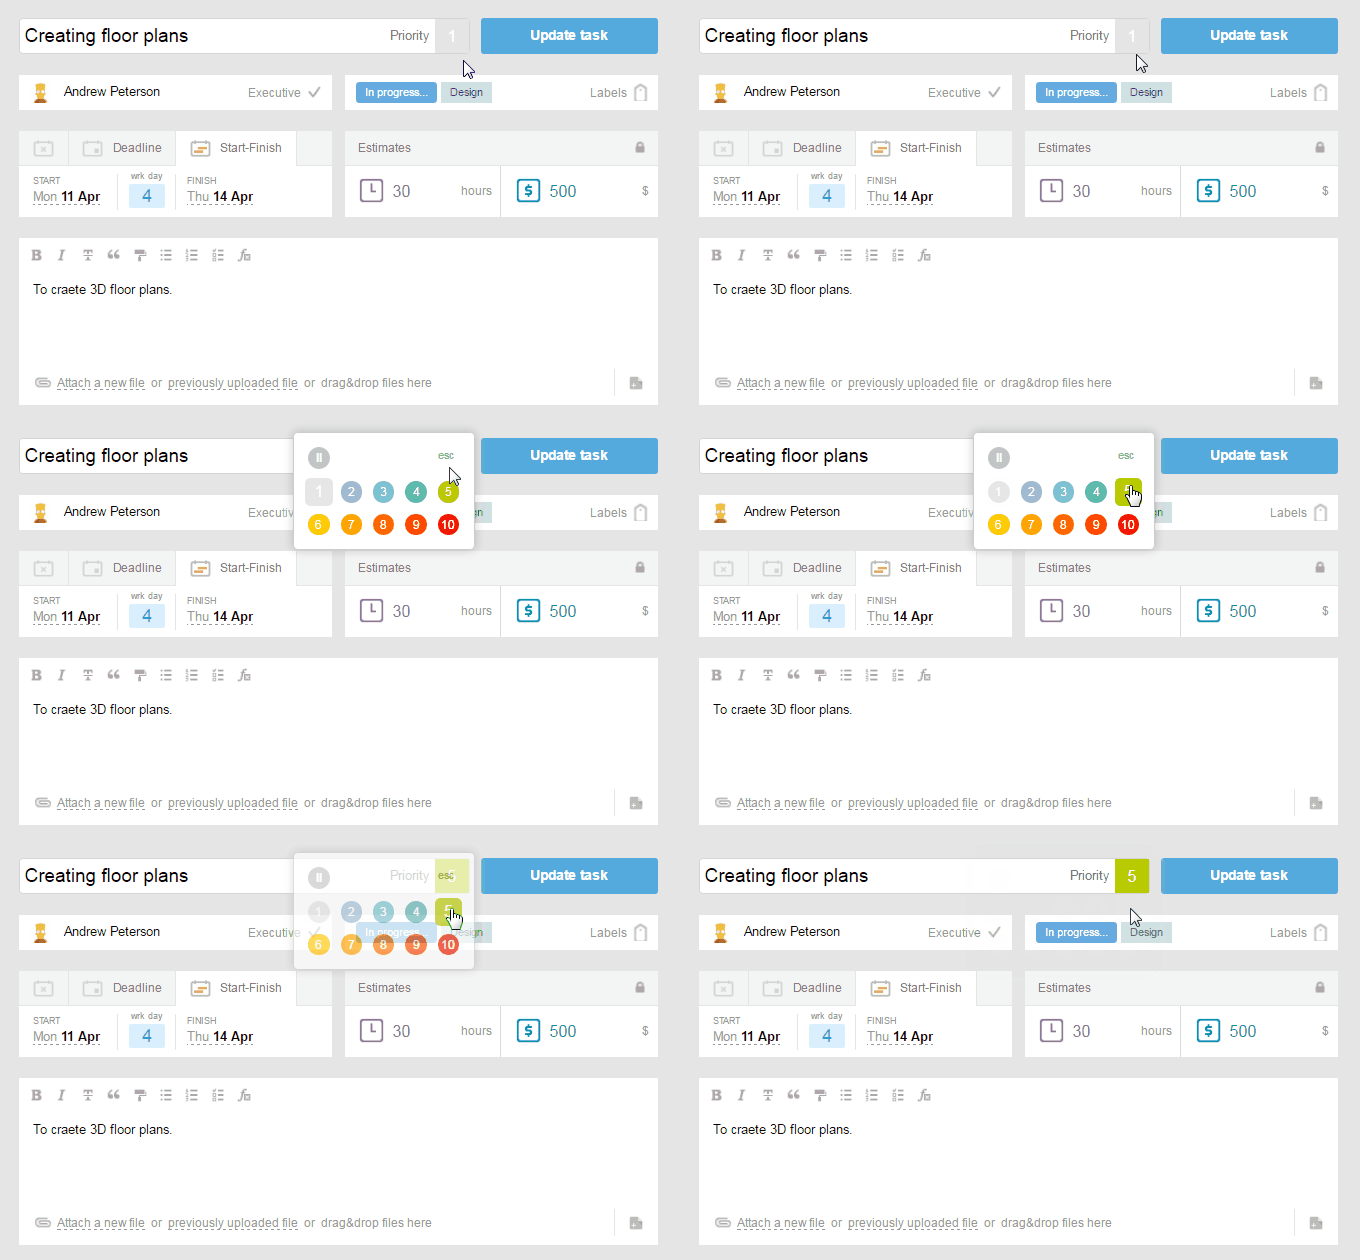
How to set priority of tasks?
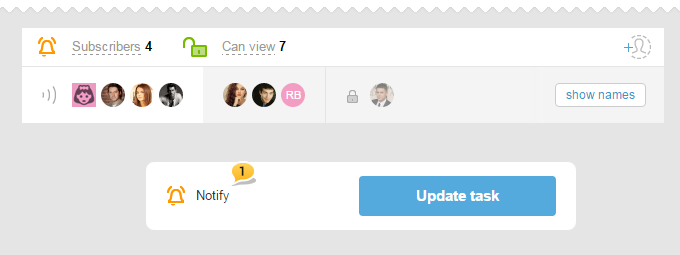
If I change a task or a subtask, will all of the subscribed participants be notified about that?
They will be notified only if you choose so. Just leave the «Notify»1 option enabled. If you just fixed a minor mistake or made insignificant changes and do not wish to distract participants with that, simply disable notifications. For this, just disable «Notify» option, and all the notifications will stop.
How to enable/disable display of subtasks in the list?

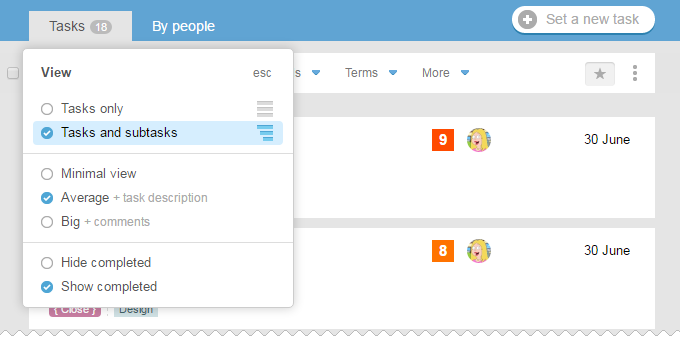
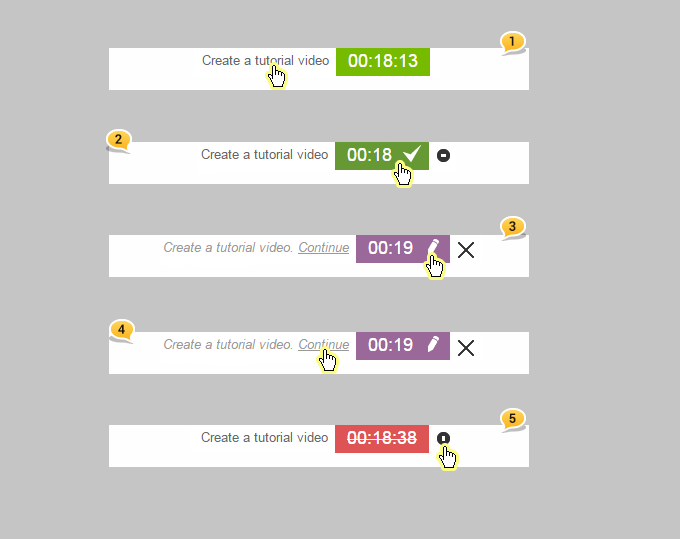
How to launch a task's timer?
Any task or subtask can have its own timer launched.
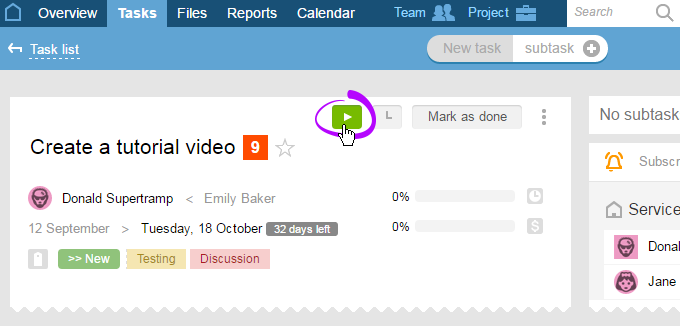
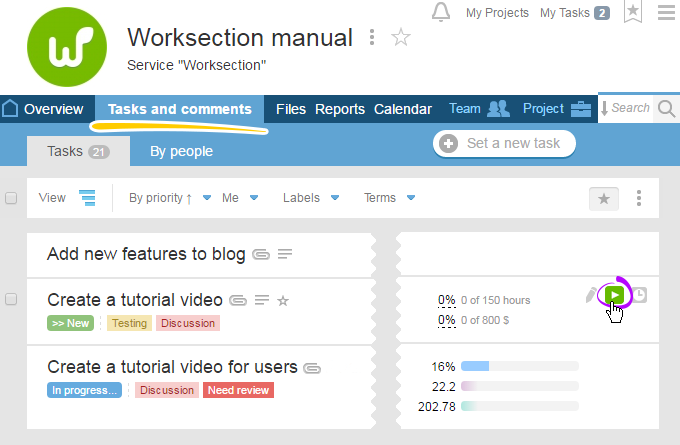
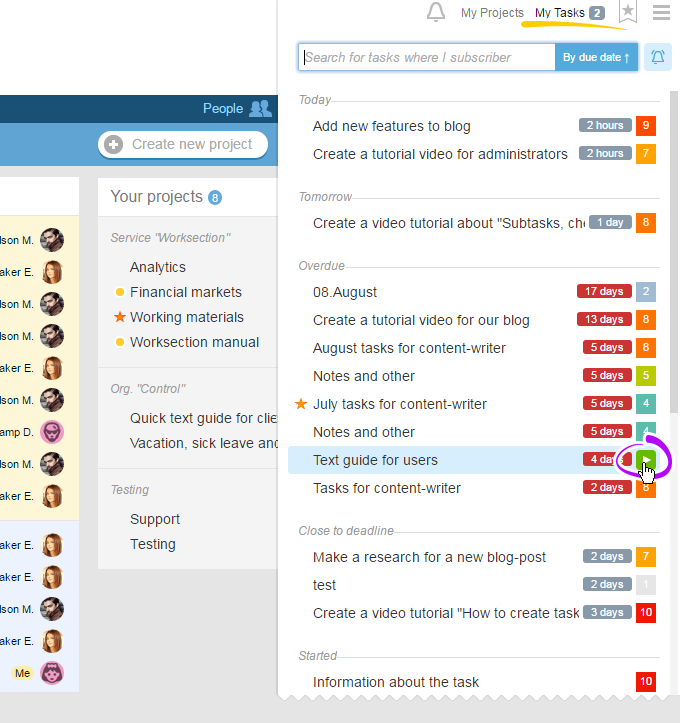
Launched timer can be seen in the upper part of any account’s page

Actions that can be performed with timer:
1 — Go to a task
2 — Stop timer
3 — Describe and track time
4 — Continue timer
5 — Delete timer
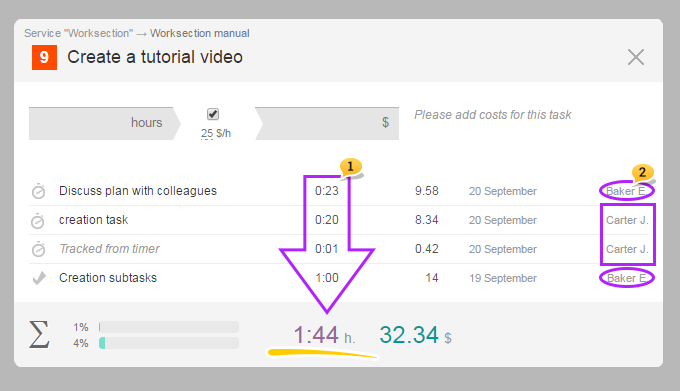
After
How to add a file to a task, subtask, or a comment?
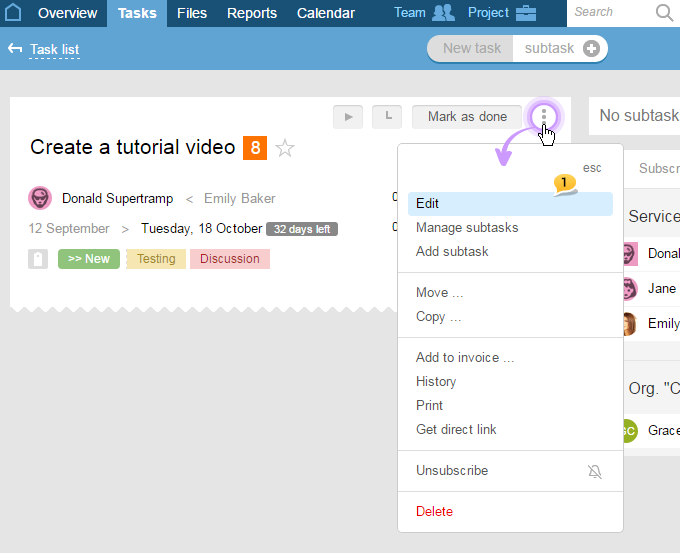
In order to add a file to an earlier created task (subtask), first, you would need to open it for editing by choosing Edit1 in the «three dots» menu:
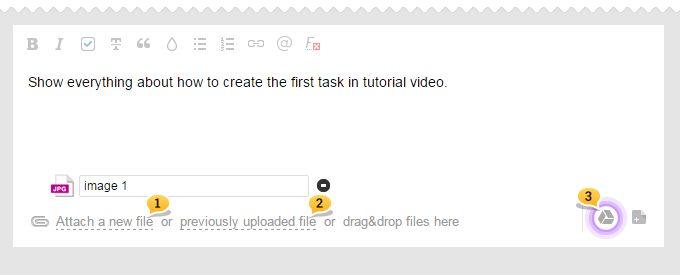
Then, choose «Attach a new file»1, «Previously uploaded file»2 (if the desired file has already been added to the project) or add a file from your Google Drive3:
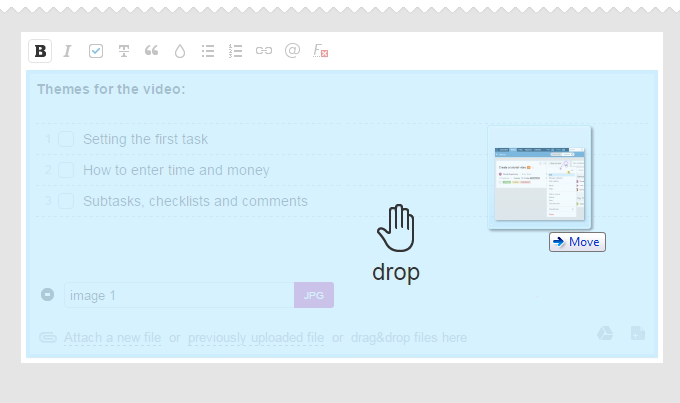
Also, files can be added by utilizing a simple Drag-and-drop function. Simply drag the files you need to where you need them, and they will be added.
How to view the history of events in a task?
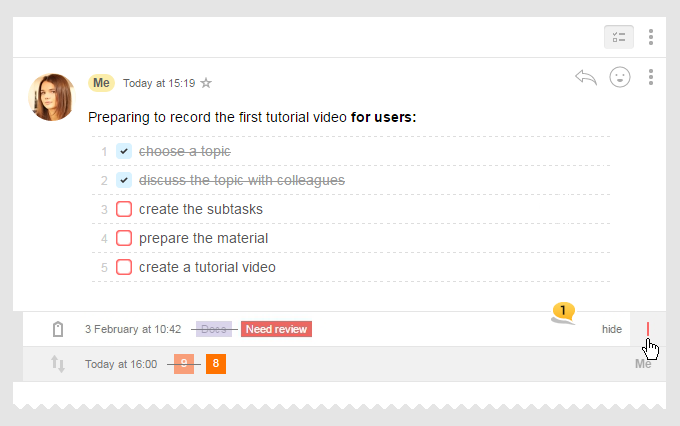
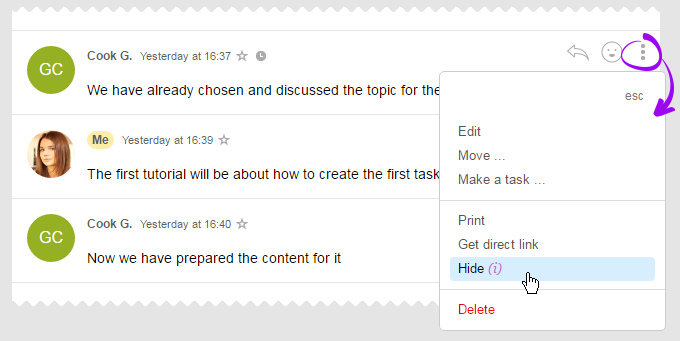
Notes about an event are visible to all the task’s participants; however, the manager of the project has an option of deleting certain events from the feed1
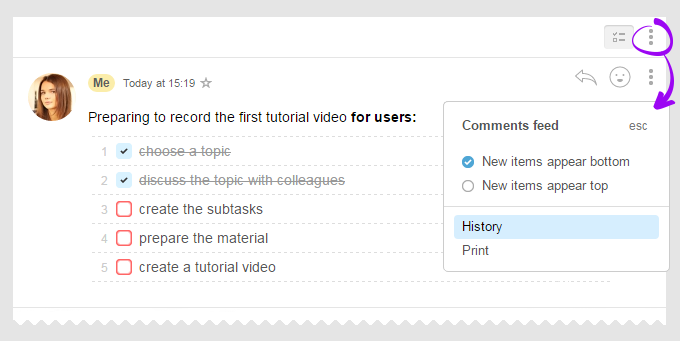
To access the full history of a task, just click on the «three dots» menu and choose the «History» option (this section is just for administrators):
Please note! Log of events is tracked from the moment of your account functionality update, and, therefore, you won’t be able to see any old events in there.
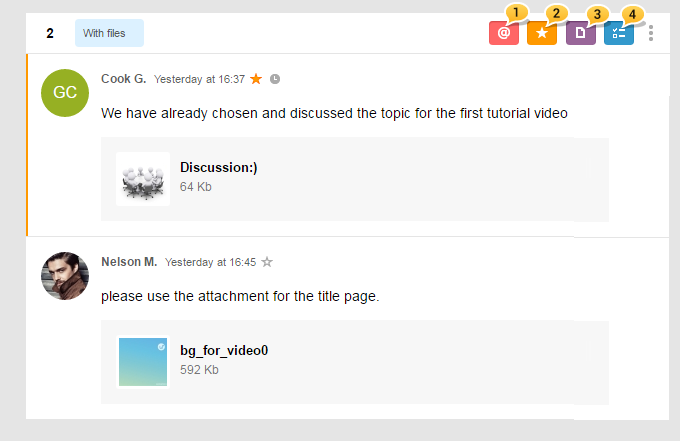
1 — by your being mentioned in the comments
4 — by comments with checklists
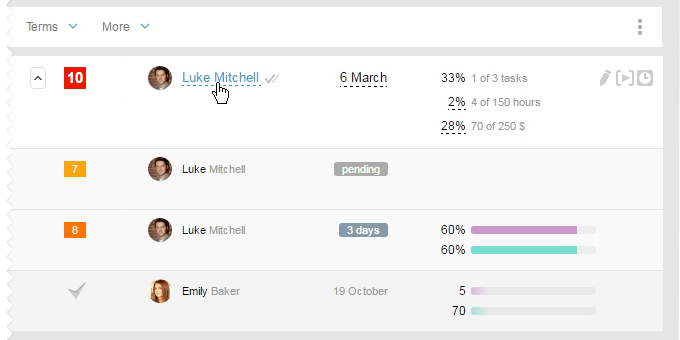
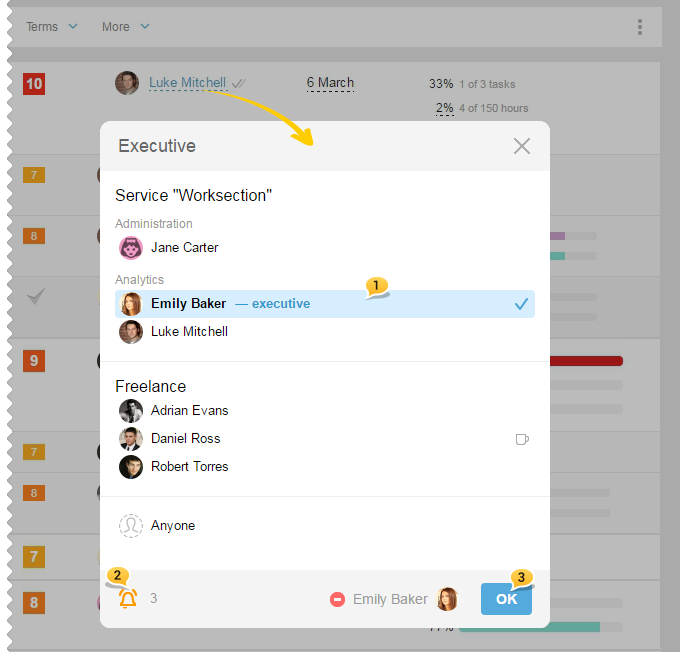
How to change an executive of a task?
Bulk task operations (copy, transfer, delete...)
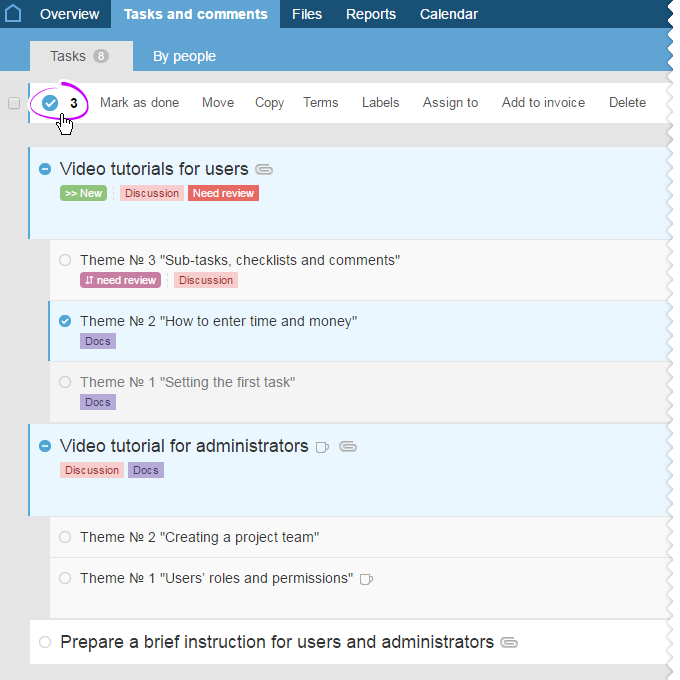
- Close— close selected tasks;
- Transfer — transfer selected tasks to another project;
- Copy — copy selected tasks to another project;
- Labels — set/delete labels for the selected tasks;
- Assign — assign another executive to the selected tasks;
- Billing — create a billing account for the selected tasks;
- Delete — delete the selected tasks with all of its subtasks.
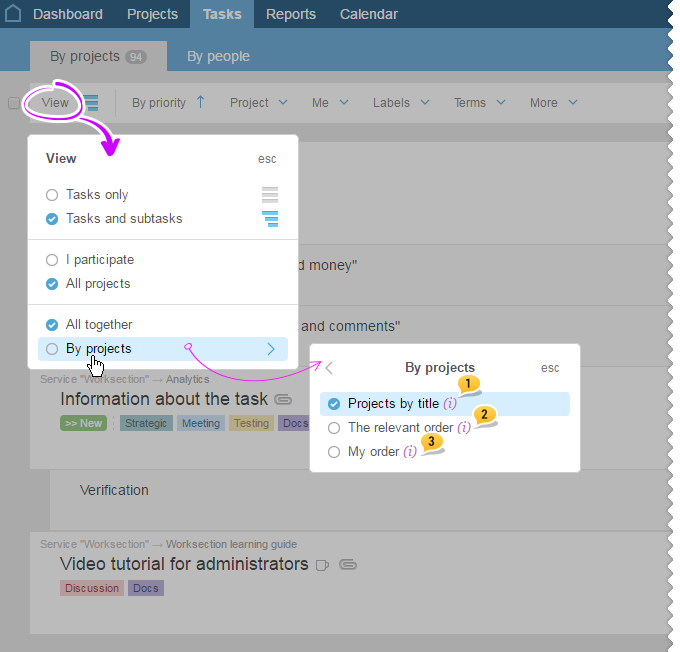
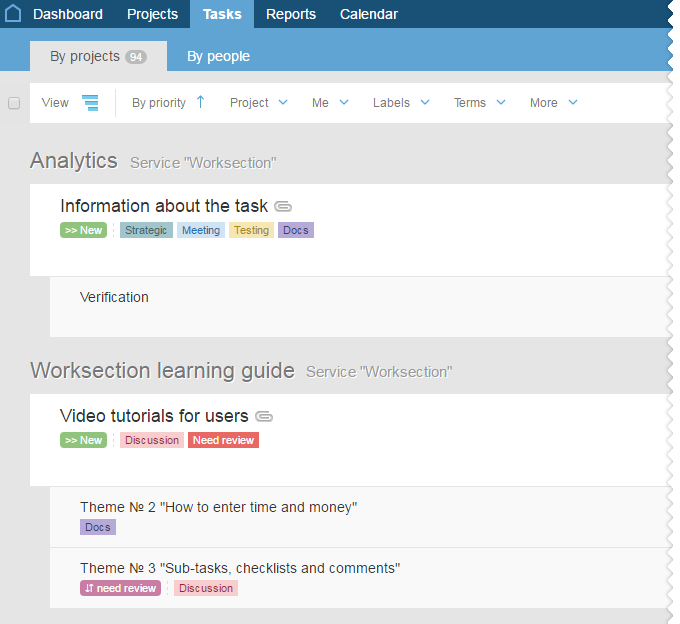
How to group tasks by the projects?
- Alphabetical order1
- Relevant order2
- My order3
What can be done with the list of tasks (export, print send to email)?
- export the list in the .xls format
- print the list
- send the list to an email address
- save all of its parameters in the
http -linkform
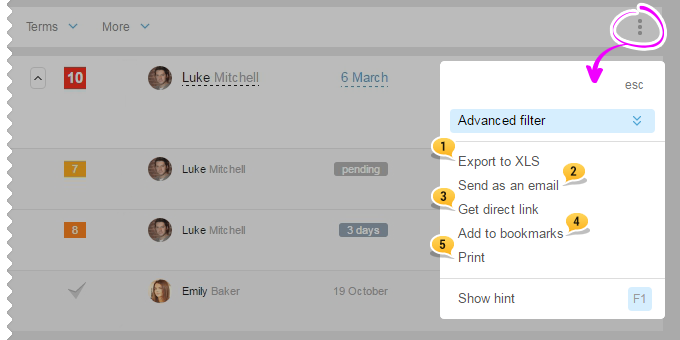
- When choosing the «Export to XLS» link,
xls -file - When choosing the second link of «Send an email», there will appear a window with the addressee selection (it can be sent to one of the account users or to a manually entered email address). Then, the list will be sent to the selected address in a user-friendly viewing format. The address of the sender is the same as for any system’s email-notifications: [email protected].
- When choosing the third option of «Get a link», the list view with all the applied filters will be saved in the
http -link format. There will also be a popup-window, from where you can copy your link to the saved list view. - You can also add filter and bookmarks parameters.
- When choosing the last, fifth option «Print», there will open a window of printing settings. After clicking on «Print», the list of tasks will be sent to the printer.
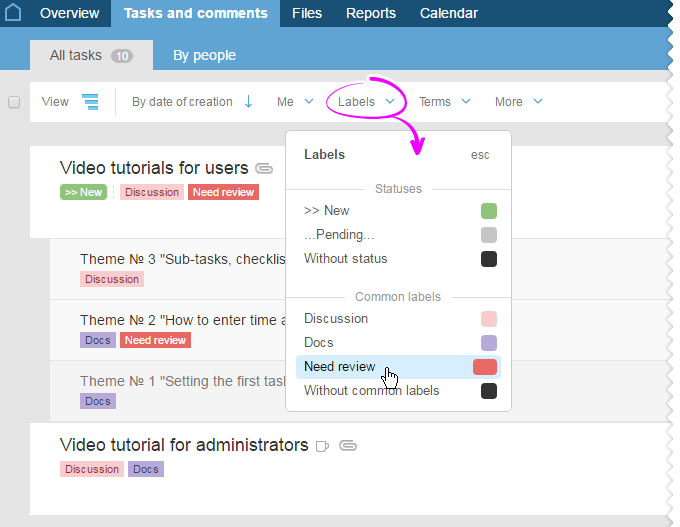
Can only tasks with a certain label be shown? How?
How do I see tasks for today? For the next 3 days? Overdue tasks?
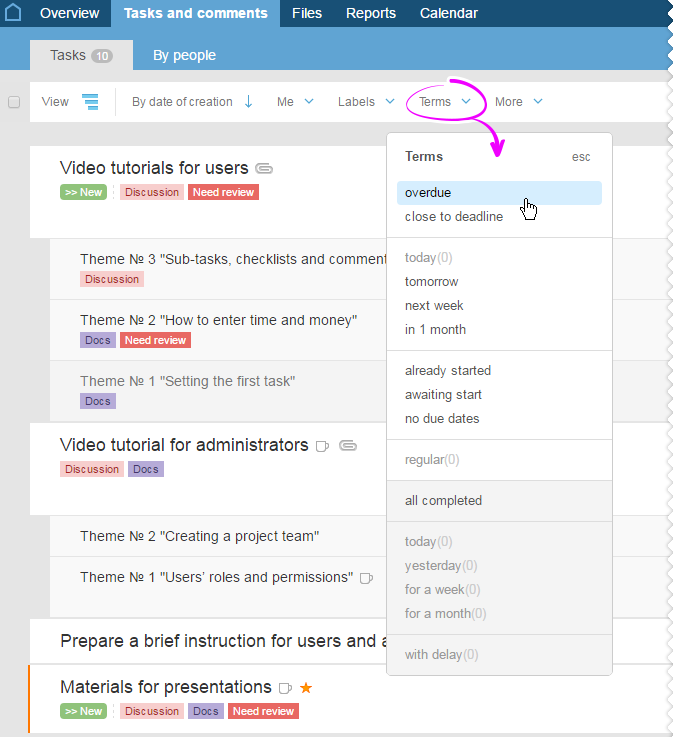
In order to choose only the tasks that you need, there is a dynamic filter «Terms» for it. It allows considerably shorten the overall list by leaving only those tasks that you need, for example, all the overdue tasks:
How to set name templates for recurring tasks?
To add a corresponding number, add %n to the template. If you need the number to contain 2 or 3 digits, then enter %nn and %nnn respectively. Numerations starts with number one but you can shift it by adding a template number, such as %n+10
In order to add a date, month, year or a quarter to a template, write a text in one word that will look like %dmy with any combination of letters d, D, m, M, q, Q, y, Y, where:
- d — day of the month, 1-31,
- D — day of the month with a zero, 01-31
- m — number of a month with a zero, 01-12
- M — name of a month (depends on the main language of the account)
- q — quarter of a year (I, II, III, IV)
- Q — quarter of a year with the added «quarter» word
- y — year with 2 digits
- Y — year with 4 digits
Besides, you can also indicate a previous or a future date in the template. Thus, the %dmy-1 template corresponds to the yesterday’s date, %M+1 — to the next month, and %QY-2 — to the one but last quarter.
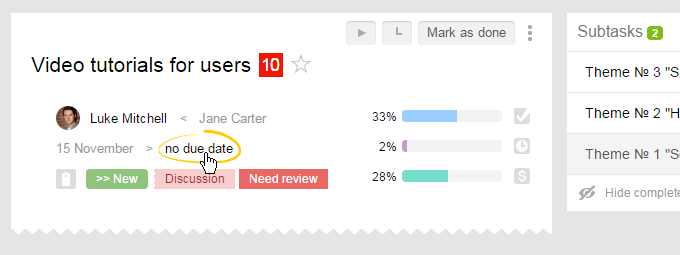
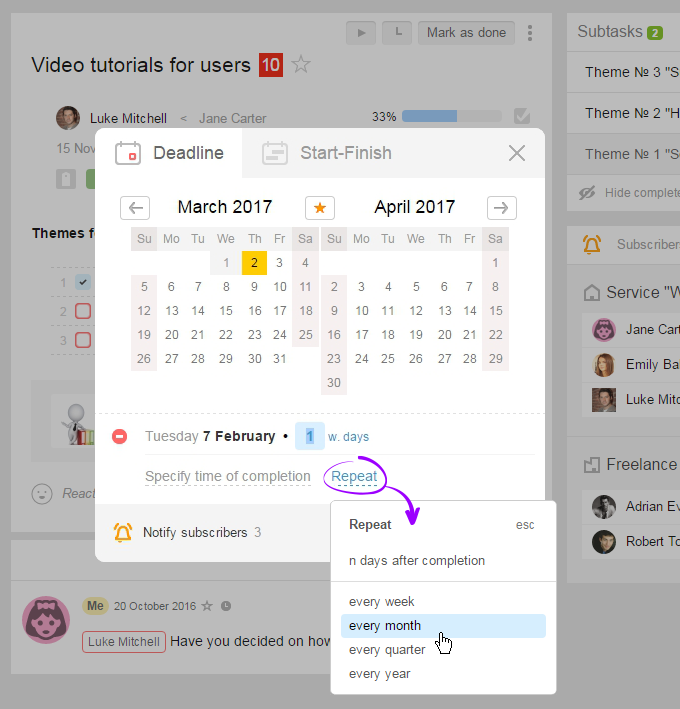
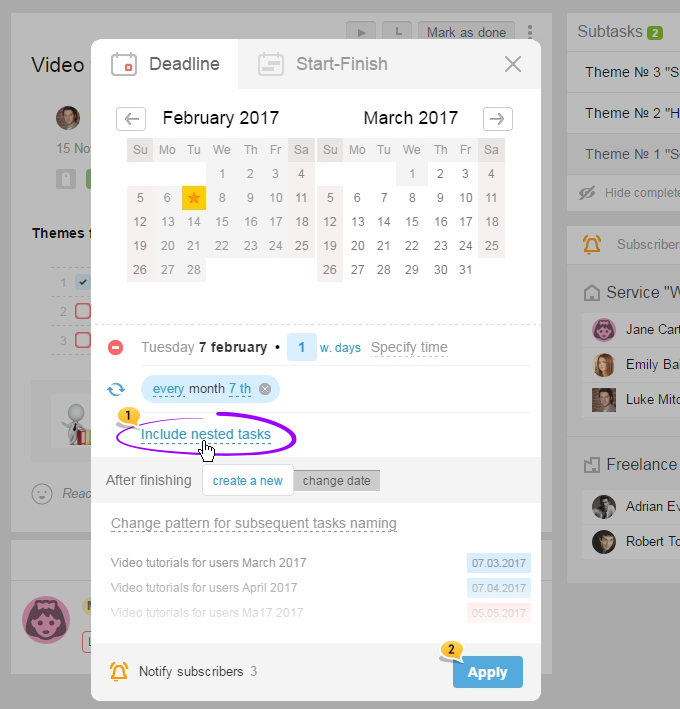
How to repeat a task with nested subtasks?
How to nest/extract a subtask to/from a subtask? Second level subtasks.
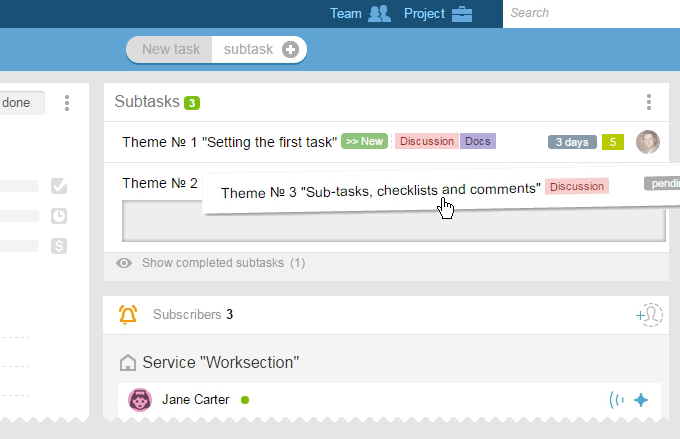
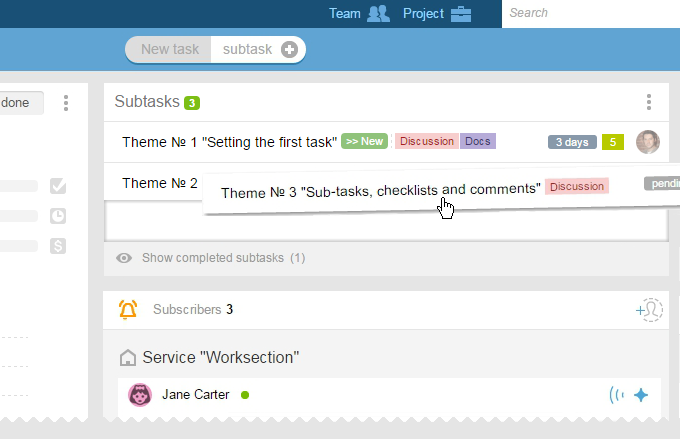
When you wish to extract a nested subtask and make it a separate subtask, then you will simply need to «drag» the nested subtask lower or higher, to the level of subtasks:
How to view the work load by people?
To view the workload of the employees, go to «Tasks» and «Tasks and comments» section and click on the tab By people1. Then in the «By first name» field, select the parameters you are interested in, for example, to filter by the number of tasks2:
How can I see if a task's executive viewed the assigned task/ subtask?
Now, in order to ensure thorough control of employees’ work, we’ve created an icon that allows seeing whether an executive viewed a task/ subtask or the latest comment.
For this, in the «Tasks» and «Tasks and comments» sections, hover over a task or subtask with a cursor and you will see two «ticks» icon next to the executive, and when you hover over that icon, you will see whether the task or subtask has been viewed or not.
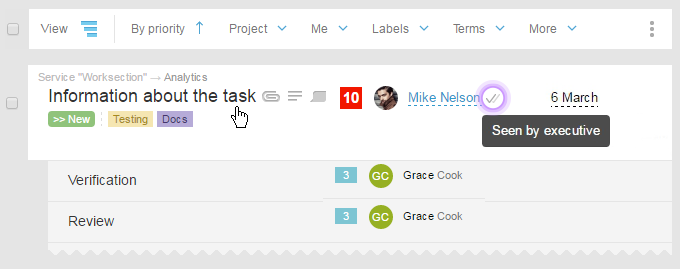
In the task itself, we will see this icon next to the executive’s name when we hover over the field with the task’s description with a cursor:
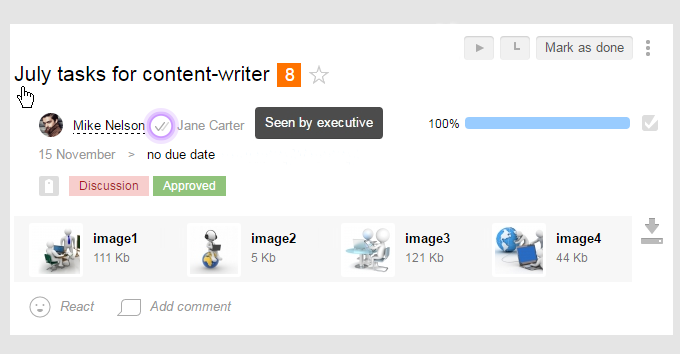
«Two ticks» will be seen next to the last comment viewed by the executive. When you hover your cursor over it, you will see a note that the comment has been viewed.

How to see who has tasks overdue and how to see the list of all overdue tasks?
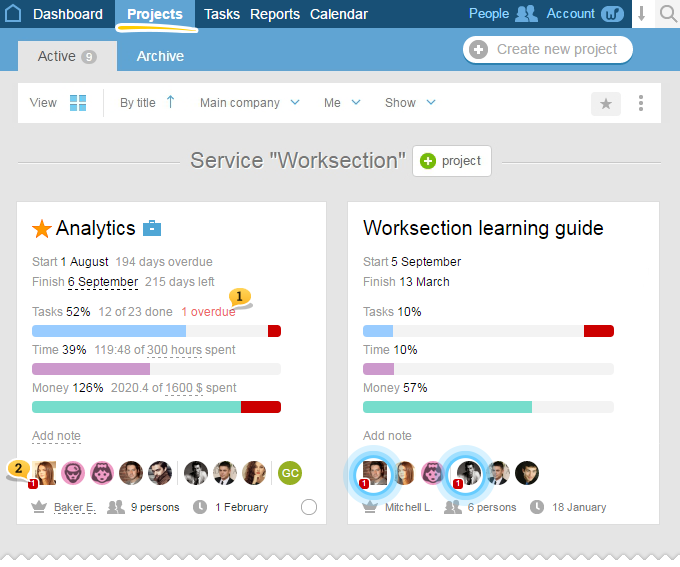
Go to the «Projects» section. Tasks that are overdue will be shown as a red icon with the number of overdue tasks next to the executive’s avatar.
In order to go to the list of overdue tasks, click on the icon with the number of overdue tasks in the tasks’ field1 or to the icon next to the avatar2.
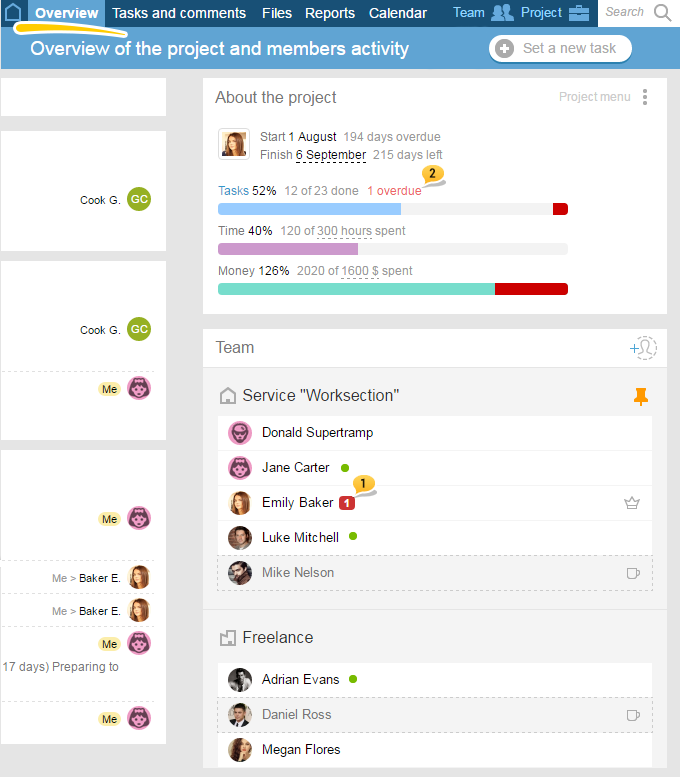
Besides you can see who has project’s tasks overdue1 in the «overview» section of every project where you can also access the list of these tasks2:
How to view completed tasks of a project?
In order to view closed tasks of a project, go to the Tasks and comments section. In the By tasks tab of the View menu, click on Completed1. Then, select a time frame that you need, for example, for a
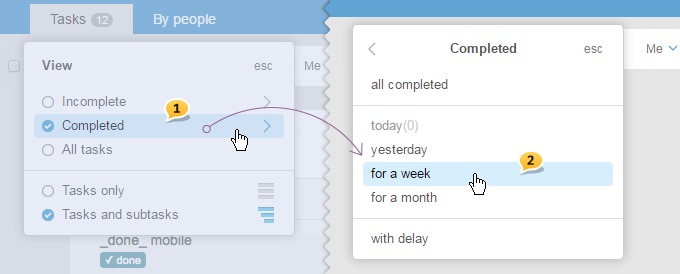
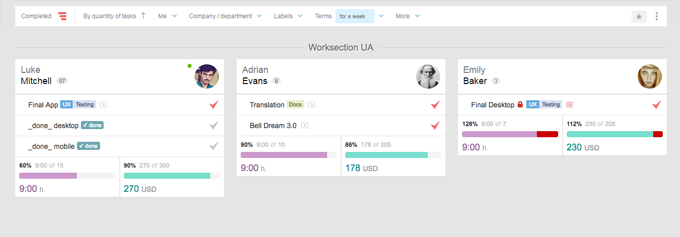
Please
How to reassign tasks between the project participants?
For this, go to the Tasks and comments in the By people tab.
Grab the line with the name of the task and drag it to the card of another participant of the project — this way you reassign the task1.
There are two «technical cards» on a page — Anyone and Executive
It allows assigning executives to the task that have not yet been set, or vice versa,
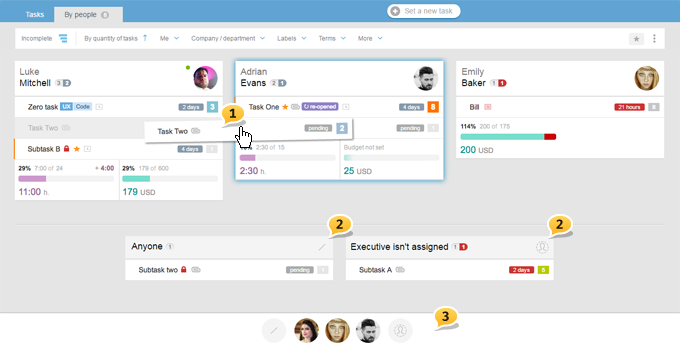
When there are many tasks and participants, the entire page will take up several screens, which won’t be convenient when using the dragging function; therefore, when you grabbed a task, there will appear a «dock» with employees’ avatars where you can assign tasks3.
Please note: if you grabbed a «hidden» task, then you will see only faces (avatars) of those people who can see it, and, therefore, only one of them can be assigned as an executive.
If you do not like dragging, you can always select several tasks at once, and as earlier, perform bulk operations, which are not limited to reassigning.
Important! Only open tasks can be dragged. All the changes to the executives made by dragging have to be Saved!
On the pages with 1000 and more tasks, dragging is automatically deactivated.
How to copy tasks with dependencies from one project to another?
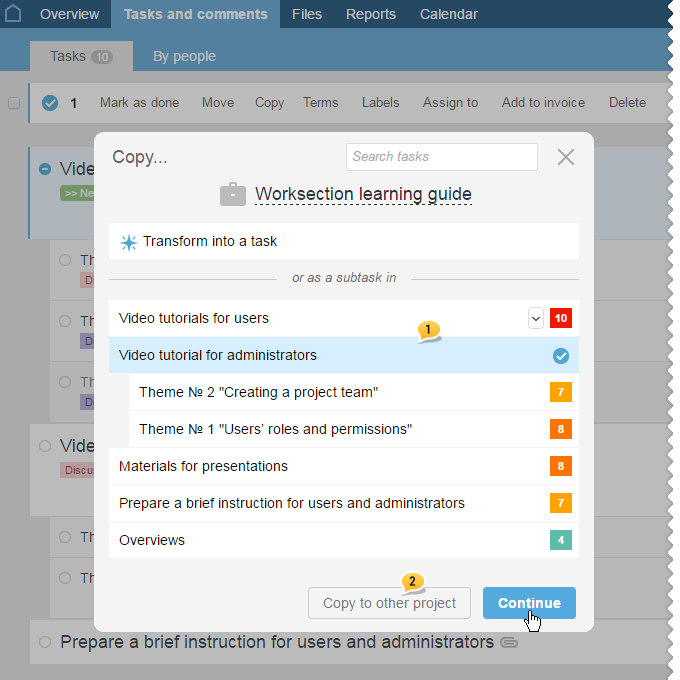
Select the tasks that you need (no need to mark subtasks) and click on Copy in the menu:
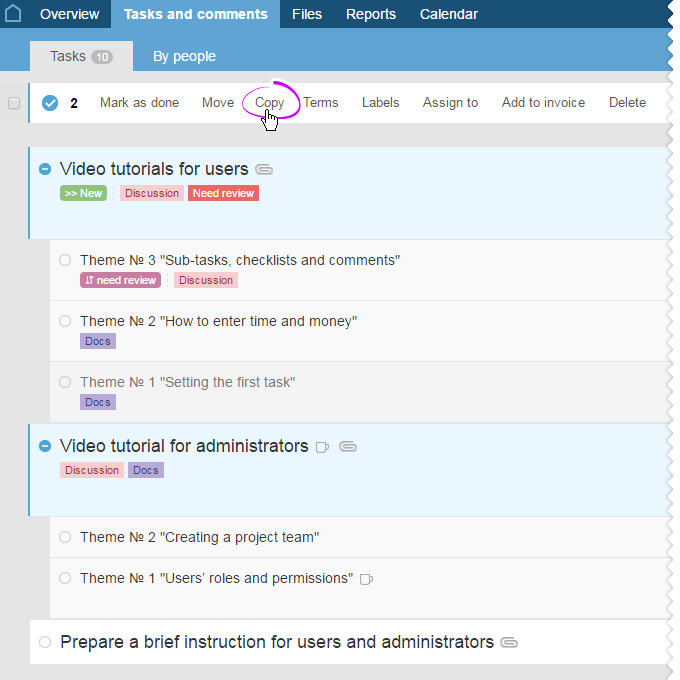
In the window that pops up, click on Copy to another project:
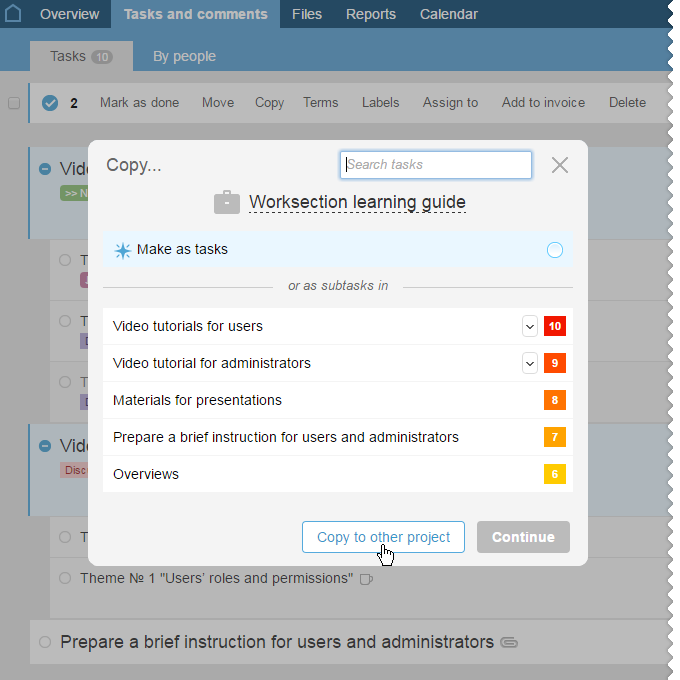
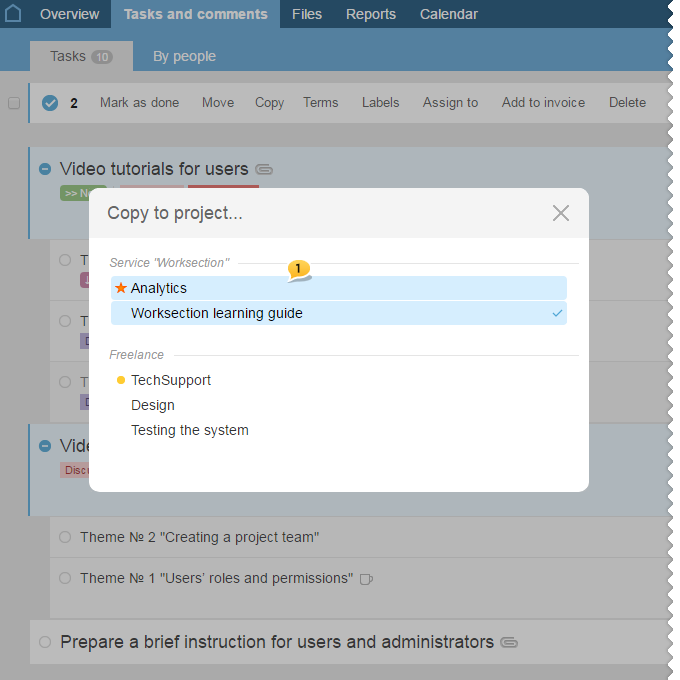
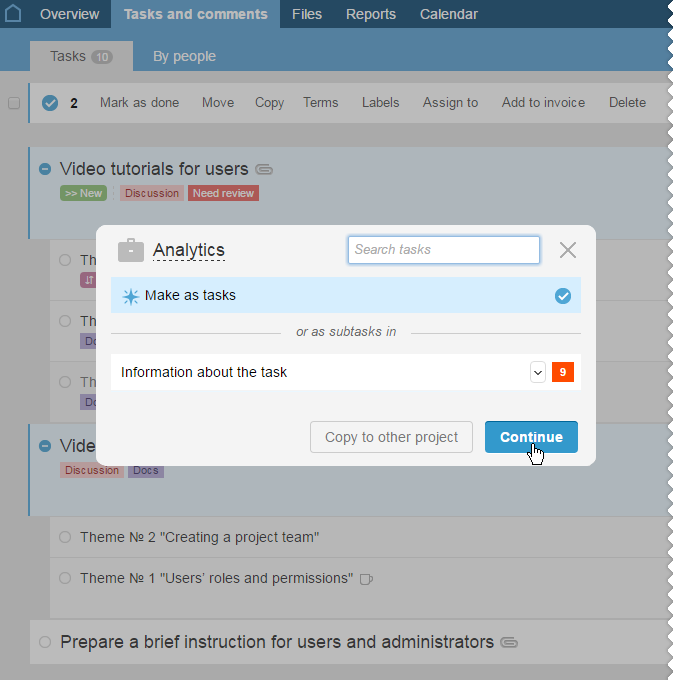
After that, click on Continue
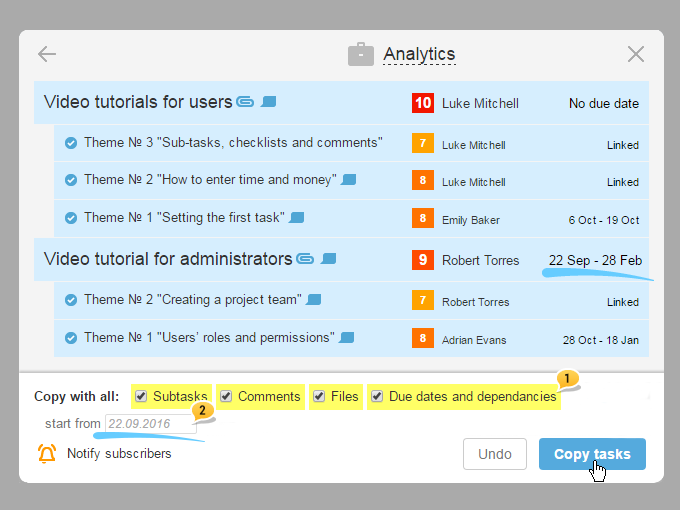
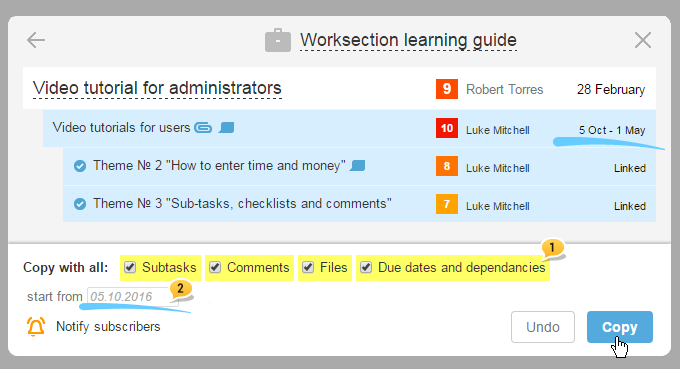
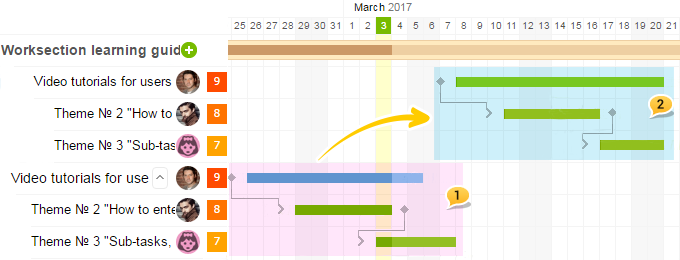
In order to copy tasks with their subtasks, comments, and files — just mark the corresponding checkboxes. And in order to save deadlines and dependencies while copying, simply
Please, note: Tasks can be copied by any user who can set tasks, while only an administrator or the author can transfer tasks.
Attention: when there’s a lack of nesting levels, subtasks are transferred to the level with a prefix of its parent task.
Can there be several executives assigned for one task?
How to check a task before closing it?
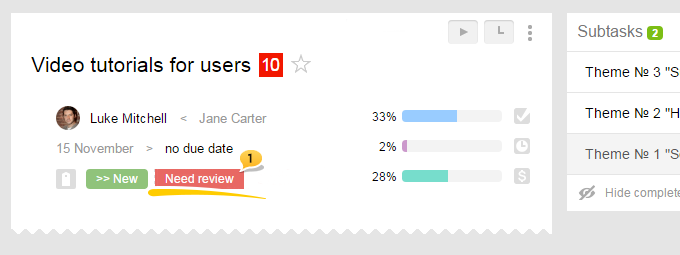
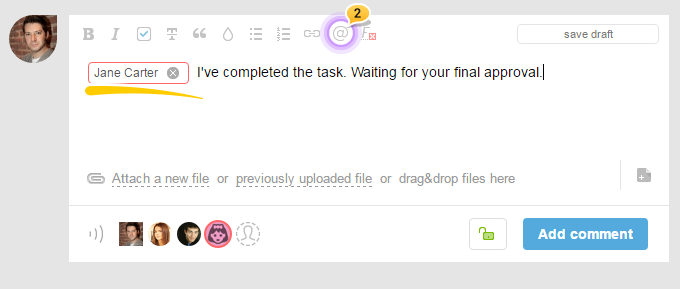
Please note: Statuses and labels can be added only by the owner or an administrator of the account in the Account Section — System Settings.
How to copy a task with dependencies within a project?
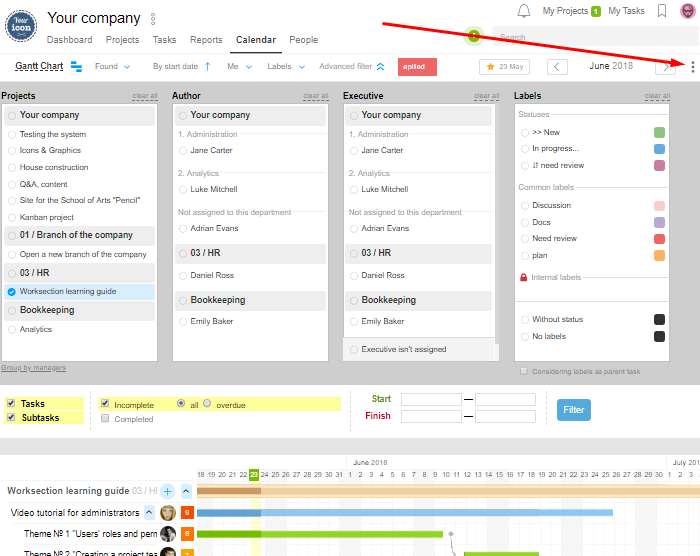
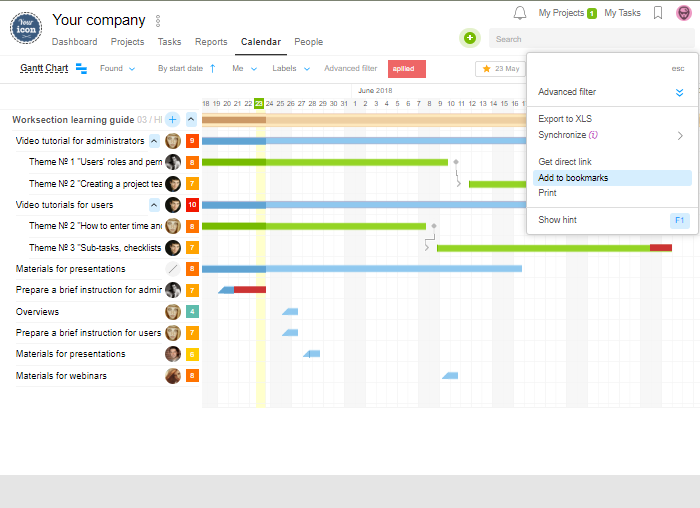
How to create & save custom filter on task list / reports / Gantt chart
How to find a task by ID?
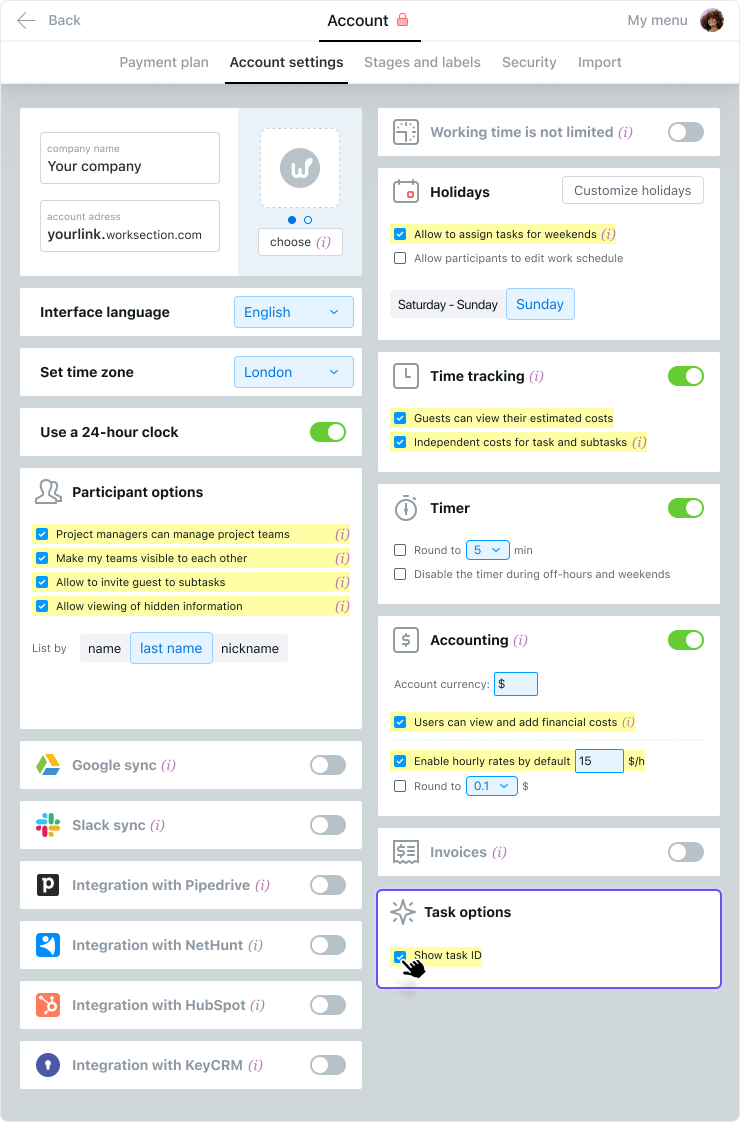
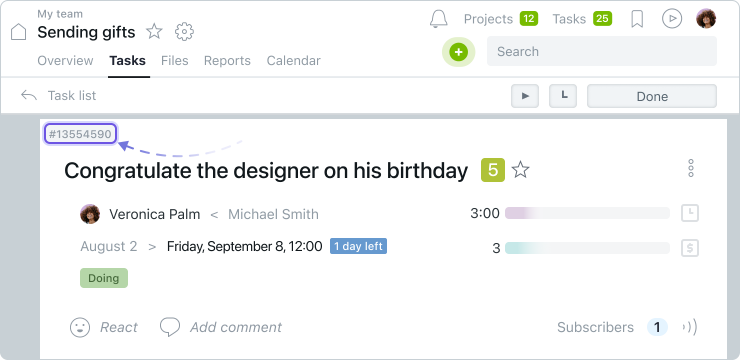
Each task and subtask has an ID – a unique number, an identifier. You can find it in the address bar of the task page. 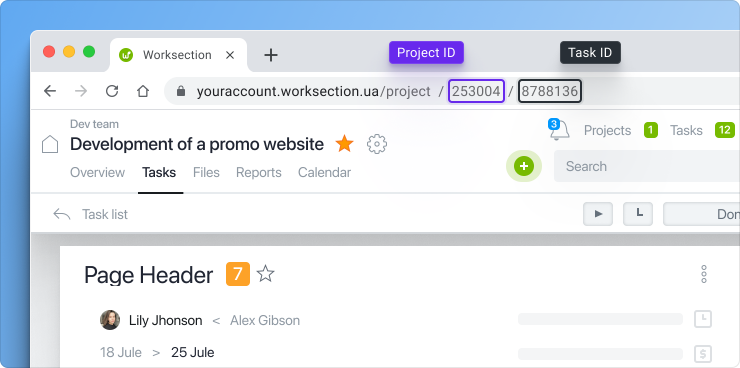
Paste the task ID number in the search bar on any page.
The task with this ID will be displayed in the search results window.

