WORKSECTION

Creating project team

How to invite a new user to a project?
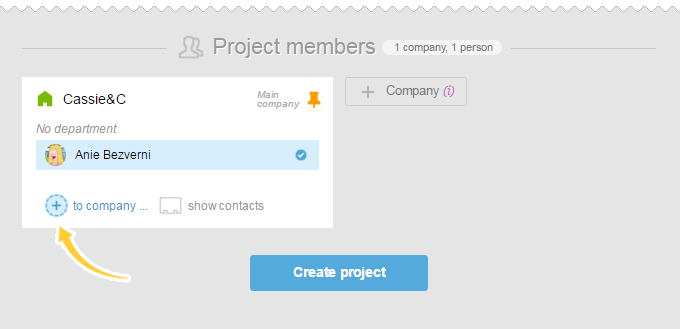
You can invite a new user right on the new project creation page. In order to do this, in the «Project participants» section on the project creation page, click «Add to Company».


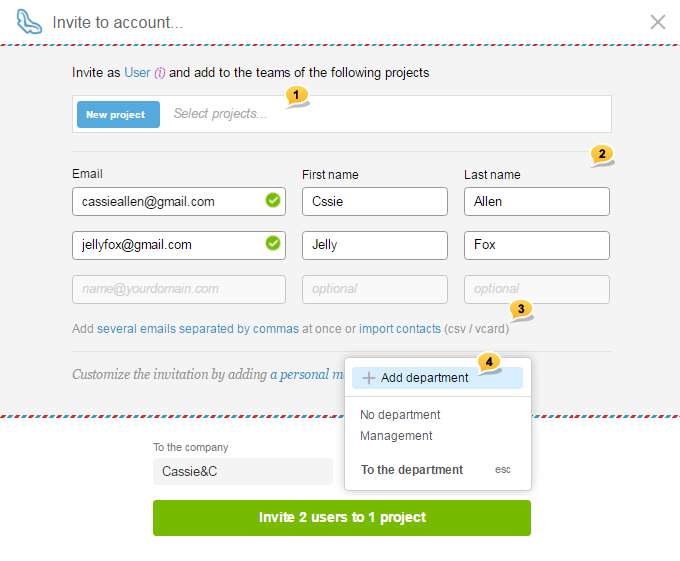
In the opened window:


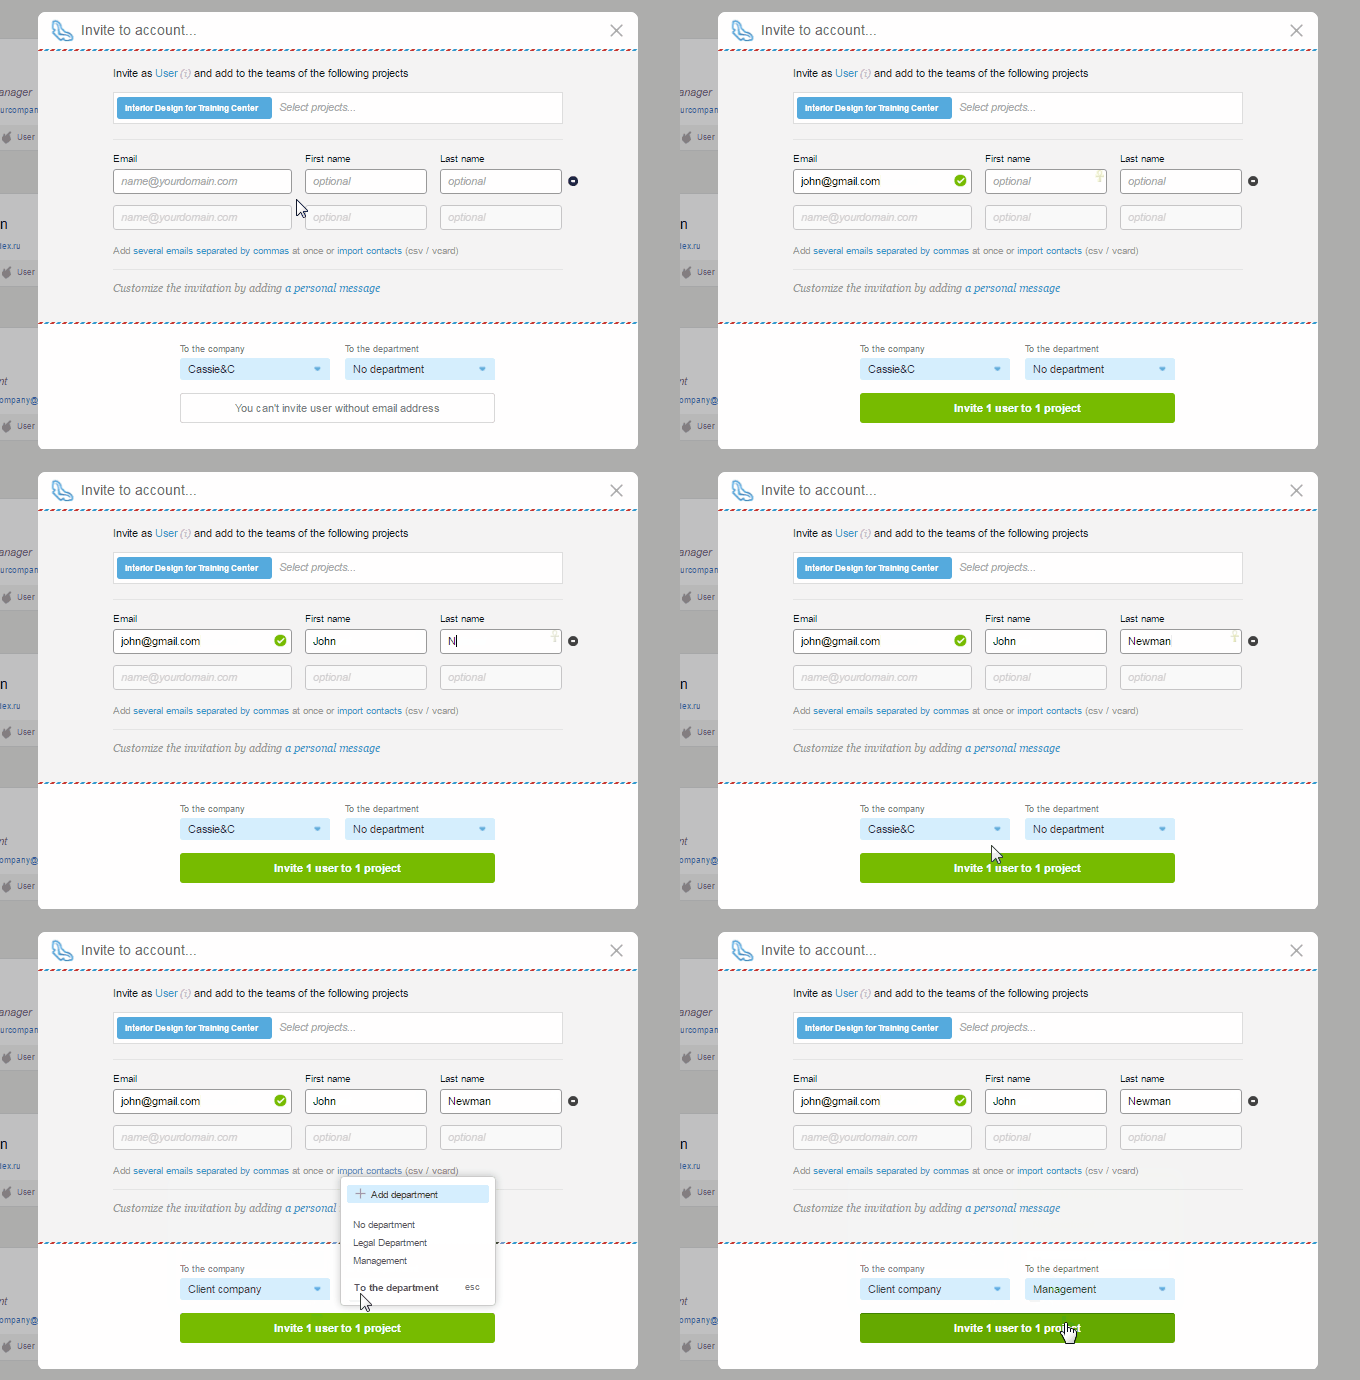
choose a project1, enter the email address, name, and last name of the participant (-s)2 (if you wish, you can add several emails separated by the commas or import contact database of your employees in the CSV or vCard format)3. Choose the company and department (in this case — create a new one). Click «Invite users to the project».

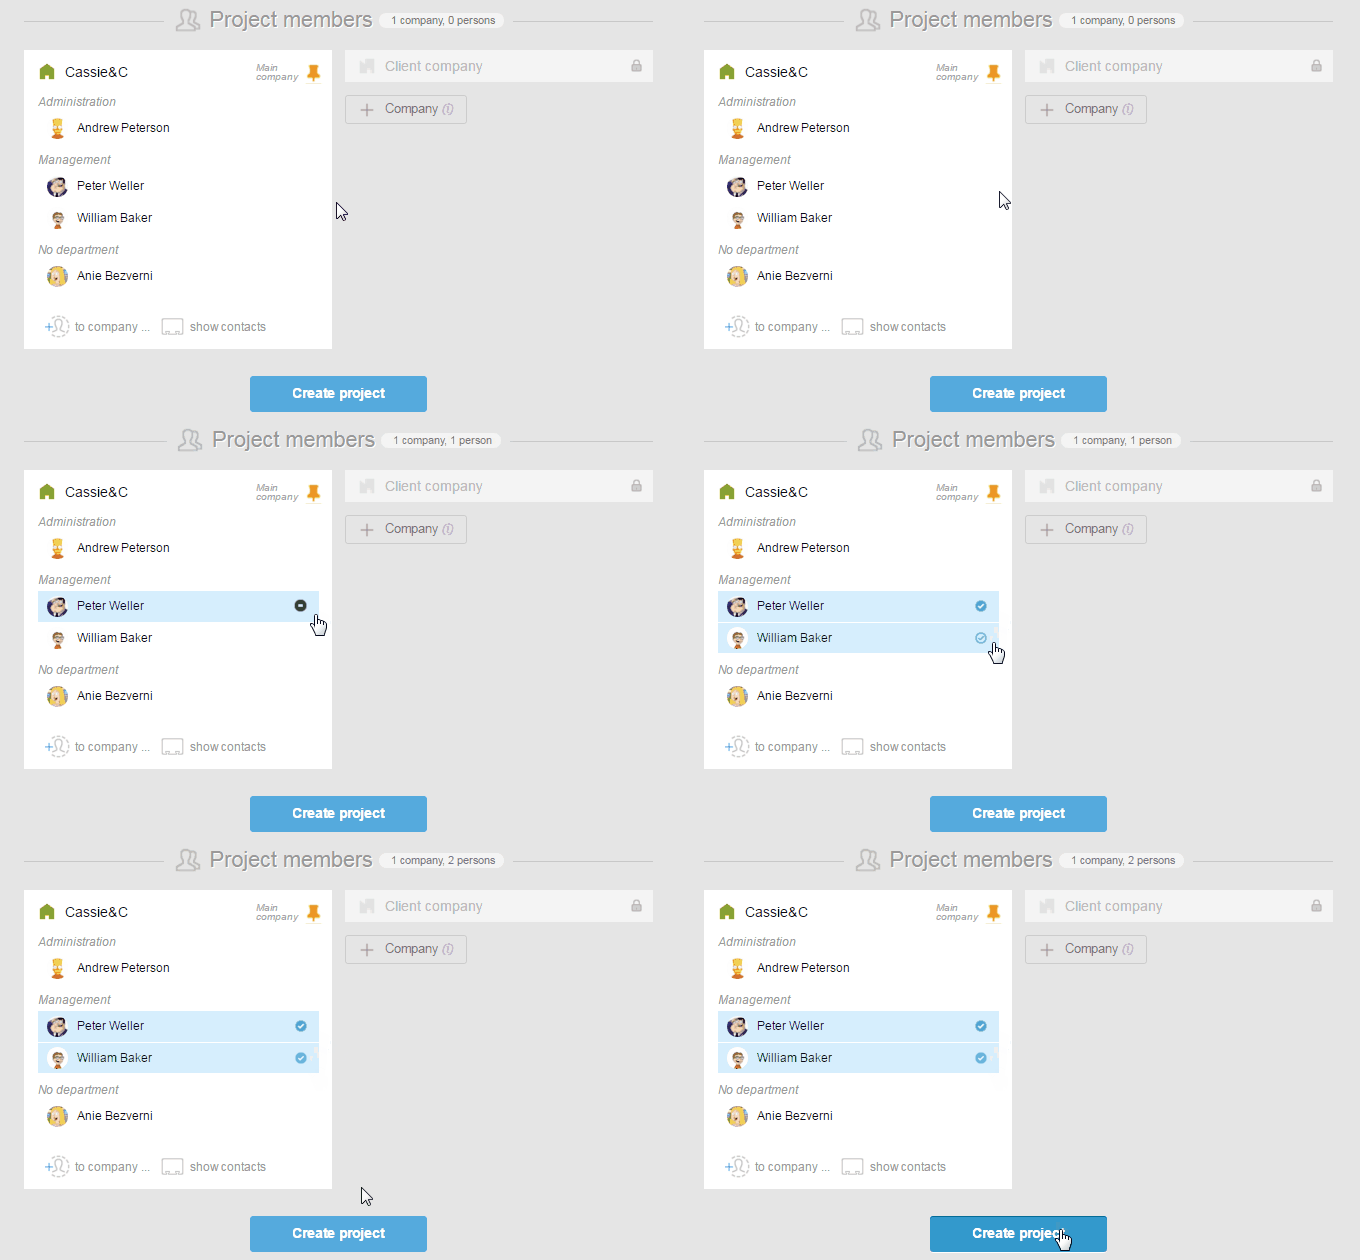
If users are already in the system, just mark the checkboxes next to their names and click «Create project».


Also, you can invite a person to the current project using the «Team» section, or when creating any task, or in the block of participants in an already existent task with the help of a special icon.

Please, note! The option of adding a participant to the project can only be done by a project manager, an administrator with the participants management rights, or an administrator with the project management control rights.
Was this article helpful? Yes, thank you! No

How to invite a client to an account?

To limit the client’s access to «behind the scenes» of the company (for example, hide time and monetary costs of tasks), it is best to create a separate client group and invite your client there.

You can do this at the stage of creating a new project as well as when sending an invitation to the client to an existing project.

In order to invite a client at the stage of creating a new project, in the «Project Participants» section, choose «Add company»1. Specify the type of company to be added (in this case — Client) 2, enter the name3 and click «ОК». In the field of the client’s company name, click «Add company» icon, enter your information and click «Invite user (s) to the project».

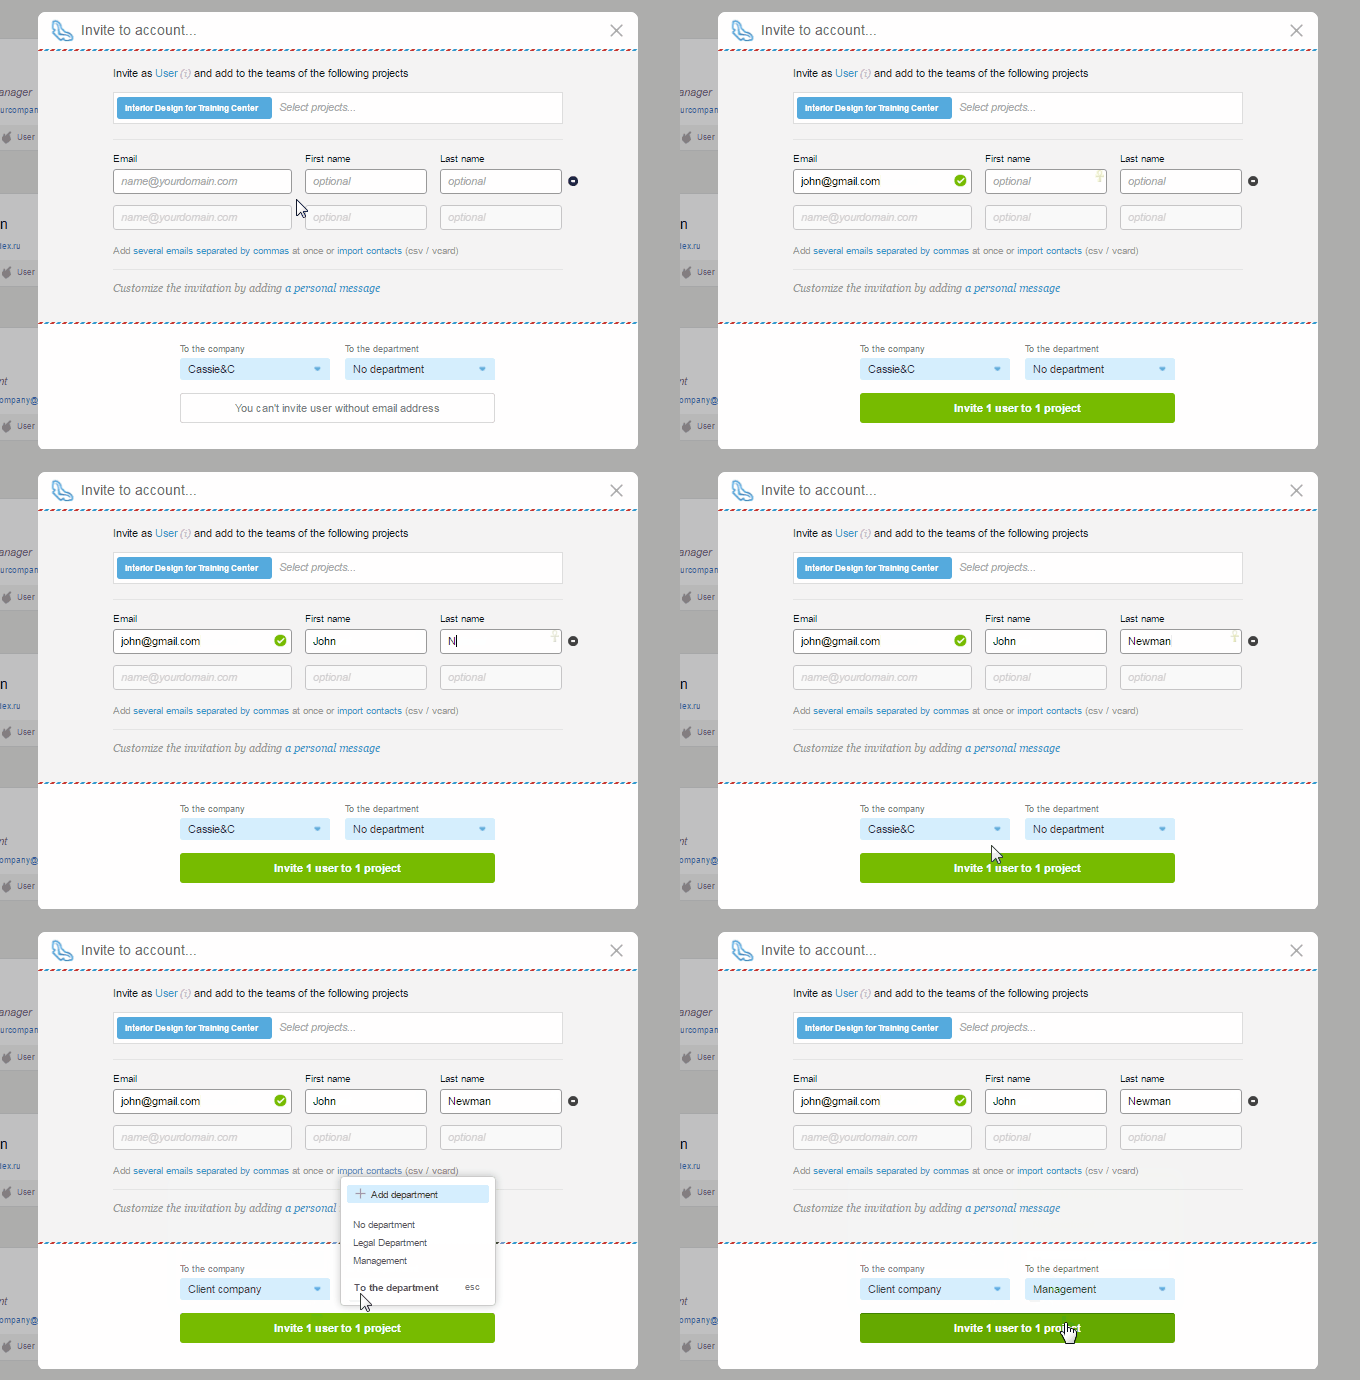
To invite a client to an existing project, jump to People and then click «Invite».

Fill out the required fields and select the project into which you want to invite a client, enter your company, department (optional), and click «Invite to the project».


Was this article helpful? Yes, thank you! No

Creating the team project. Roles of users and a company

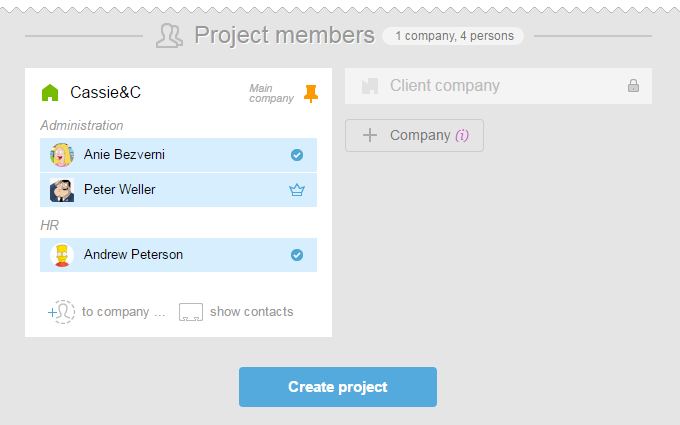
For each project, it is necessary to form a team. The project can be an «inside» one, and then its team will consist only of employees of your company. It can also be «the client’s» one, which allows the client to be present in the project. In this case, the client is best to be added as a separate company.
The structure of the «inside» project’s participants may look like this:


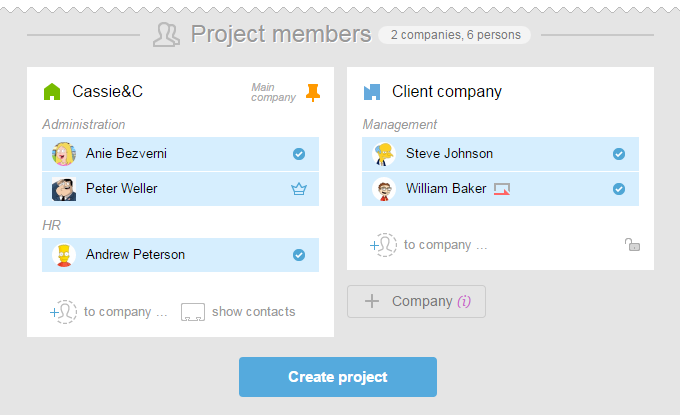
If you create a project with a client or subcontractor, the project structure might look like this:


In this case, when you create a project, you need to create a client’s company or a subcontractor’s company, and invite participants in there. You can do this directly on the stage of the project creation or in the People section.
If these companies were created previously and their users are already in the system, just check their names in the checkbox to «add» them to the project team.
The following roles are possible in the project:

  • Administrator is a role with customizable access to users, projects, tasks, hidden information, reports, and timers. It may be an «account administrator» or «company administrator» or «department administrator»
    Project Manager is a person responsible for the outcome of the project. Project Manager has extended permission in the project and may change the terms and closing tasks. This can be whether a regular user or an administrator.
    Regular users are people who see all the usual (not «private») project tasks to which they are included.
    A member of the client’s company is the person taking the job. This person does not see the «inside» of the account.
    Guest is a person with the guest access only to the task for which he or she is responsible.

A more detailed description of roles can be found here.


Was this article helpful? Yes, thank you! No

How to add a new company?

You can create additional companies to organize people in the account. Typically, clients and subcontractors are added to different companies for information visibility to be divided. You can also create a separate company for your branch company if it is working on its own individual projects.

You can add a new company at the stage of project creation or at any other time convenient for you.

In order to add a new company on the project creation page, in the «Project Participants» section click on the «Company» button. Choose the type of company (client’s or your company’s branch), enter the name, and click «ОК».
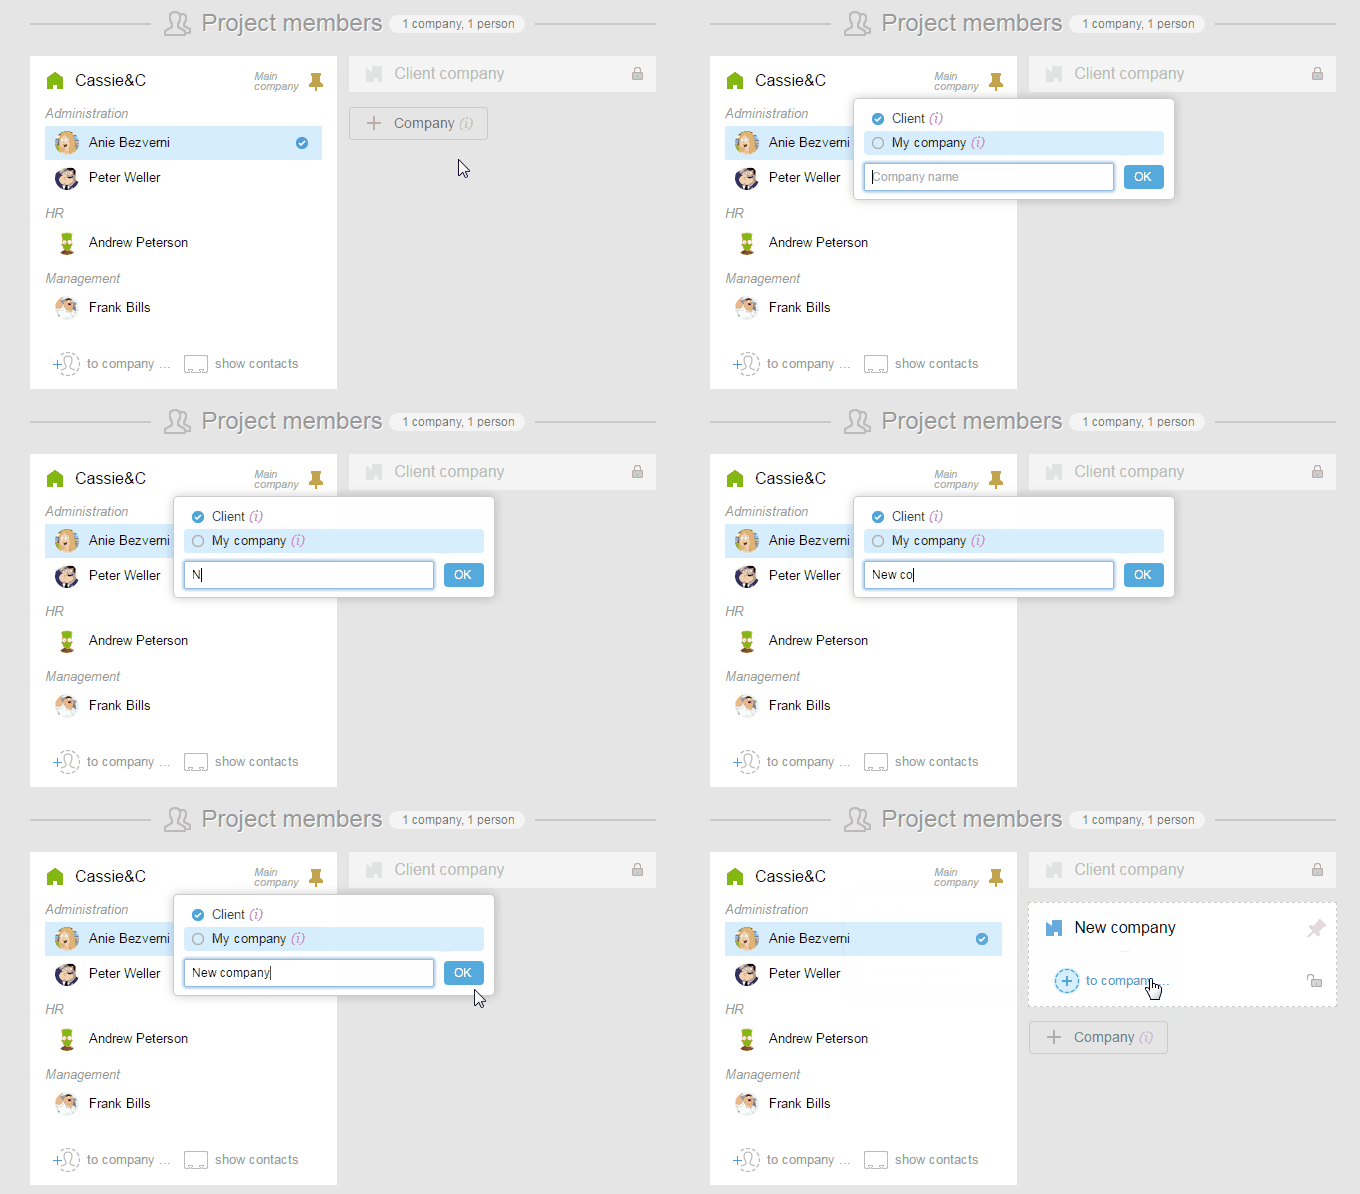


Right here, after you have added a new company, you can invite new participants to it and create a new section.
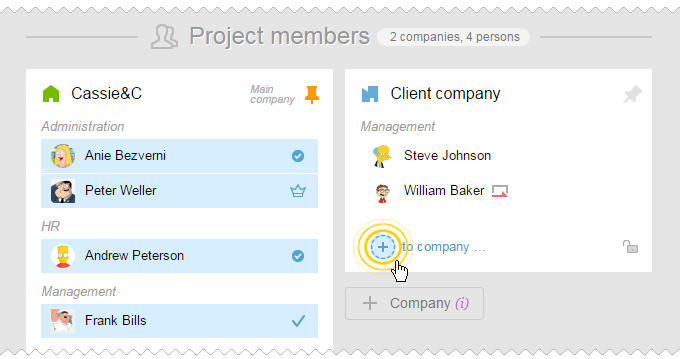

To add a company after creating a project, you need to invite at least one employee in there.

Jump to People section. Click on «Invite», enter the necessary data and in the «To the Company» click «Add Company». Enter the name of the new company (if necessary, create a section as well) and click «Invite».


There is no limit to the number of companies.
Was this article helpful? Yes, thank you! No

How to enter additional information about the company and upload its logo?

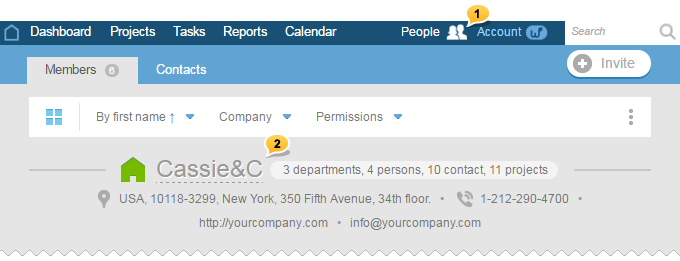
In order to add information about a company, jump to People1 section.
You will see a list of all the companies, departments, and users of the system. Find a company in which you want to add the new data and click on its name2.


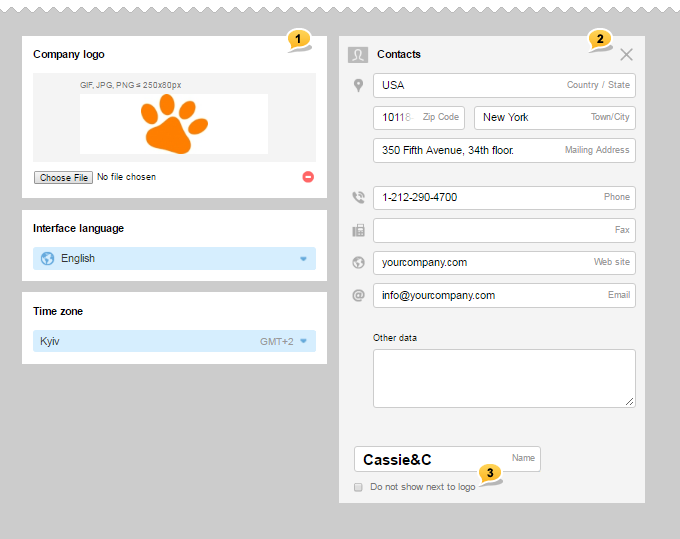
Under the title, a form will open that will allow you to enter the data about the company where you will be able to upload a logo1 and add information about the company (address, phone, website, email)2. In the same form, you can set the time zone of the company and choose the language of the interface.


If you do not wish to display the name of the company along with the logo (for example, the name is already in the logo) — choose the corresponding option3.

Please, note! Save button appears only once you change something.
Was this article helpful? Yes, thank you! No

How to invite numerous users at once?

You can invite numerous users at once to your account when using the following options:

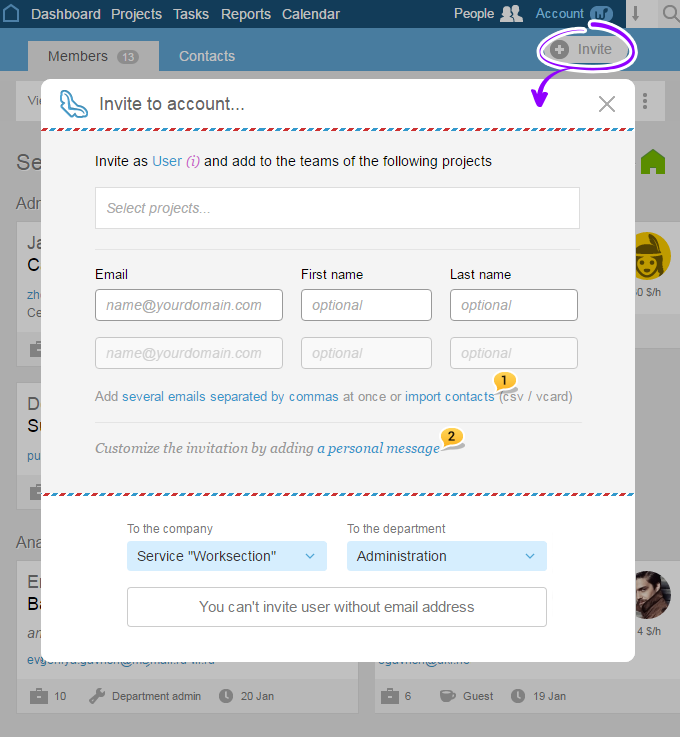
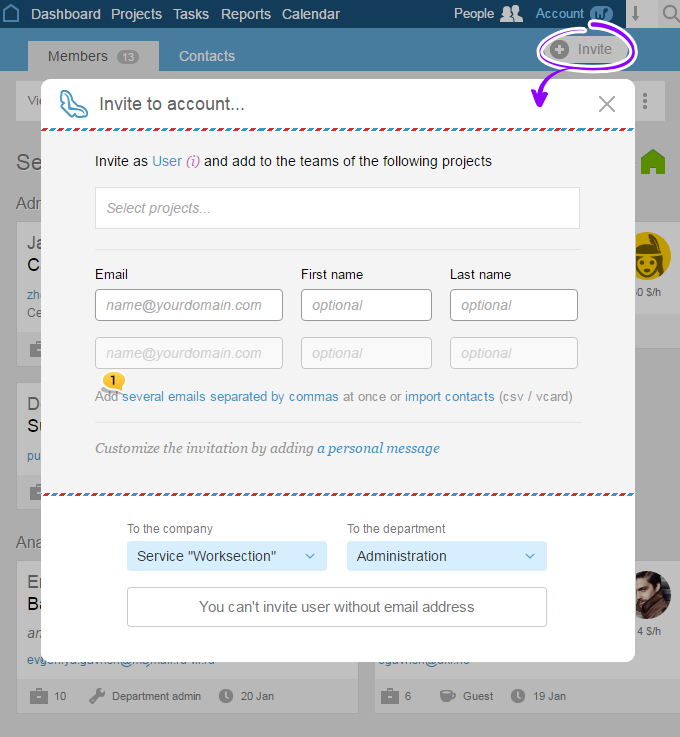
1. Enter several emails separated by a comma1:


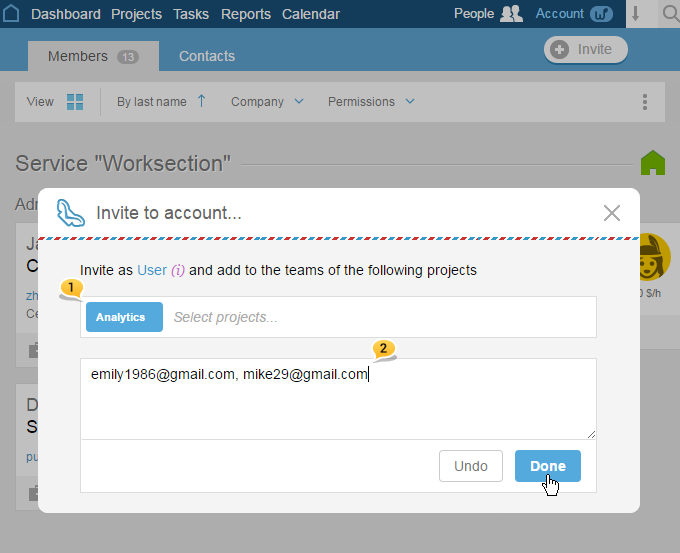
Then, in a window that appears choose the project1 and enter emails2:


2. Alternatively, import contacts in the CSV / vCard formats1 :


Also, you can personalize your invitation adding a personal message2 to it.

Was this article helpful? Yes, thank you! No

How many users can be created in an account?

As many as you need. We do not limit the number of account’s users. Worksection does not take payments for users’ licences.


Was this article helpful? Yes, thank you! No

Alternative ways of adding participants to a project

1st option

Using the project’s settings (add several users to the project at once).

Go to the project’s settings.


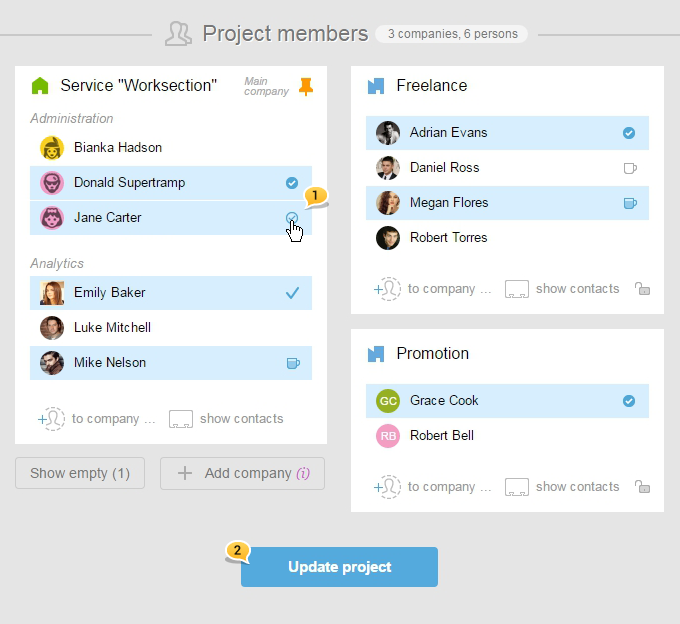
In the settings window, there is a «Project’s participants» section where you can select those participants that you would like to add1 and then click on «Update project»2.


2nd option

Using the «Access» option in the bulk operations section (adding several users in several projects).

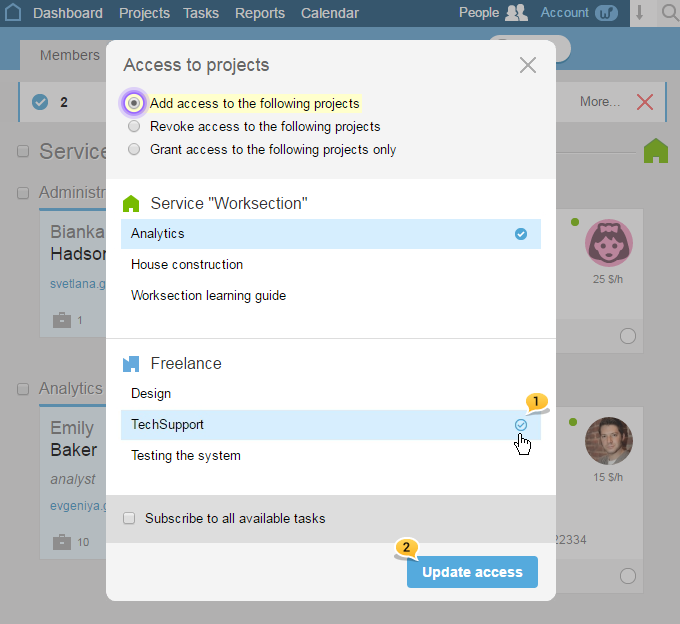
From the account’s homepage, go to the People section. Click on those participants’ cards for whom you would like to open access to the project, and then choose «Projects».
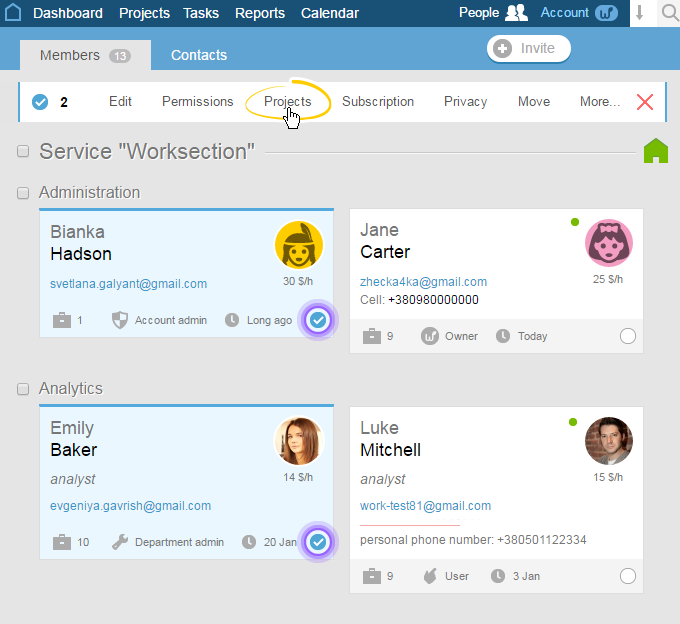

In the window that appears, mark those projects in which you wish to include the selected participants1, and then click «Update access»2


3rd option

Using the particpant’s profile (if a certain particpant is added to different projects).

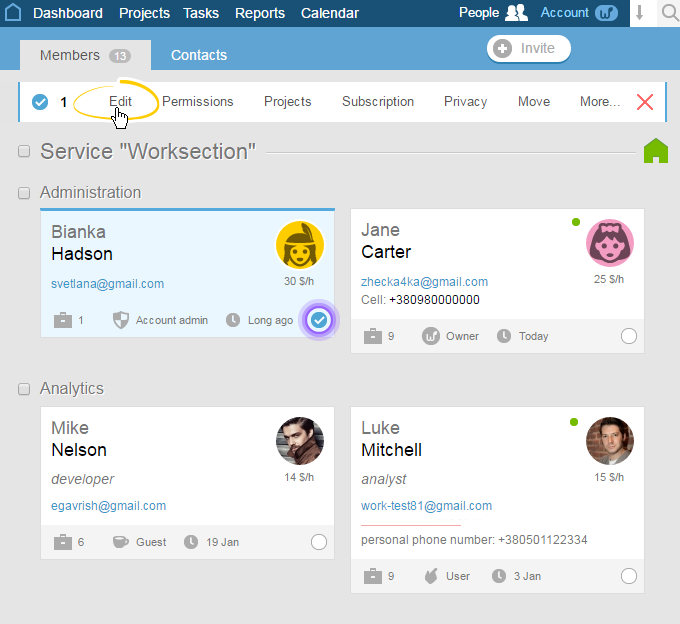
Go to the People section. Click on a particpant’s card and select «Edit» in the window that appears:


Select those projects in the «Projects’ participant» field to which this participant will be added.
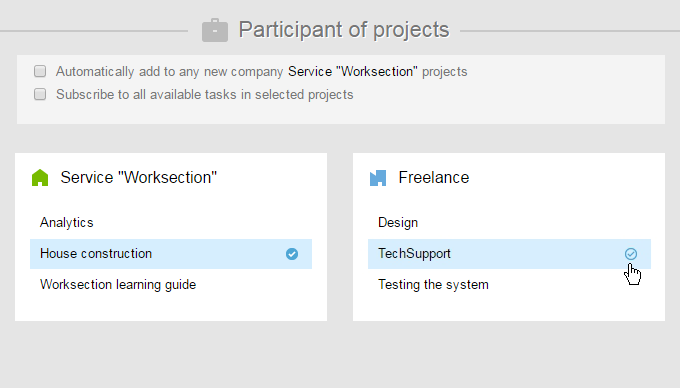


Then, click on «Update access»:


Please note! The option of adding a participant to a project can only be done by the project’s manager or an administrator with the permissions of managing participants or projects.

Was this article helpful? Yes, thank you! No

How to create a department?

Company’s employees can be grouped in departments. Department can be created when inviting an employee by clicking the «Department» field. You will see a window where you can name the «department»1:
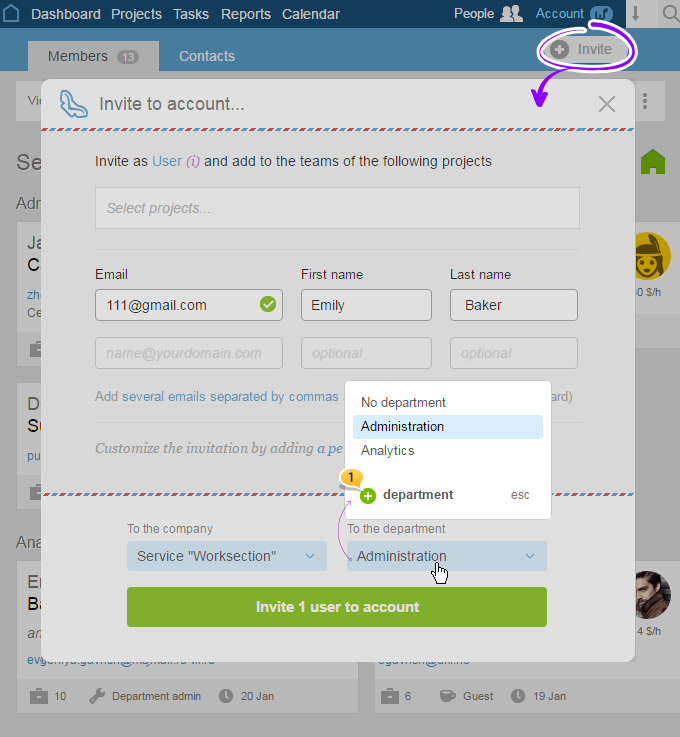


Then enter the name of the new department and click OK.


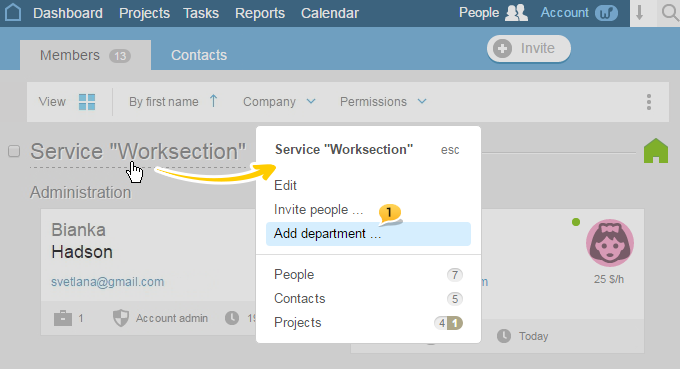
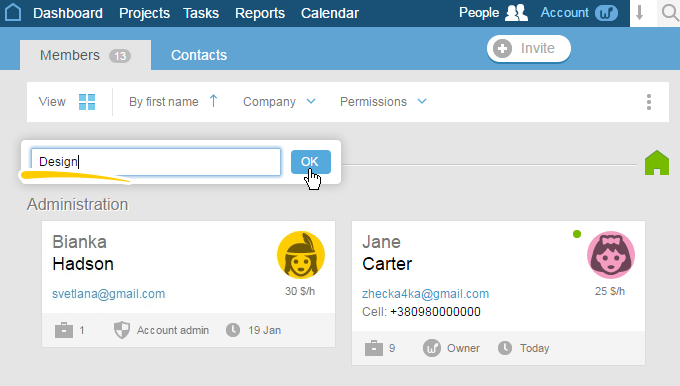
You can also create a department in the «People» section by clicking the name of the company. Then, choose the «Add department» option:


Then enter the name of the new department and click OK.


Was this article helpful? Yes, thank you! No
esc
или
Print