WORKSECTION

Нові питання без категорій

Creating the first task

Hello, colleagues!

Today, we will learn how to create tasks.

On the main page of the account, you see a block of projects1 in which you are a participant.

Choose the desired project and enter it2.
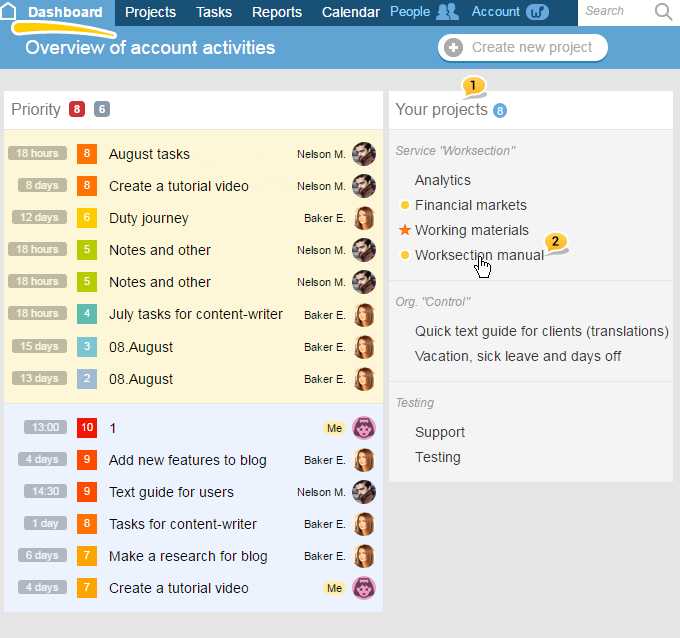

Creating a task

Now, you need to create a new task. In order to do this, click on the «Create a new task» icon.


After, you will see that:
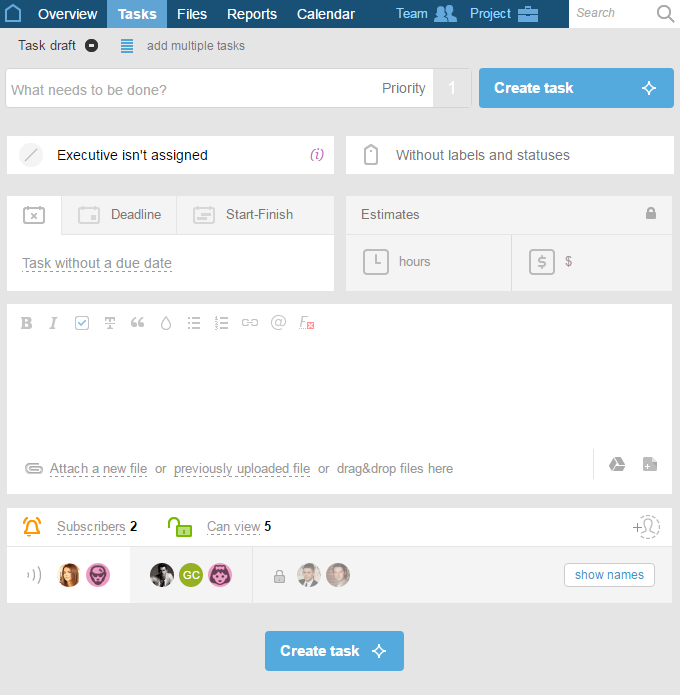


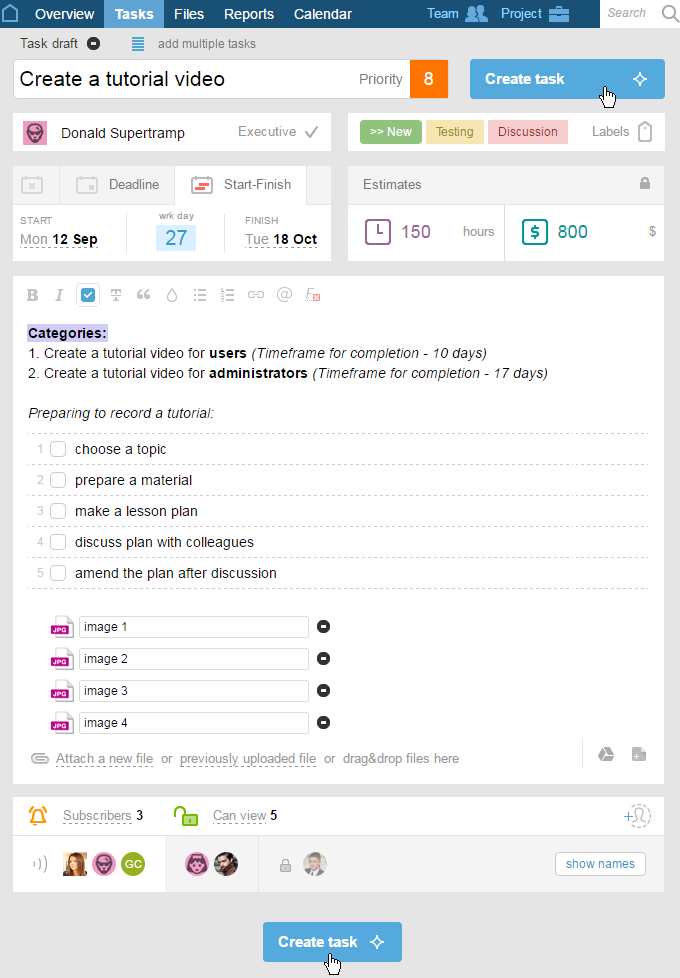
Name & Priority

You need to write the name of the task at the top1. Make sure that the name is clear, easy to understand and doesn’t have a double meaning.

For each task, you can set the priority of its importance2. Just as an example, let’s choose the priority — eight.


Executive, labels and statuses

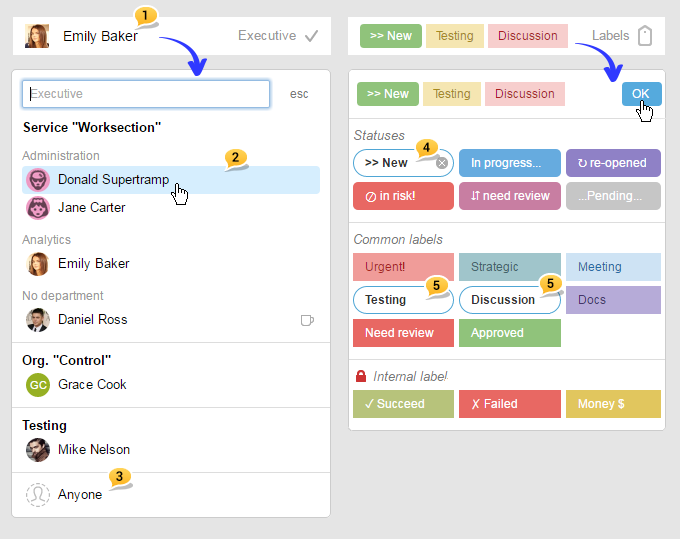
Then, let’s define an executive for the task. You can assign yourself1, another project’s participant2, or leave the task without an executive, and, in such case, project’s participants can take on this task3.

For the structured tasks, use labels and statuses. There can be only one status4, but there is no limit to the number of labels5.

Timeframe for completion & Estimates

After setting the status and the labels, let’s set the timeframe for this task completion. A task can be without any timeframe1, or can have the date of completion set2 (or «deadline» in other words), or can have the date of its start and finish3.

If necessary, set estimates for completing the task you are creating. You can set estimates both for time4 and costs5.


Task’s goal
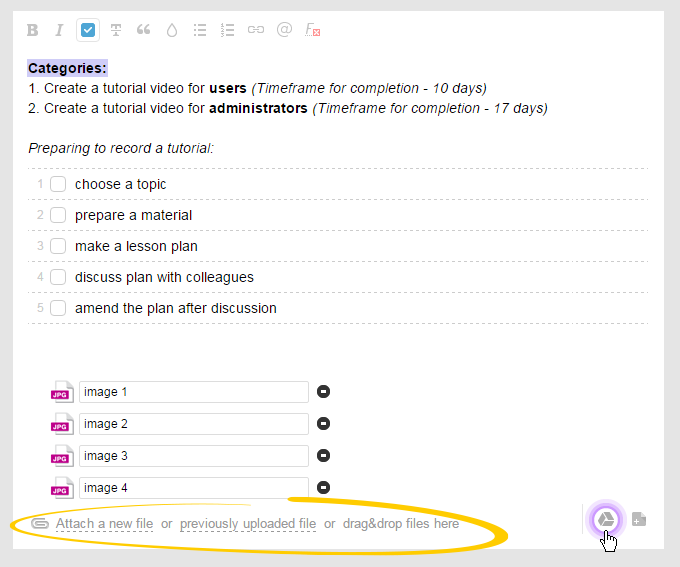
After setting all the necessary parameters, proceed with filling out the field that should contain the goal of the task, its detailed description, and the requirements to the outcome. It is very important to PROPERLY describe the task. It will ease up the understanding within the team and increase the likelihood of the task’s correct completion. Also, you can attach files to the task.


Notifications

Let’s proceed to the next stage. Choose the subscribers who will receive notifications about this task. It should be noted that the author1 and the executive2 automatically become subscribers to the task. If you need to subscribe your co-worker to the task, just click on his or her icon3


And do the same if you need to unsubscribe some person from the task4


The visibility of the task (Lock)

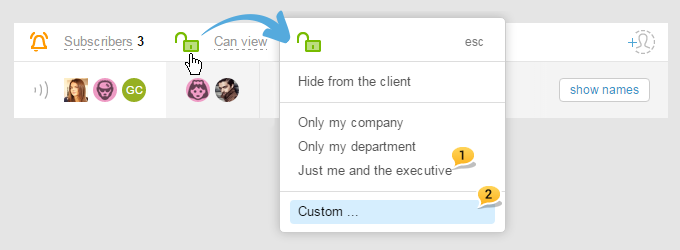
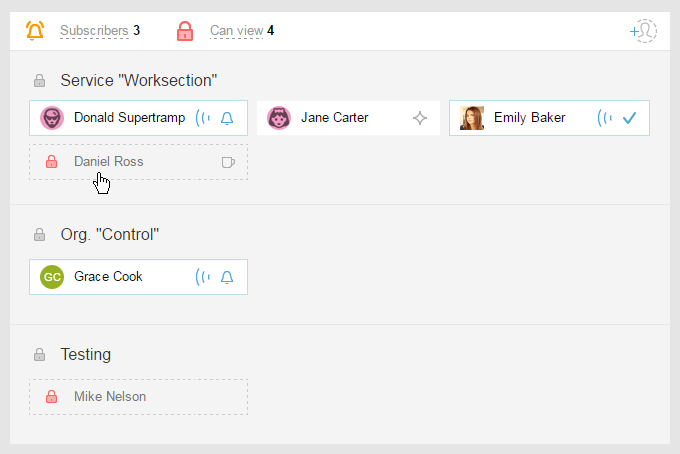
If you wish to restrict access to the visibility of the task, click on the lock. When selecting «Executive and I»1, the task will be visible only to the author and the executive. If you need someone else to see the task, just choose «arbitrary group of people»2.


Among the emerged icons, choose those who will also be able to see the task, and to subscribe them for notifications.


In our case, let’s set to «Visible to all».

Creating a task

Now is the time to create a task:


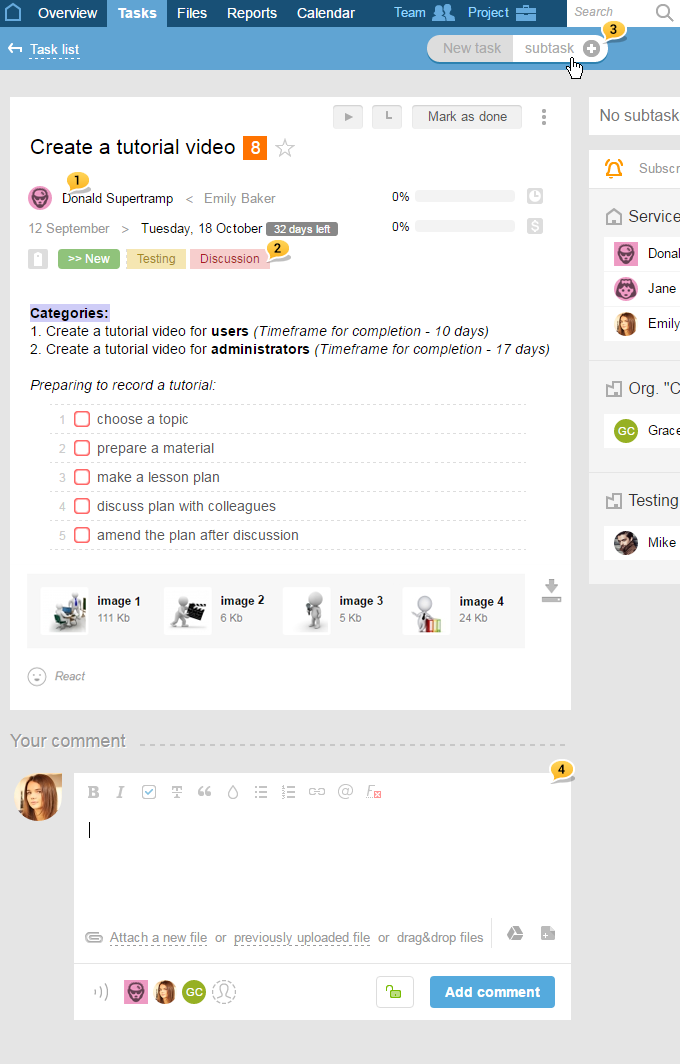
And this is how it looks like.

To the right, we see the number of subscribers1.
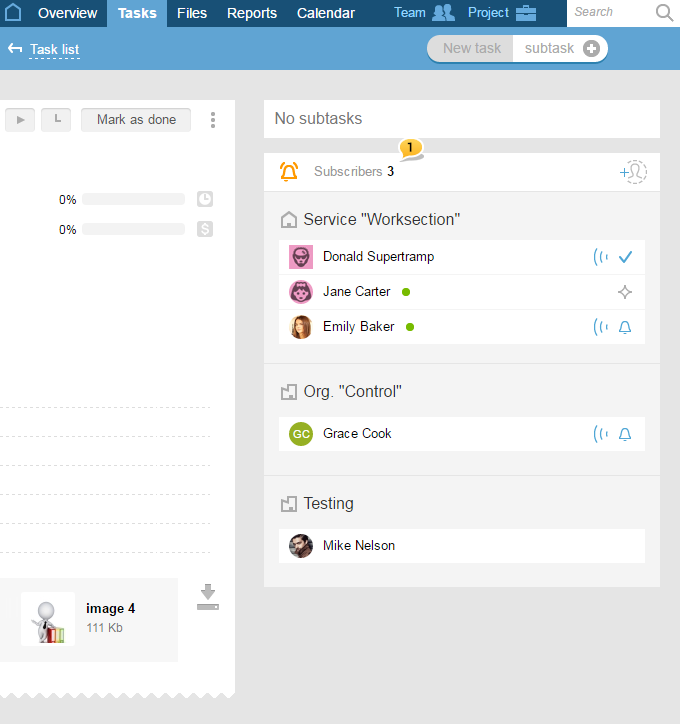


And to the left, there are the executive of this task1, the status and labels2. If desired or needed, you can create subtasks3.

In the task itself, you can conduct correspondence with the help of the comments4.

Notifications about the comments will be sent to subscribers’ email and will also be reflected in the bell.
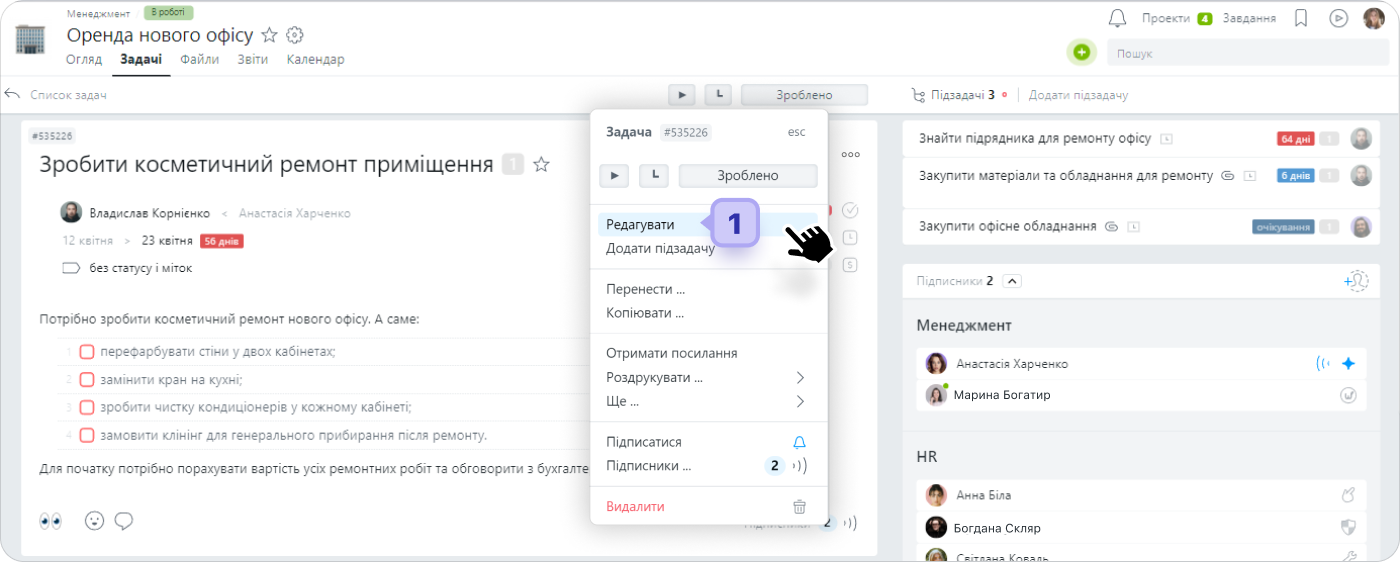
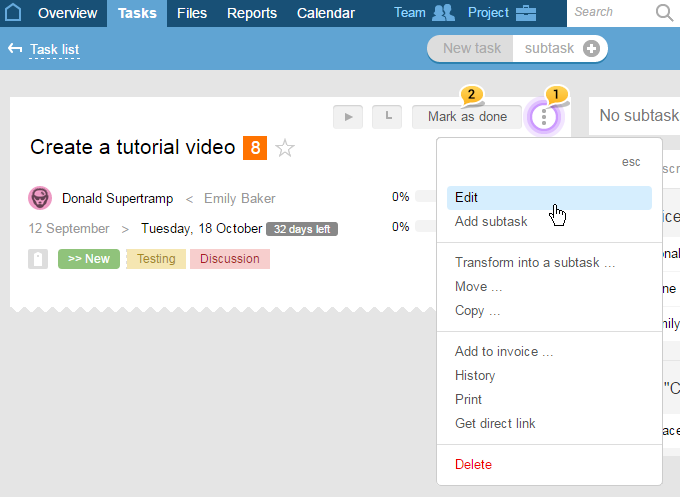
In order to make changes in the task, click on «edit»1.

Close the task after its completion2.

Ця стаття була вам корисною? Так, дякую! Ні

How to enter time and costs

Hello!

Today, we will take a look at how to add costs and track time.

When working on any task, it is important to know how much time we spend on it at the end of the day. Time can be added manually or using the timer.

Starting the timer

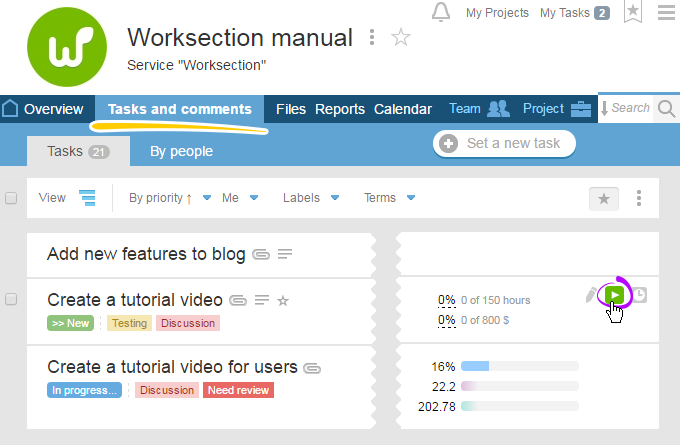
You can start the timer right from «My tasks».


Or you can also do it in the «Tasks and comments» section:


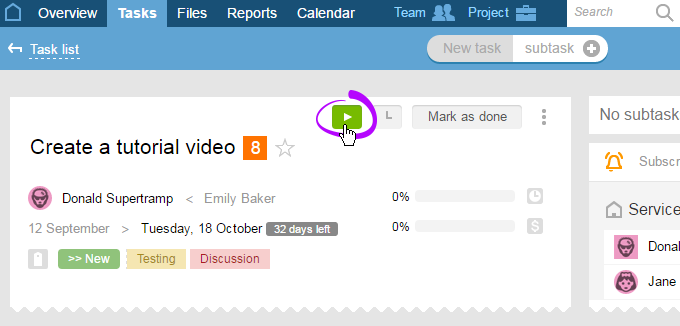
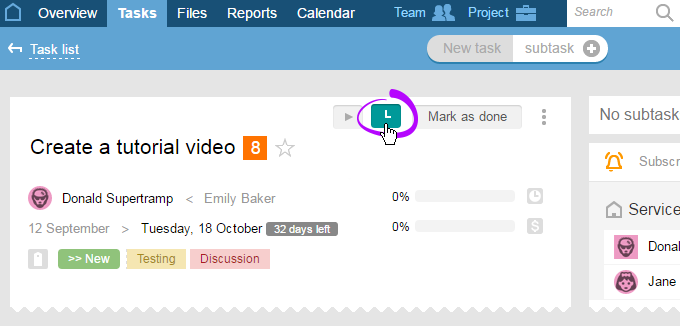
Or you can start timer right from the task itself.


It is time to see how it all works.

Timer display

Once started, the timer is displayed at the top of the account’s page.


When you hover over it, you can stop it and enter time:


Or, you can delete it:


Stopping the timer

Let’s stop the timer and add this time as «spended on task».


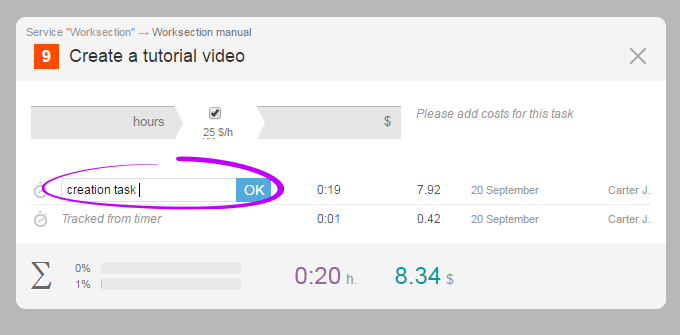
And now we can make a note of what has been done during this time.


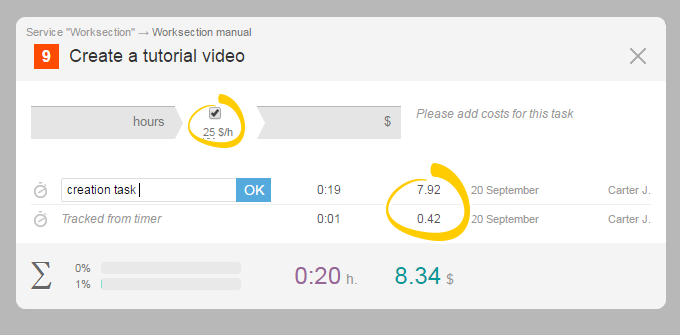
Please, note that financial costs will be automatically accounted only if the administrator or the owner of the account set an hourly rate in the account settings.


To finish, click «OK», and close the window.

Timer continuation

There are times when you need to take a break and stop the timer for some time. In order to resume your work, click on «Continue».


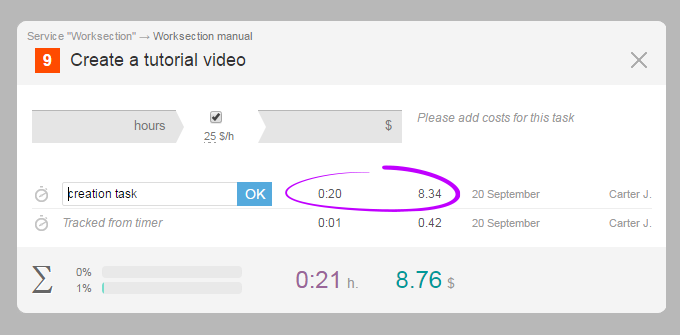
Your new spent time is added to the previously entered costs, namely, in the line that you have just filled out. Let’s take a look at how it works.

Our time has summed up in one box.


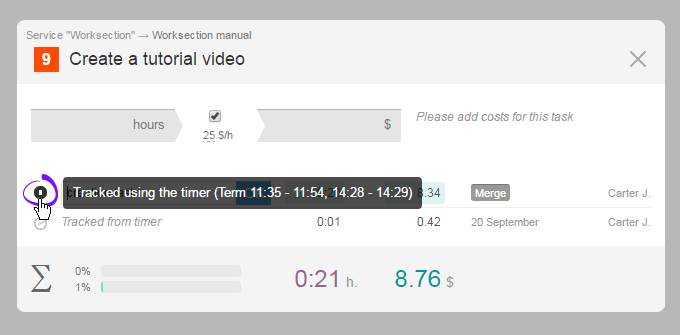
When you hover over the timer icon, we see the time period of the timer’s work.

You can add the name or leave it without changes.


Hide the timer

If you no longer wish for the timer to go on, click on «hide».


The timer can be started as many times as needed.

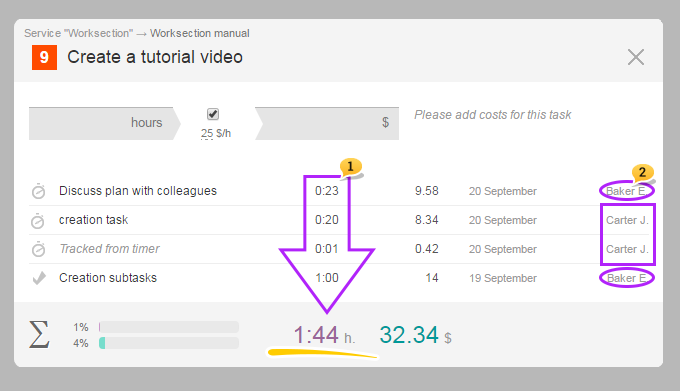
After the timer is stopped, the time is automatically added to the overall time spent for a particular task1 and is assigned to a particular executive2.

Adding time manually

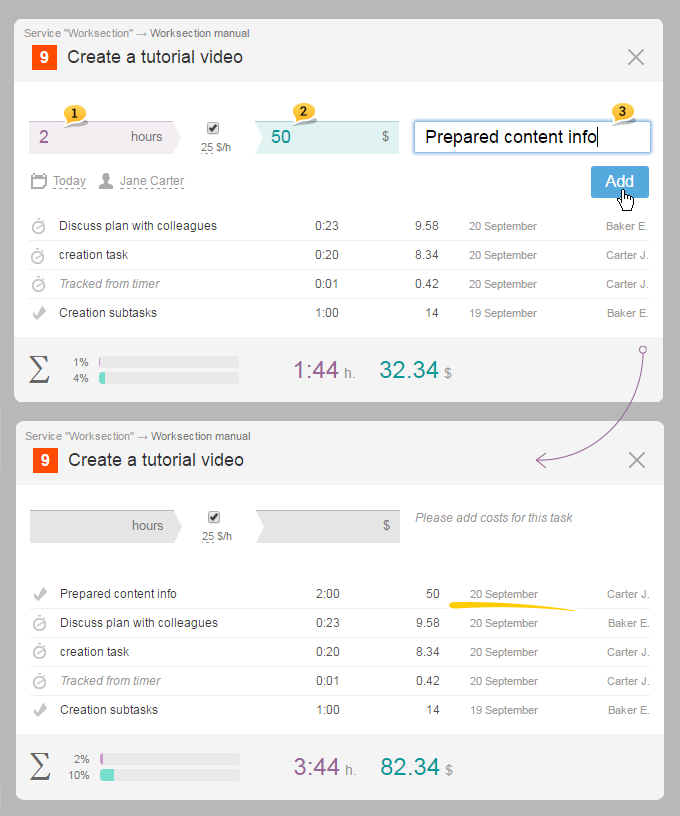
Also, time and financial costs can be added manually. For this, click on «Costs» icon:


And fill out the corresponding fields: by time1, by money2, and by what has been done3. The costs were entered as of today’s date.


Backdating the costs

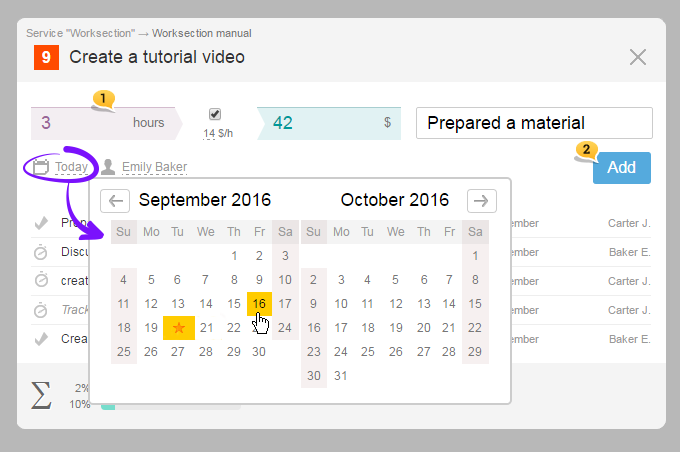
There are situations when costs need to be backdated. In such case, fill out the fields with the required data1, click on the calendar, and choose the date that you need. After that, click «Add»2.


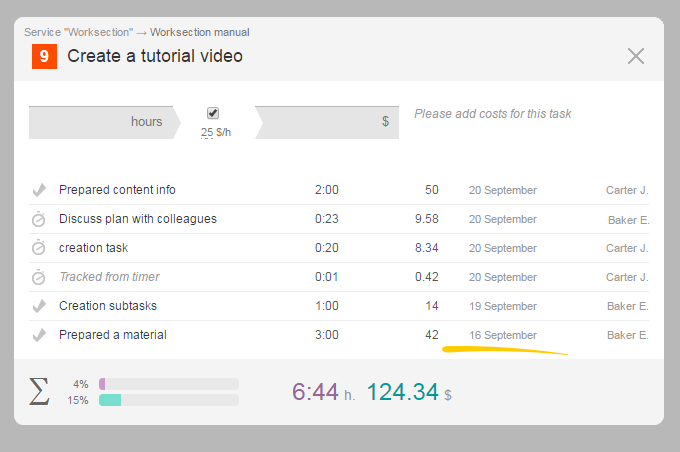
Costs were entered for the date that we chose.


«Reports» section

You can see the entered costs in the «Reports» section broken down by tasks1, people2 and days3.


Don’t forget to start the timer and enter costs in a timely manner.

Have a productive worktime!

Worksection team

Ця стаття була вам корисною? Так, дякую! Ні

Subtasks, checklists and comments

Dear colleagues!

Today we are going to discuss Subtasks, Checklists, and Comments.

Subtasks

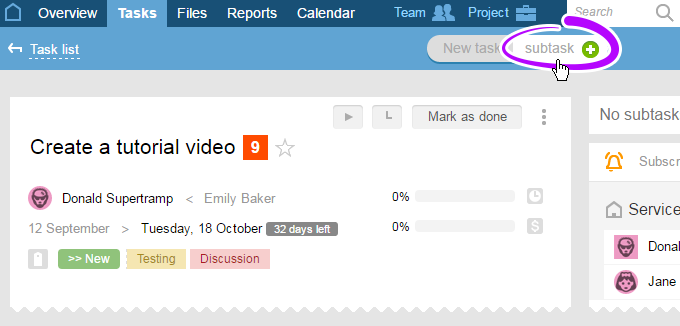
A complex task is usually divided into subtasks. It is easy to create a Subtask. Open a Task and click on Subtask icon.


Functions of Subtasks are similar to the ones of Tasks, in other words, we name them1, set priority2, assign an executive3, choose status and labels4, set deadline5, specify estimates6, and write comments. We can describe the subtask7 and attach files to it8 — just the very same way we would do with a Task.


Here we also have subscribers, and the visibility of a Subtask can be limited.

Group of subtasks

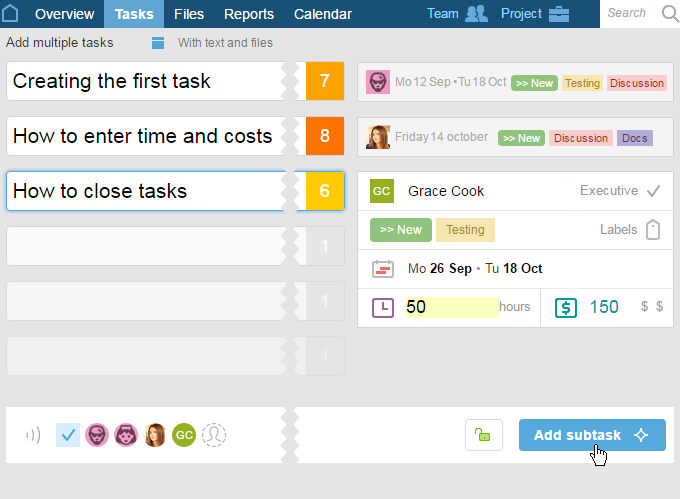
If you need to create many Subtasks at once, add them in bulk. To do this, select Add Group of Subtasks:


And fill in same fields except for the Subtask description. Do not attach files. Then click Create Subtasks.


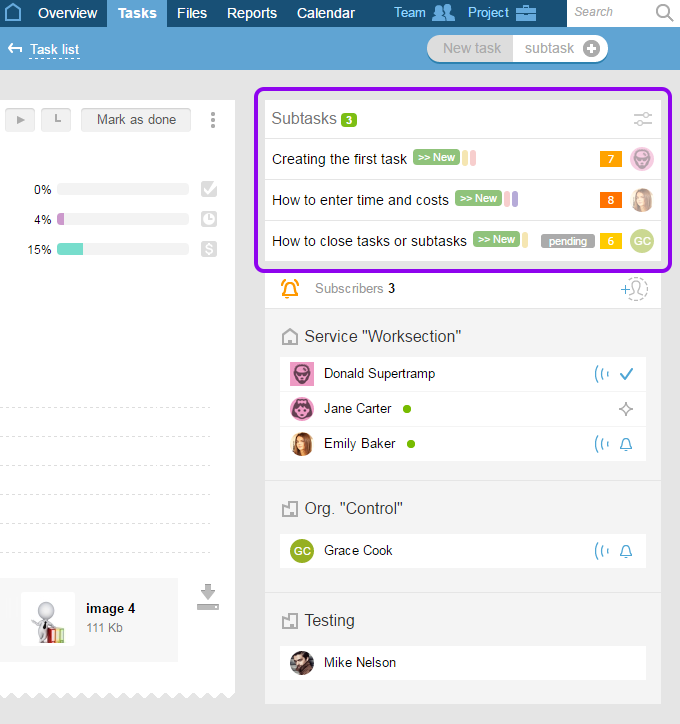
You will be able to see all the Subtasks of the current Task.


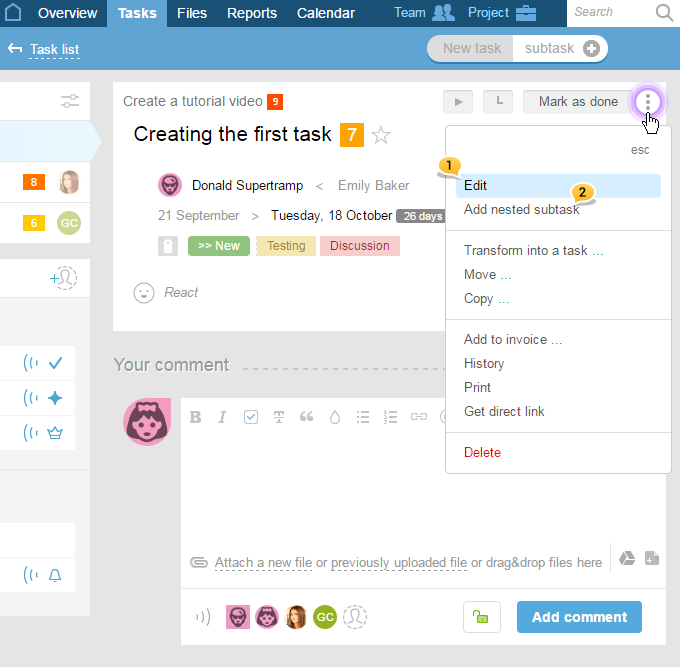
In order to add description and attach files to a Subtask, click on it, select Edit1, fill in all information required and click Update subtask.

There may also be a Subtask of a Subtask2.


Checklists

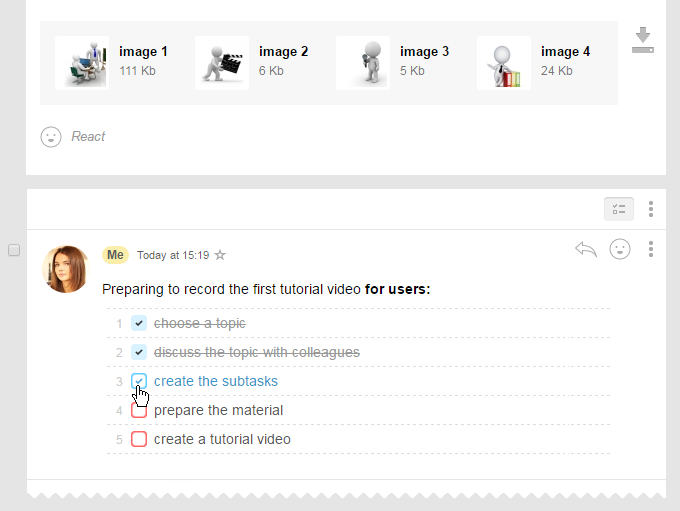
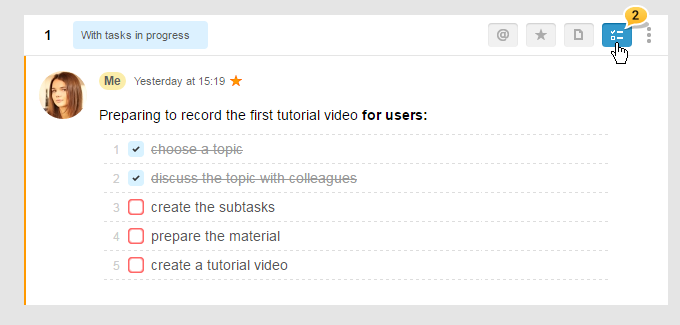
And now, let’s talk about Checklists. A checklist is a list of minor tasks that may be crossed out. Checklists are not shown in reports and cannot be assigned to someone.

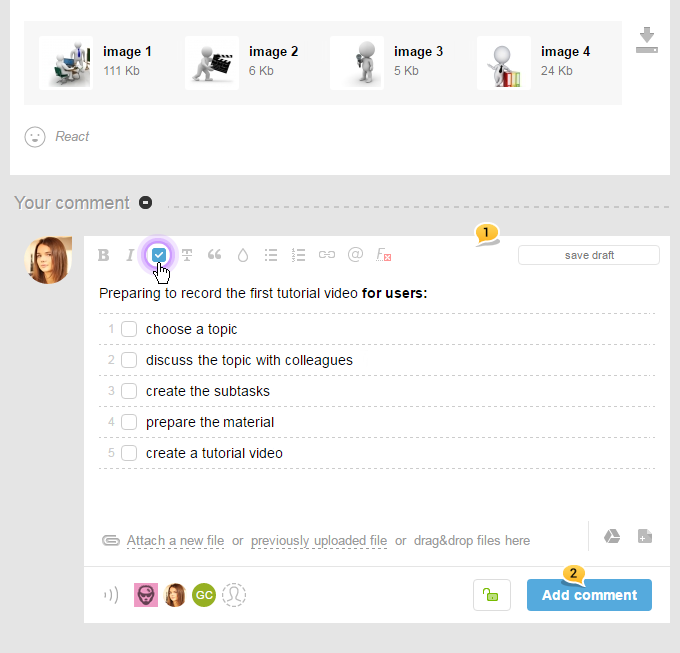
Let’s create a checklist for the current Task. Click «Your comment»1, describe what needs to be done, and create a checklist of things to be done for it.

It should be noted that Checklists may be created in Task or Subtask description as well.

Write down what needs to be done and click «Add comment»2.

Cross out each of the listed items upon completion:


Comments

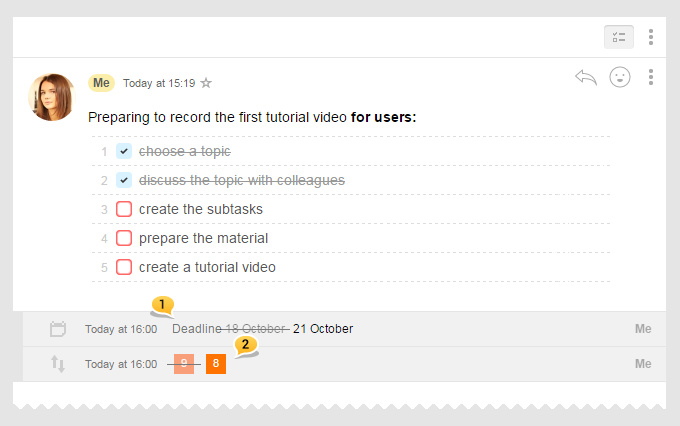
Let’s take a closer look at the Comments Feed. That is where you communicate with your colleagues about a Task or Subtask. Here you also may see the updates such as changed deadline1 or priority2, etc.


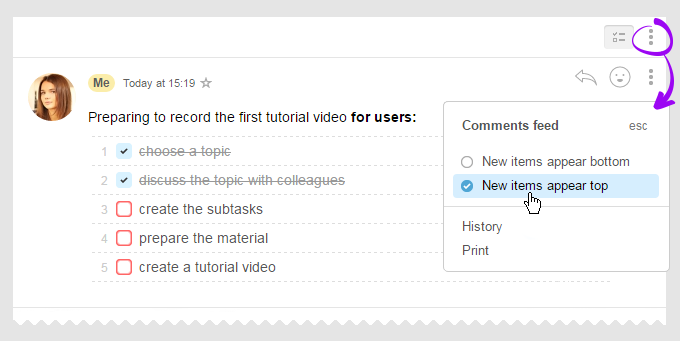
The Feed is customizable.

If you prefer to see the latest comments first, click the Feed menu and select Latest first.


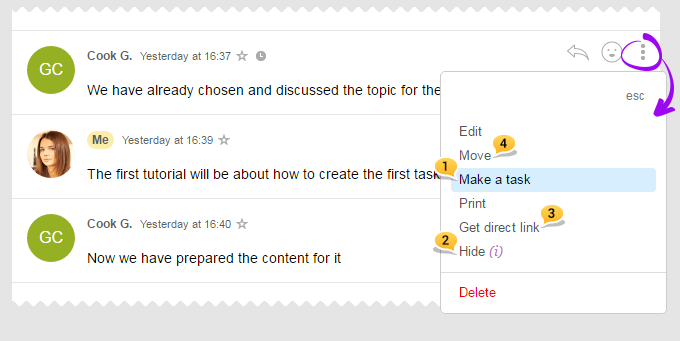
Each Comment has a menu where you may select different actions, such as turning Comment into a Task or Subtask1. You may also hide Comment2, get its link3 or move it to another Task or Subtask4.


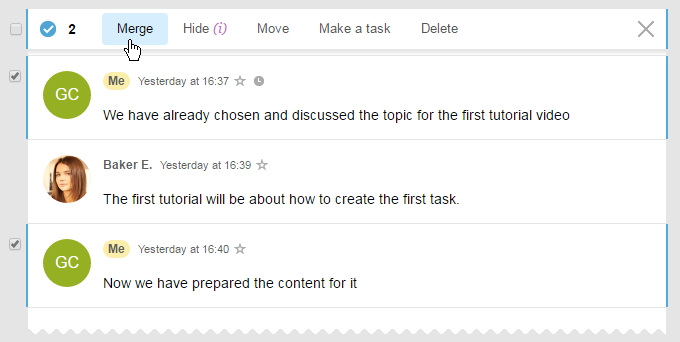
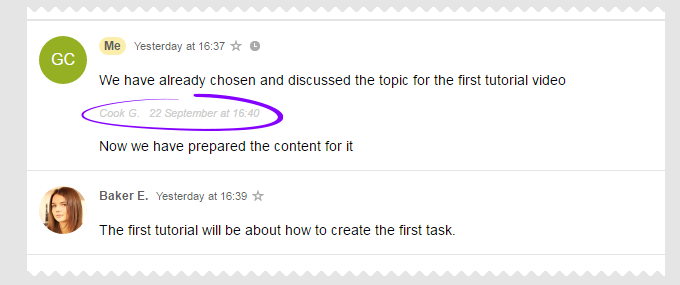
Comments may be merged into one:


In that case, the author and date of each Comment appear in the text of the comment.


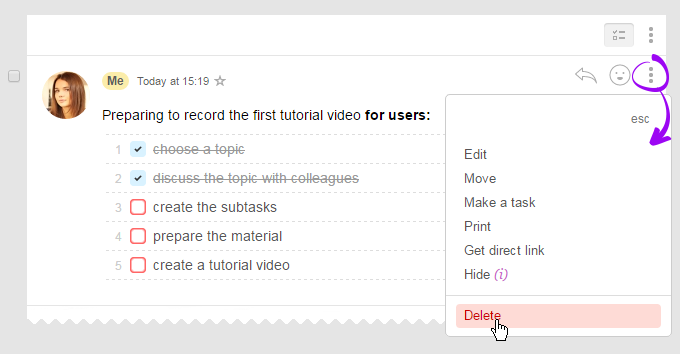
You can delete your comment if necessary.


Feed filter

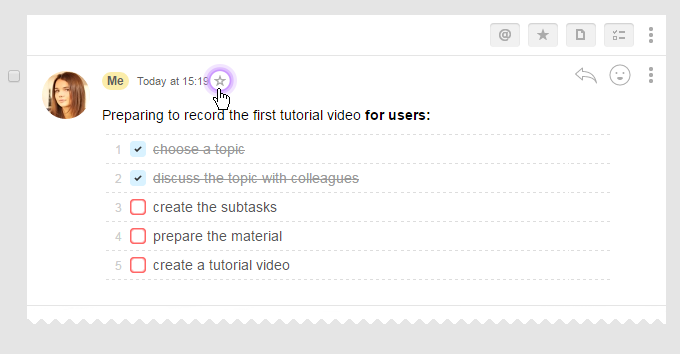
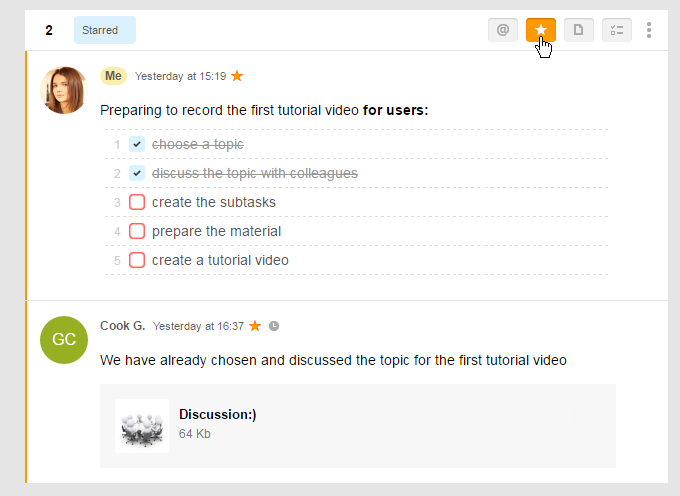
You can mark comments considered important with an asterisk.


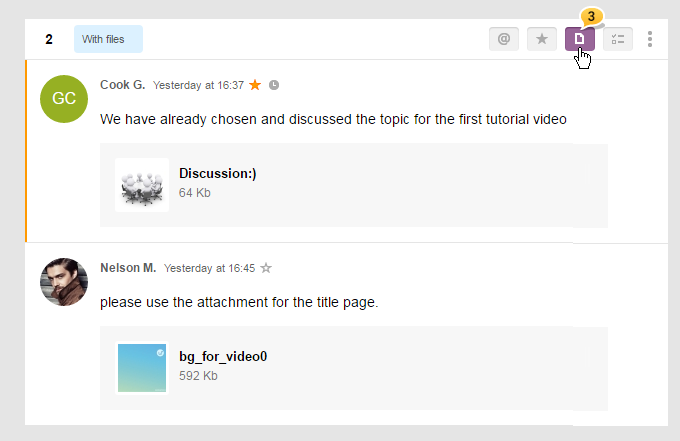
Click the asterisk icon near main menu to see the marked messages only. Such filter is useful when you need to find one specific message among many.


You can use other filters as well. Click1 and see all messages where you have been mentioned:


Click this icon2 to see unfinished tasks or mark their completion:


Click this icon3 to see messages with files attached.


Use quick filter of the Feed to save time when searching for necessary comments.

9 reactions

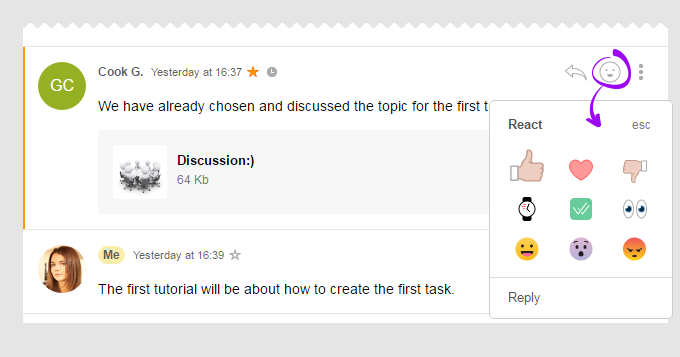
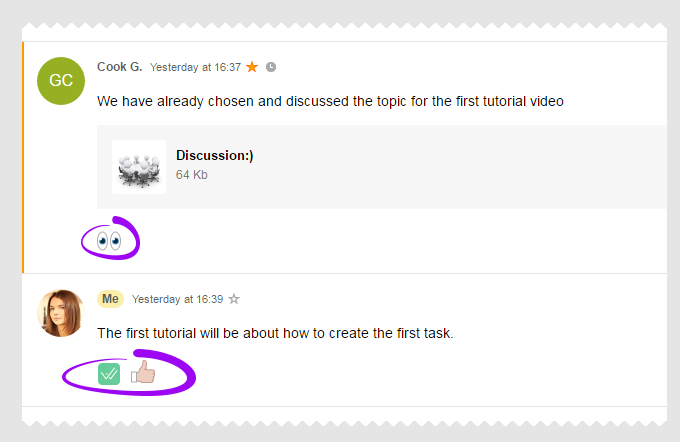
Quite often the comment requires a reaction rather than a detailed reply. Here we have 9 different reactions that can help you. They are not named but you can come up with their meaning.


For example eyes mean «I saw it»; watch «hurry up»; double tick «It’s ready, check it!»


You can use responses not only for Tasks but for each comment as well. Click the icon and select the appropriate response.

@mention

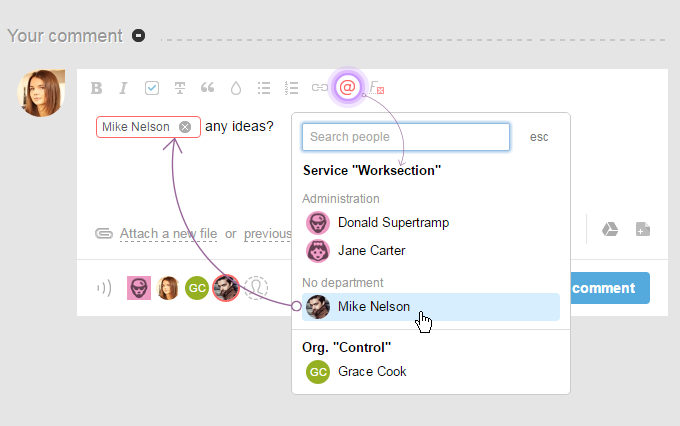
If you with to draw attention of a specific colleague to a comment, use @mention:


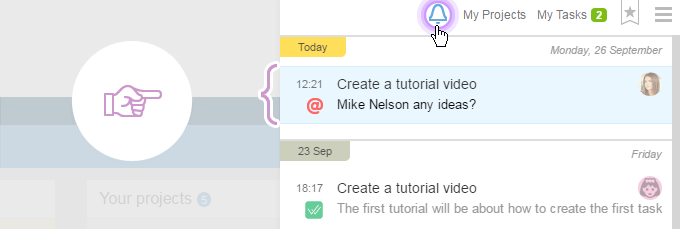
And this colleague will be notified both by bell and by e-mail. The notification appears in red.


Notification

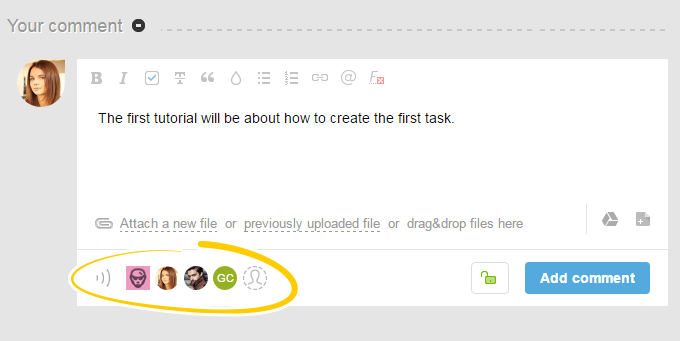
Please consider that when you write a comment to a Task or Subtask, only the constant subscribers of this Task or Subtask are notified. You may see their avatars.


If you prefer not to notify one or more constant subscribers, click the avatar of the one who should not be bothered; the avatar disappears. Only those remained, namely, whose avatars you still see, will be notified of your comment.

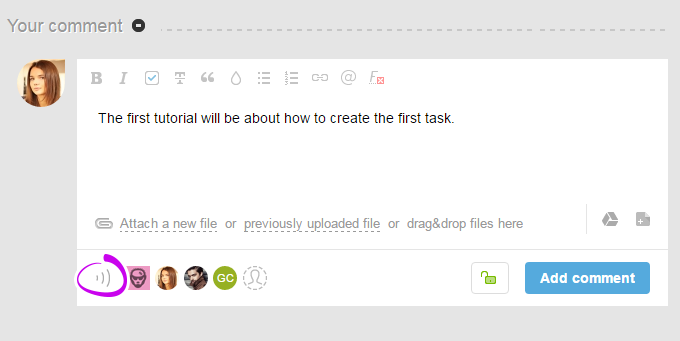
To disable all notifications at once, click the first icon:


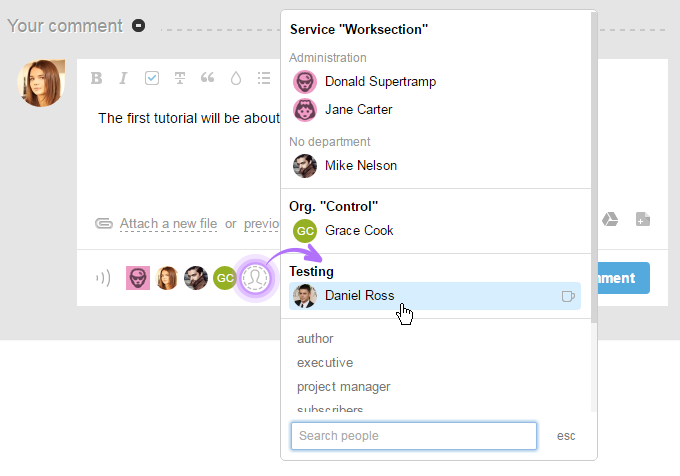
Please be reminded that apart from deleting subscribers, adding of those who are not subscribed for the current Task or Subtask is possible. Click the last icon Also, Notify and chose the person who shall receive the same notification.


Create Subtasks, Checklists, write Comments and use Reactions — this will make your work easier!

Have a productive worktime!

Worksection team

Ця стаття була вам корисною? Так, дякую! Ні

Quick access menu

Dear Colleagues!

Today we are going to learn how to quickly see the list of your goals, projects you are participating in, and selected tasks/subtasks and other pages of your account.

My tasks

No matter which page of your account is open at the moment, the top right corner shows the «My targets» menu. Here you may see all the tasks and subtasks assigned to you.


This list contains all your active tasks, and Worksection will notify you of certain updates in your tasks. A green-framed figure near «My targets» shows the number of tasks where you are an executive which need to be viewed:


Red frame means that tasks are out of date or, in other words, overdue:


Gray frame means that the deadline is pressing:


Task or subtask automatically disappears from that list after closing.

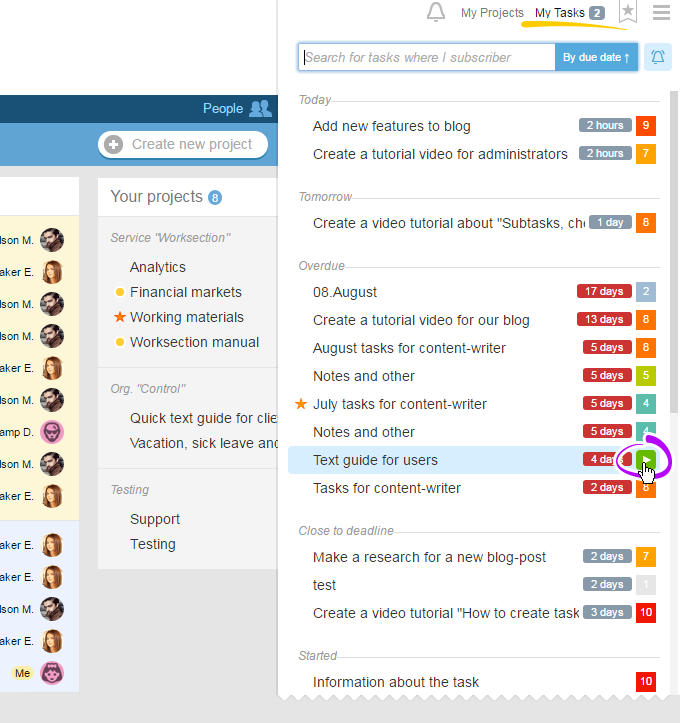
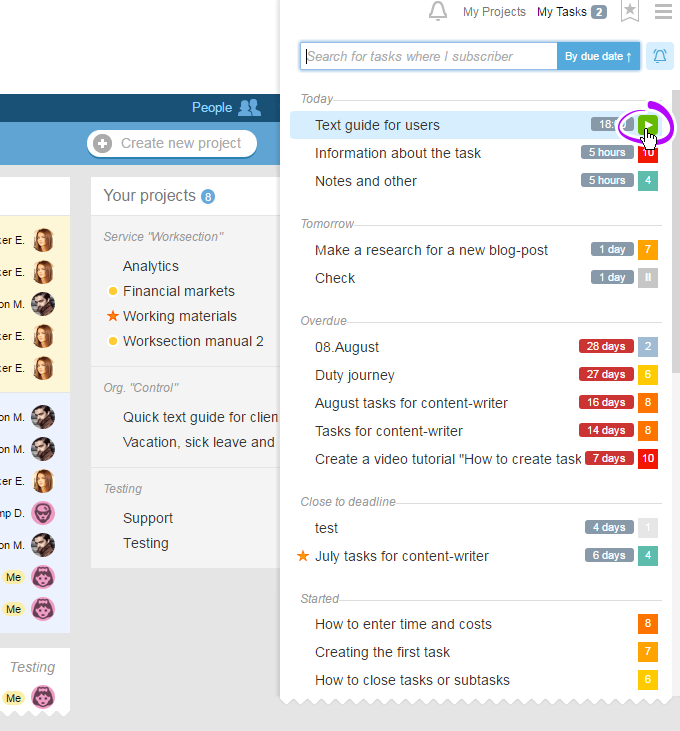
To enable timer directly from «My task» menu, hover a cursor over a task or subtask and, click timer start icon:


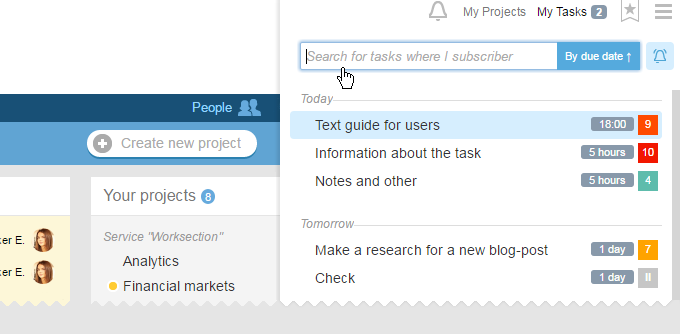
Use search box for quick search, if you have a lot of tasks and subtasks.


Group tasks and subtasks according to your needs.

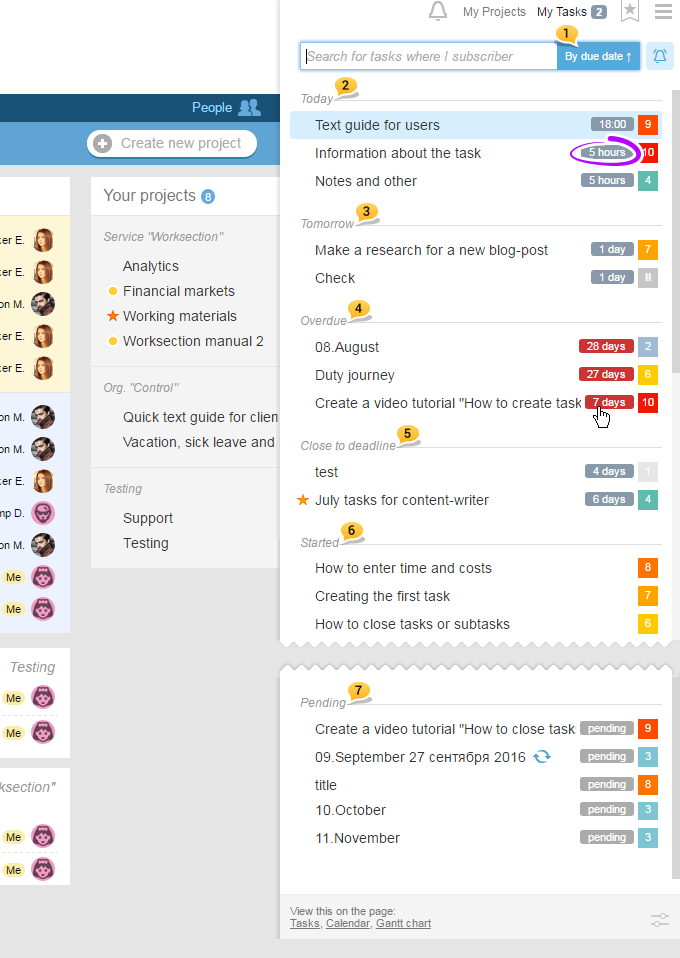
Please note that by default the tasks and subtasks are grouped by due date1, i.e. according to completion date. Field «Today»2 shows tasks that should be completed today and how many hours are left. The same is true for field «Tomorrow»3.

Overdue tasks and subtasks are in «Overdue» field4 with the number of days in red frame.

Check the «Pressing Deadline»5 group to see the list of tasks and subtasks with pressing deadline and the number of days left.

Next, we see the tasks that have already started6, and in the very end there are tasks and subtasks labeled as «Pending»7.


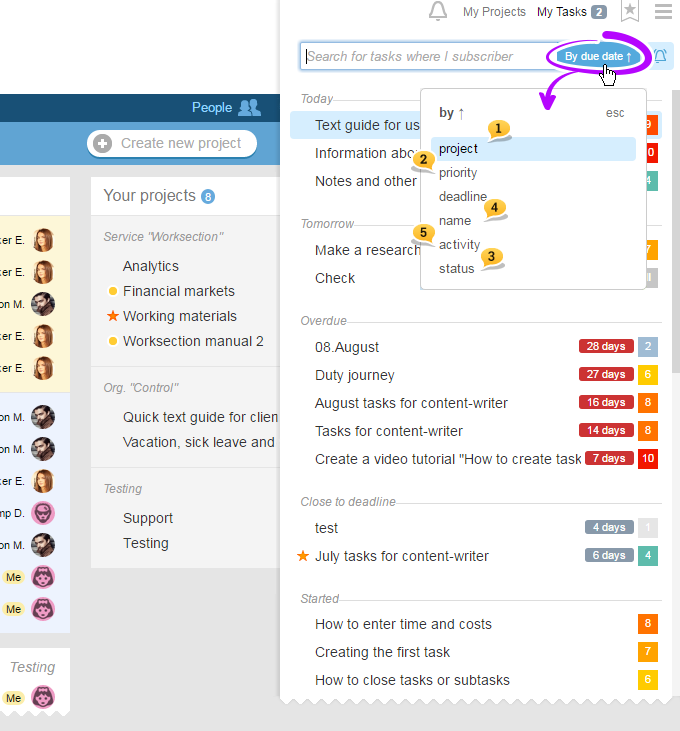
Should you need to group tasks and subtasks according to projects to which they belong, select «By Project»1.

Should you need to sort tasks and subtasks according to importance, select «By Priority»2.

If you filter «By Status»3, all tasks and subtasks are divided according to status which is very useful if you need to find the task with specific status, for example «New».

The tasks and subtasks can also be filtered according to their name4 and the latest action date5:


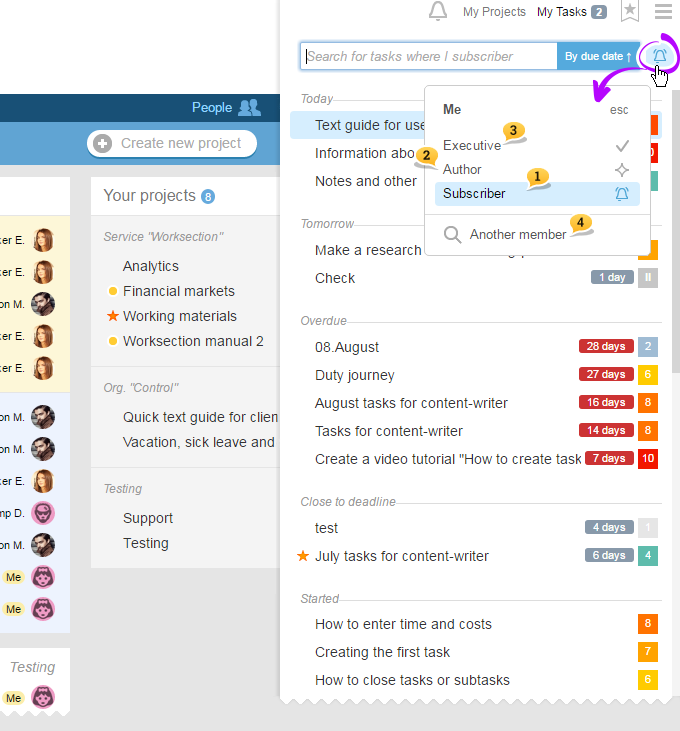
By default, you are viewing the list of tasks and subtasks you are subscribed to1. Click the following icon to see the list of tasks or subtasks where you are the author2 or executive3.

Option «Another member»4 allows you to choose any colleague and to see the tasks and subtasks in which he or she is an executive.


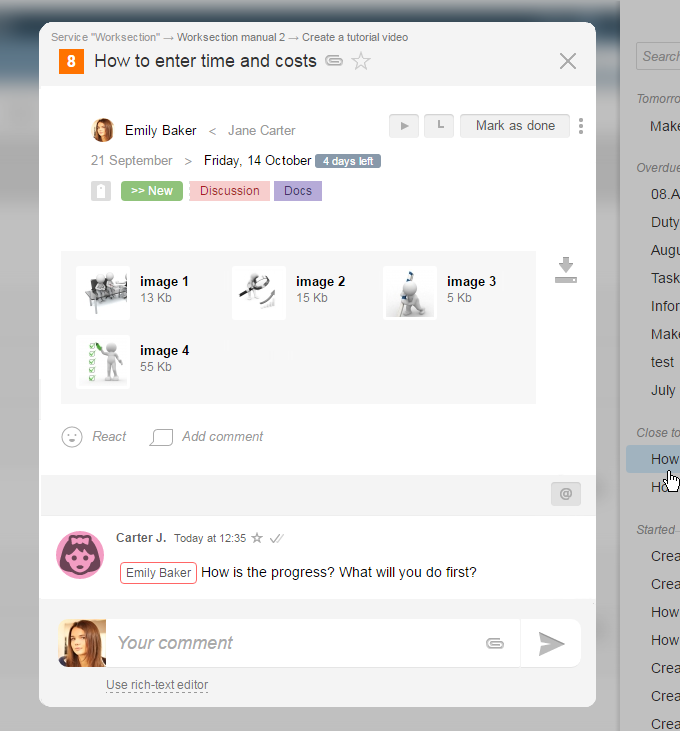
Click the name of any task or subtask to open preview:


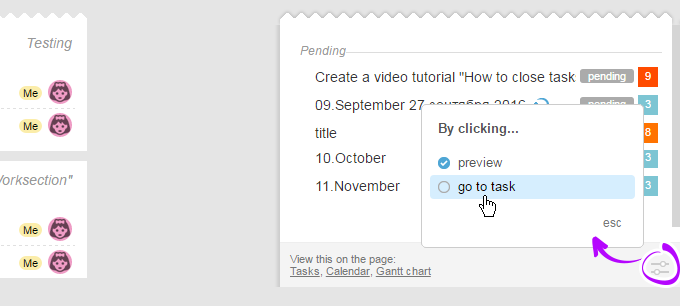
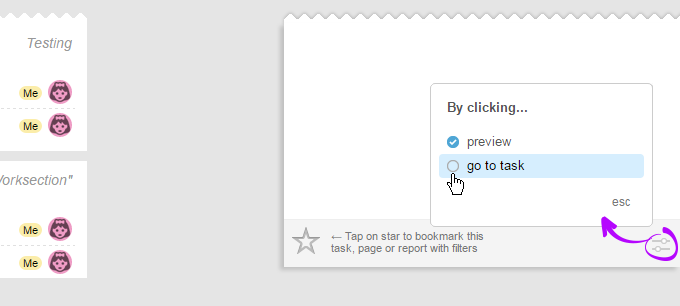
If you wish to get to task or subtask immediately, click the Panel Expand at the bottom of preview window and select Go to task:


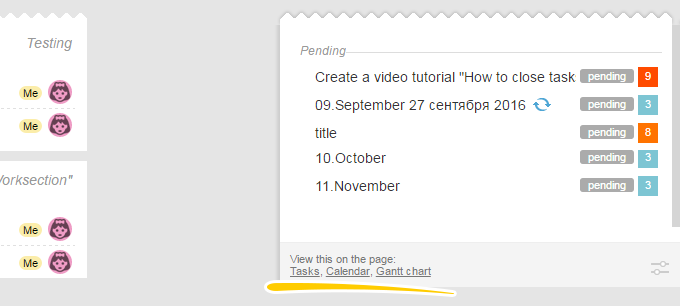
Furthermore, here you have quick access to Tasks, Calendar and Gantt Chart for the same tasks.


My projects

No matter which page of your account is open, use «My projects» menu to get access to all active projects that you are involved in. This menu helps you to switch from one project to another without returning to the main page of your account.


Here1 you can see a list of recent projects you have been working with lately. Such list contains only five projects.

This box shows all active projects2.

However, if you haven’t found the project you were looking for, check the archive by clicking «Archived Projects»3 at the bottom of the page.


My favorites

If you regularly work with the same tasks and subtasks, lists of tasks or reports, add them to bookmarks for quick access. To do so, click asterisk near the task and subtask name:


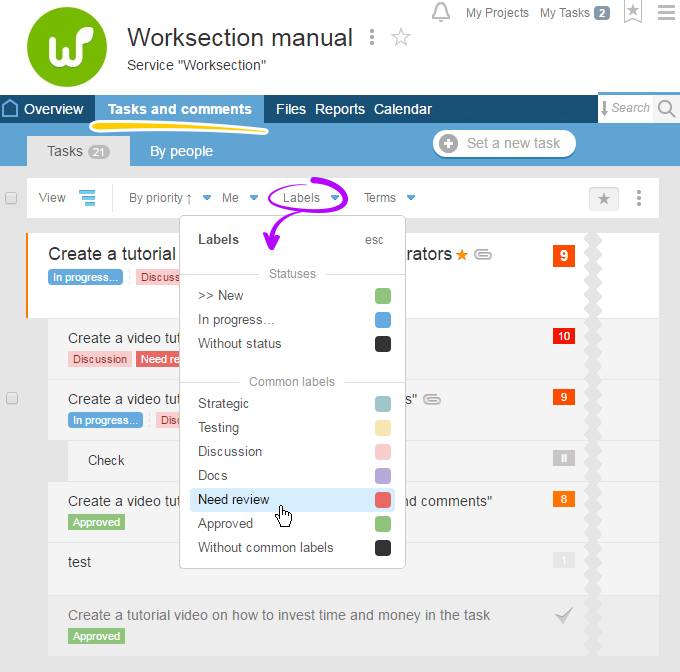
or set parameters:


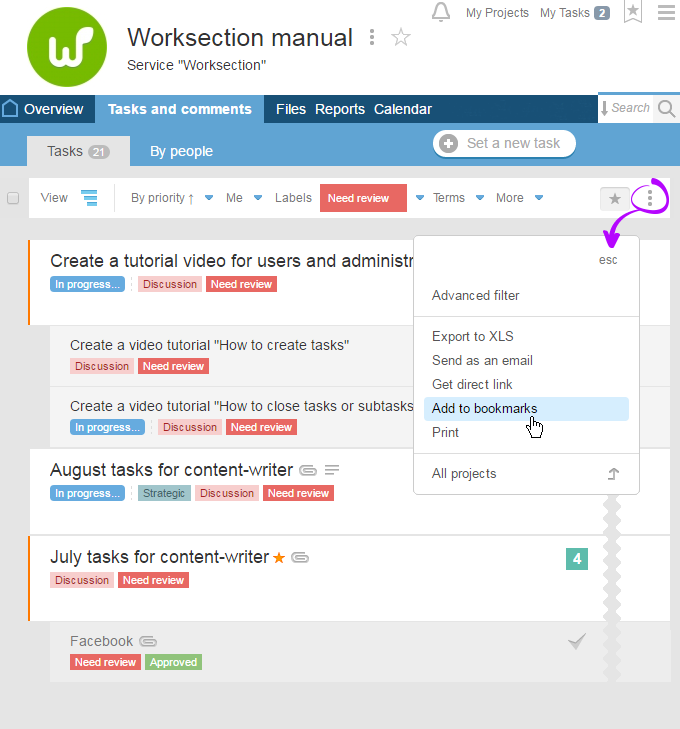
and add the list to bookmarks using three dots menu:


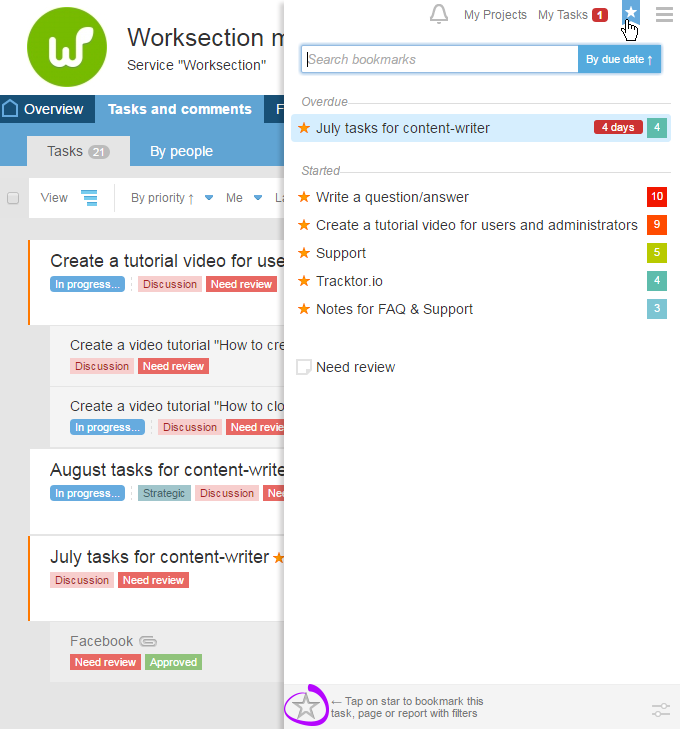
or use quick access clicking asterisk at the bottom.


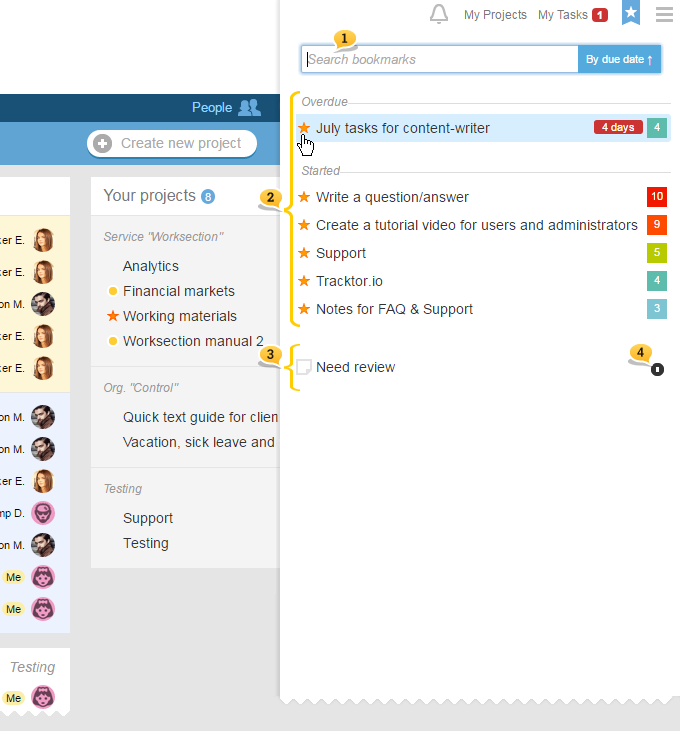
Go to the «Bookmarks» menu to see all bookmarks.


If you have many tasks and subtasks in this list, use search and filters1, identical to those in «My tasks» section.

All tasks and subtasks of the account, marked with asterisk, are shown at the top2. Press asterisk to delete it and remove one of the items from the list.

Following is the list of pages saved from account with applied selections and filters3. Press this icon4 to remove the saved page.


For your convenience, you can expand the panel, namely to see preview or to go directly to a task or subtask:


Use quick access menu to go immediately to the desired task, subtask, or the list of tasks or reports!

Have a productive worktime!

Worksection team

Ця стаття була вам корисною? Так, дякую! Ні

Some API method

Пример get_costs_total запроса
🤖 посилання на Postman
🤖 попробовать в Postman

https://your-domain.com/api/admin/v2/?action=get_costs_total&hash=HASH
Возвращает данные по суммарным внесенным временным и финансовым затратам задач и подзадач
При отсутствии параметра page будут получены затраты по всем проектам аккаунта

Необязательные параметры:
  • page — возвращает затраты указанного проекта/задачи/подзадачи (см. формат ссылки)
  • datestart и dateend — диапазон дат для поиска данных в формате DD.MM.YYYY (даты считаются включительно)
  • is_timer — возвращает сумму только по тем строкам затрат, в которых время:
    1 — внесено с таймера
    0 — внесено вручную

Пример JSON ответа
При успешном выполнении запроса, ответ будет содержать статус ok и следующие данные:

{
"status": "ok",
"total": {
"time": "HH:II",
"money": "0.00", }
}

📄 Альтернативна документація 
🤖 тестування методів у Postman
Ця стаття була вам корисною? Так, дякую! Ні
esc
или
Роздрукувати