Controlling a project involves systematizing, generating reports for any period, and tracking project costs at various stages of its implementation.
What is a Project Plan?
A project plan is a document that defines the goals, tasks, resources, and stages of project execution, along with their timeline. It includes a work schedule, costs, risks, and management strategies to effectively achieve project goals.
A project implementation plan is a strategic document outlining the objectives, tasks, deadlines, and resources required for successful project execution. It creates a clear structure aimed at achieving goals.
How to Create a Project Implementation Plan
Creating a project implementation plan is a critical step for success. The general description defines the main parameters and goals of the project, establishing a basic structure for further detailed review.
Step 1: Define Project Goals and Parameters
The first step is defining the goals and main parameters, helping to form the overall concept of the project, which includes:
- Goals
- Scope of work
- Key execution conditions
Step 2: Execution Strategy and Resource Allocation
The second step involves developing a strategy for executing specific tasks and identifying the resources needed for their implementation. Describing each task and identifying key participants helps avoid misunderstandings and ensures efficient resource use.
Step 3: Communication Plan and Success Metrics
The third step focuses on developing a communication plan and defining success metrics. Ensuring effective internal and external communication guarantees mutual understanding among all parties and timely response to changes. Defining success metrics provides specific criteria for evaluating results.
Step 4: Risk Management
The fourth step consists of identifying risks and developing management strategies. Analyzing potential challenges and preparing for their resolution makes the plan more flexible and adaptable to changes.
Step 5: Summary and Final Refinement
The final step is summarizing and refining the entire plan. This involves a final review of all steps, considering all corrections and improvements. The concluding stage ensures the completeness and consistency of the project implementation plan before execution.
Controlling Project Implementation Stages
Controlling the stages of project implementation involves comparing planned timelines and budgets with actual figures at various stages of project work. In the past, quality control of a project involved filling out numerous papers (some of which inevitably got lost), but today, project implementation can be monitored using a project management system.
Now, all project work will be within a single system. This means no more paper reports, rough expense reports at the end of the month, unexplained deadline misses, and chaotic task execution.
Project Implementation Steps
- Create a Project: The name should be clear and concise, and the description should be precise.
- Add Files: If the team needs to work with files for project implementation, add them.
- Set Deadlines: Having deadlines allows for detailed planning of project work.
- Specify Planned Expenses: This can include the amount of time and budget likely needed for project implementation, or one of the two: time or budget.
- Assign a Project Manager and Responsible Person: This can be the same person or different individuals.
Having a Project Manager and Responsible Person increases the chances of successful project implementation. The Manager’s task is to monitor and control the project’s execution. The Responsible Person’s task is to follow the pre-approved project plan, communicate with the team, promptly identify and make changes, prepare project reports, and more. - Select Status and Tags: Each project within the management system can have one status and several tags. Status and tags can change during the project’s implementation stages. Control tools such as status and tags become key elements.
Planning Task Execution for the Project
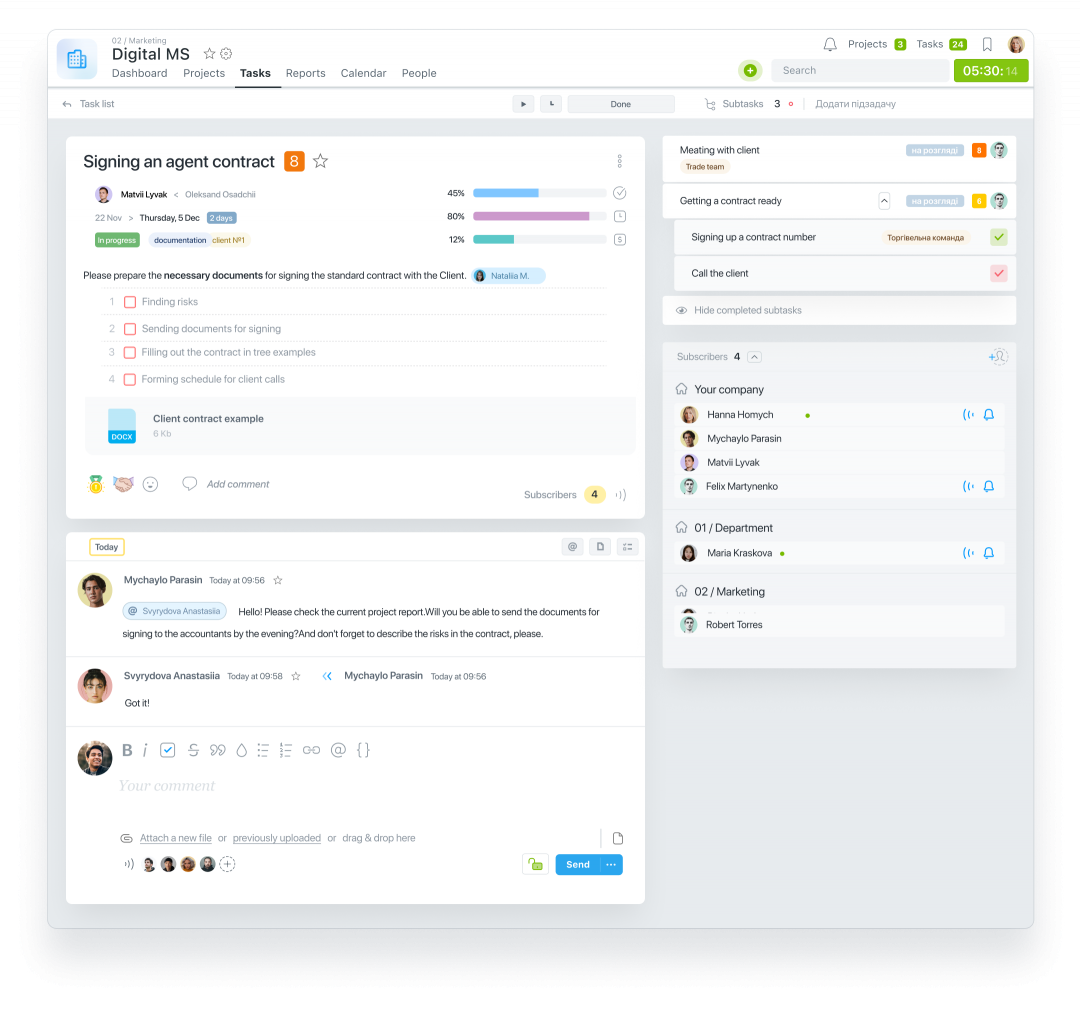
When the project and its information are entered into the project management service, the next step is breaking the project down into individual tasks. As with the project, each task can include:
- Title
- Folder (select the team that the task belongs to)
- Responsible Person
- Status and Tags
- Deadline
- Planned Expenses
- Team
How to Control Task Execution
Each task has initial data that can change during the work process. For example: if 20 hours were planned for a task but 30 were actually spent.
Comparing the Plan and Fact allows for justifying to the client why specific task expenses need to be adjusted.
It’s best to entrust task execution control to one employee, such as the Responsible Person for the task.
Tools for Controlling Project and Task Implementation
Now that individual tasks within the project are created and documented, it’s crucial to effectively use control tools.
The process of implementing a project management system can be challenging for the team (anything new is often met with resistance), so it’s essential to explain why specific tools are important for the team’s overall results and each member’s efficiency.
You can independently test the project management service, then help the team adapt to new project and task management rules. Alternatively, appoint someone responsible for training the team.
Tool #1: Timer
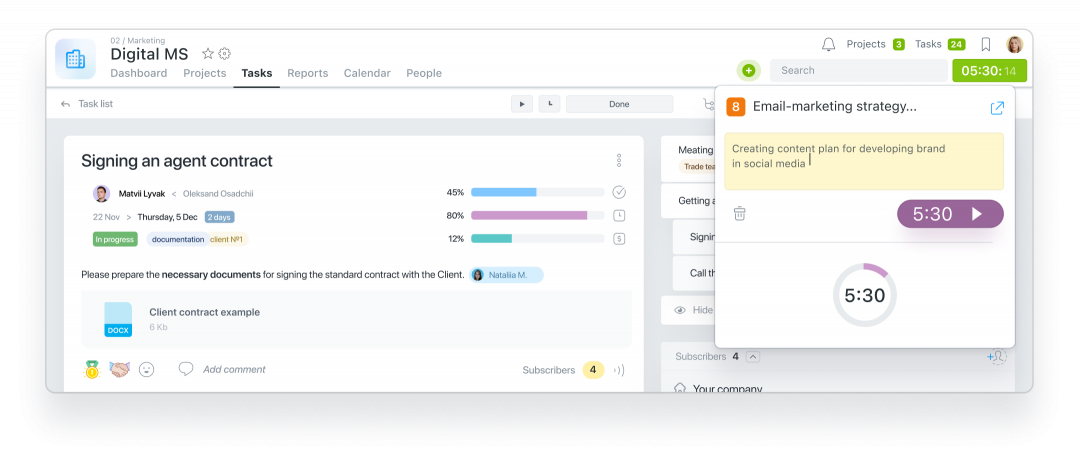
The timer can be used for each task. If multiple people work on a task, the timers’ totals are summed, but each participant sees their data and can use it in reports.
The timer allows controlling actual time spent on a task. Using the timer will become a beneficial habit if the team understands its importance.
Why is it important to start the timer for a task?
It clarifies actual time expenses, and if they differ from the plan, this can be shown to the Manager or client for plan adjustments.
If not all employees start the timer at the beginning of a task, they can enter the actual time spent afterward: the amount of time and cost of this time or just one of the two.
Tool #2: Calendar
All tasks with set deadlines will appear on the Calendar. But that’s not all the advantages of the Calendar within the project management system.
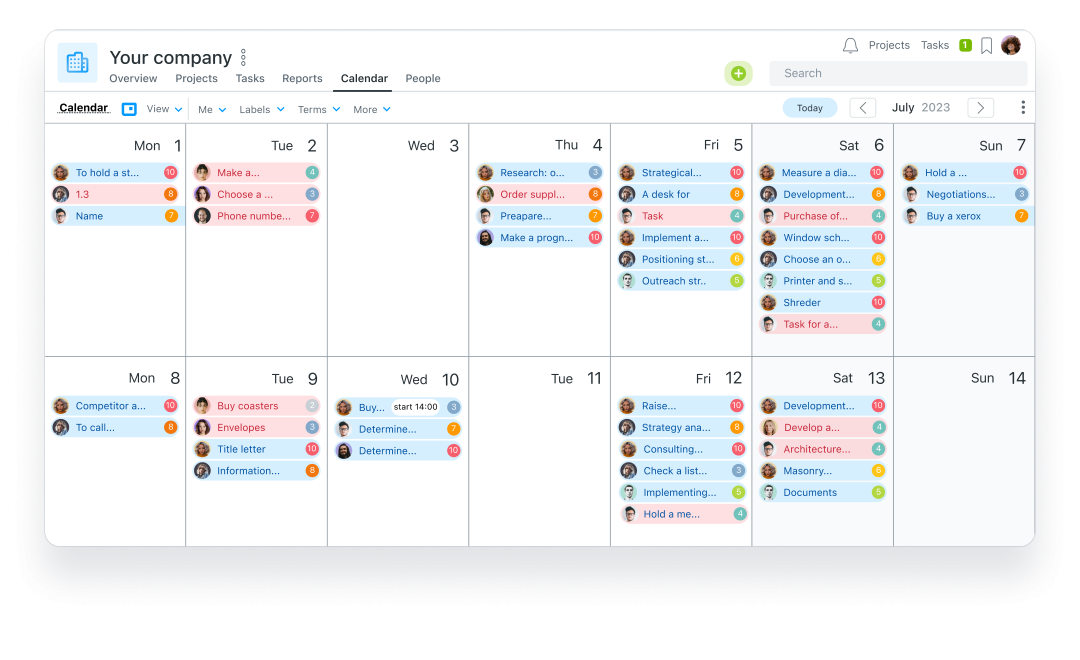
On the Calendar, you can also:
- See start and end dates of vacations/sick leaves for employees
- Filter tasks by tags, statuses, priorities
- Filter tasks by entered data, attached files
Tool #3: Kanban
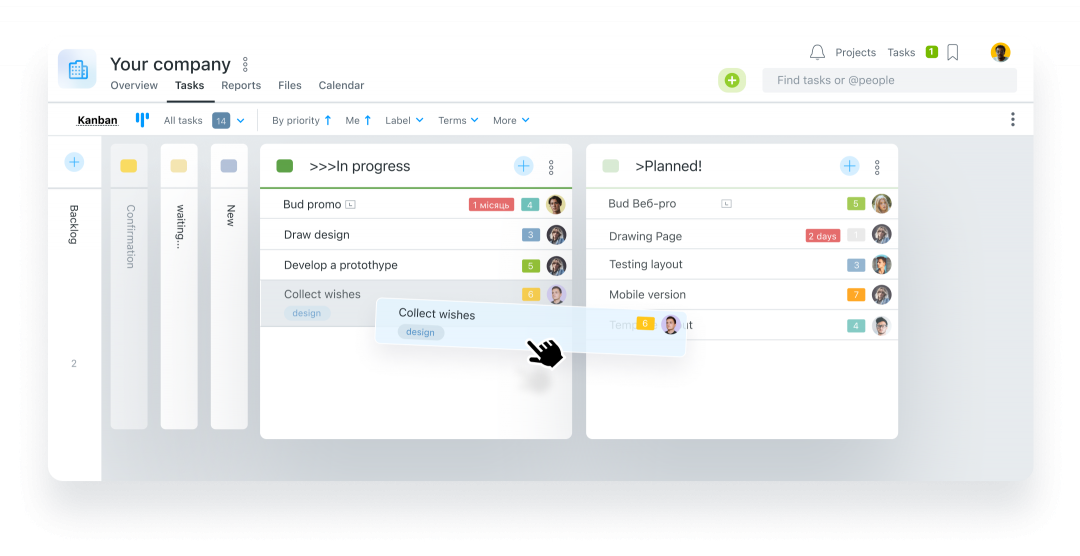
This is a visualization board showing tasks at different execution stages. Execution stage = status. To move a task on Kanban, a status must be set.The advantage of Kanban as a visual control tool is the ability to drag tasks from one stage to another. Visually, Kanban looks like separate columns (previously, these were colored stickers on a physical board). Each column corresponds to a specific status.
For example, there is a task to create a commercial proposal. The first stage is writing. This task will be given the status “Writing”. After the text is written, the task can be moved to the next stage (dragged to the next column), changing the status to “Design”.
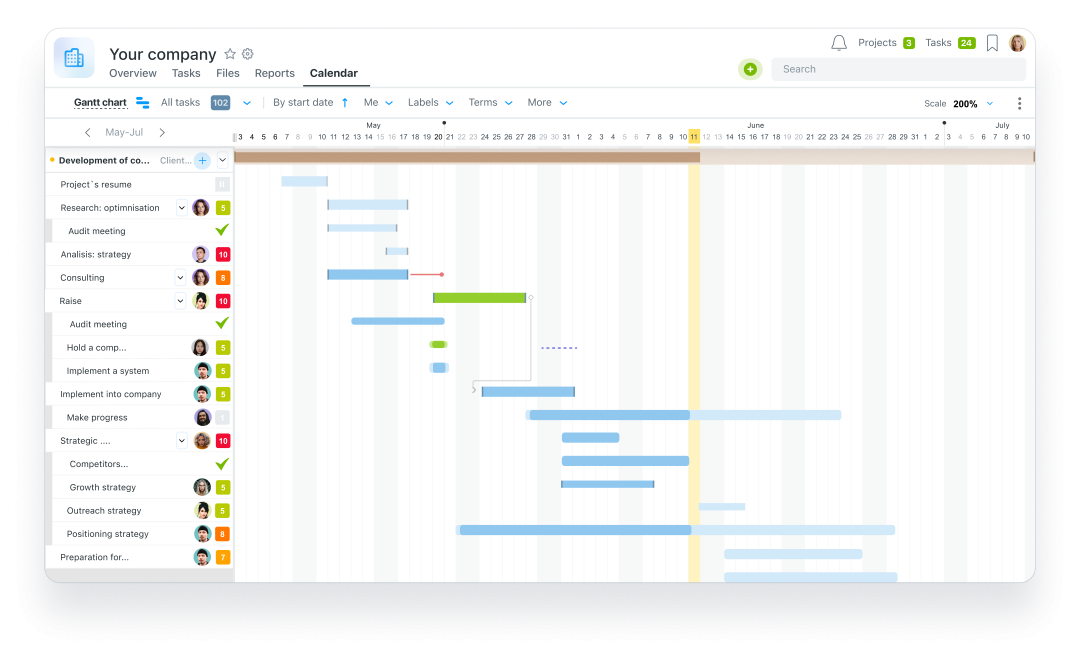
Tool #4: Gantt Chart
Another visual control tool. Projects, tasks, and subtasks are displayed on the Gantt Chart. You can change a task’s deadline on the Gantt Chart without editing the task.
The Gantt Chart is a project roadmap tracking connections between tasks, critical points, start and end dates of task execution.
Control task execution with the Gantt Chart based on visual color indicators of deadlines and creating task connections. For example, if a task’s deadline is delayed, it will be indicated on the Gantt Chart with a color indicator.
How to link tasks on the Gantt Chart?
You can link the finish date of one task to the start date of another if they are related and the second task’s result depends on the successful completion of the first.
Tool #5: Reports
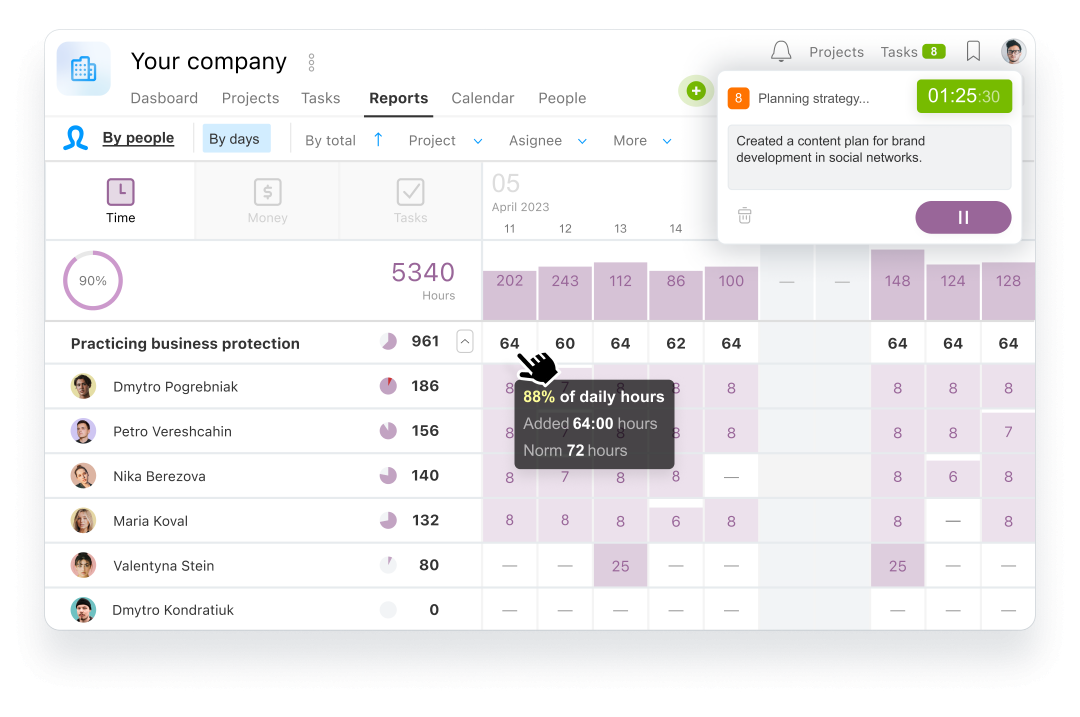
Project management systems can generate and export reports for any period and needed parameters. Reports no longer close at the end of the month based on approximate data. The exported report for a day, week, month, year, or any manually selected period will show exact information on project tasks.
For example, a report on tasks with planned expenses, actual expenses, timer start, with or without comments, tasks with certain tags and status, by priority and finish date.
The variability of reports makes project and task control flexible. Choose the timeframes and parameters for report generation yourself. For new projects, it’s best to do reports for short periods: day, week. This allows timely adjustment of the work process and avoidance of costly mistakes.
What to Look for When Choosing a Project Management System?
- Availability of tools for quantitative control (time and money)
- Availability of tools for visual control (Kanban, Calendar, Gantt Chart, Report)
- Ease of use: it’s essential that the system’s functionality is understandable and convenient for the entire team, from the accountant to the developer.
- Ability to detail data on projects and tasks (availability of filters)