Effective project management is essential for team productivity. It helps to systematize tasks and keep track of how they are performed by employees. Choosing the right project management tool can greatly affect how seamlessly tasks flow, track, and collaborate within a workplace.
There are many project management systems to choose from. Tools such as Jira, Asana, and Worksection cater to a variety of needs, from basic project management to more advanced workflows. There are specific settings for each program. The creation of a project is a key stage that will determine the outcome of its implementation. Therefore, it is important to have an understanding of all the details before you begin work.
This guide provides detailed step-by-step instructions on how to create a project in these services.
A Step-By-Step Guide to Creating a Project in Each Tool
How to Create a Project in Worksection
Worksection is a great choice for small or midsize companies that work hourly or want to start managing work consistently. Let’s look at how to create a new project in Worksection.
Step 1: Go to Worksection and Start a New Project
Open your Worksection account. To start a new project in Worksection click a “+” button and choose New project.
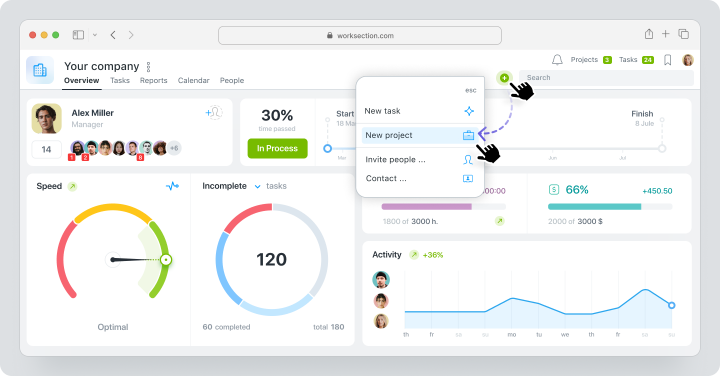
Step 2: Customize Project Details
Add a project name and description in the new editing window. Include any relevant documents or notes that will help the team understand the scope of the project. Assign a manager, a person who will have oversight of the entire process. Set a deadline and time and budget limits.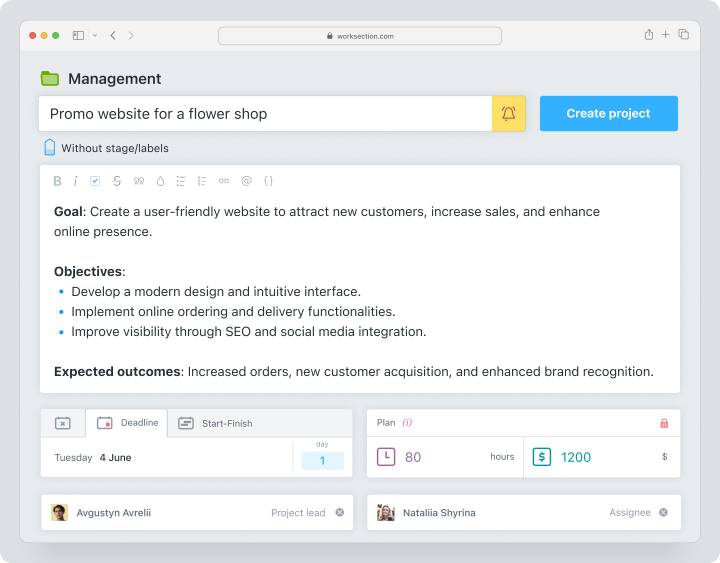
Step 3: Add Team Members and Clients
In the same window, you can add your team, including your co-workers and clients.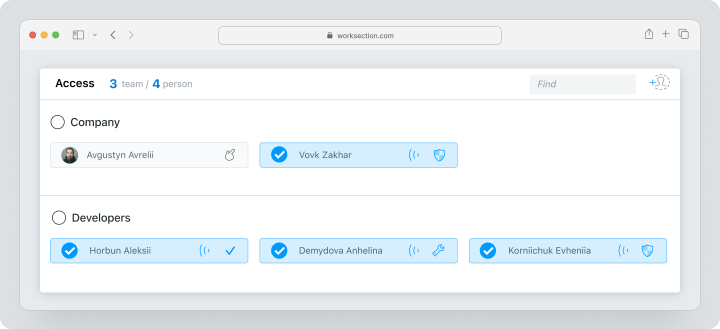
Important note! Information about expenses is not available to client teams.
Step 4: Configure Project Restriction and Permissions
Worksection gives you the opportunity to customize the project according to your company needs. Choose whether users are allowed to delete or edit tasks, specify required fields for a task, etc.
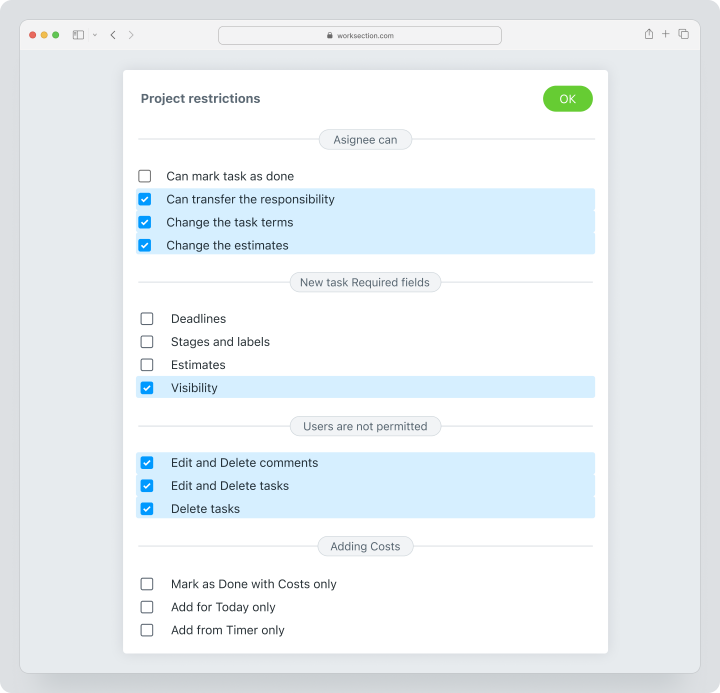
Step 5: Finalize and Create Project
Click the Create Project button as the last step. Set project-specific parameters like time tracking and budgeting. Customize notifications to keep the team updated and informed. After that you can start adding tasks and start working on the project.
Pros and Cons of Creating Projects in Worksection
Like its competitors, Worksection has strengths and weaknesses.
| Pros | Cons |
| Intuitive and easy-to-use interface. | Limited customization compared to competitors. |
| Built-in time tracking and cost analysis tools. | May lack depth for specialized technical workflows. |
| Affordable pricing, ideal for SMEs and startups. | |
| Granular user roles and permission settings. | |
| Quick onboarding with live support from product experts. |
How to Create a Project in Jira
Jira is a powerful project management tool. It’s known for its advanced customization options, especially for software development teams. Let’s see how to create a project in jira.
Step 1: Ensure Proper Authorization (Optional)
Make sure you have the necessary permissions before starting a new project in Jira. Typically, creating a new project requires Administrator access. If you’re not sure about the level of access you have, contact your Jira administrator to confirm the status of your permissions.Step 2: Create a New Project
Locate the Projects drop-down menu in the main navigation bar once you are logged in to Jira. Click on it and select Create Project from the options displayed. It takes you to the project creation screen.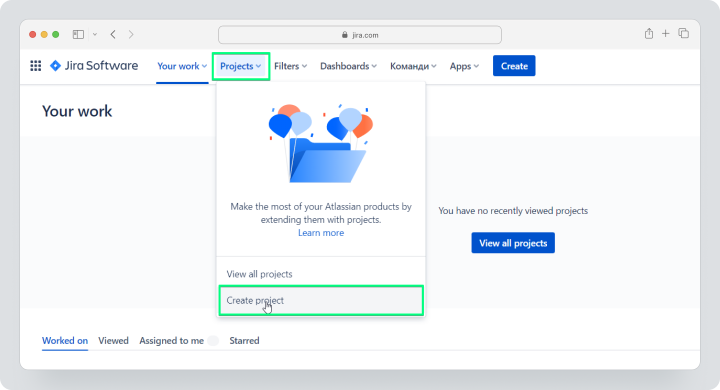
Step 3: Enter Project Details
Jira provides a variety of templates. These templates are tailored to different methodologies, such as Scrum, Kanban, or Bug Tracking. Choose a template that matches your project’s workflow requirements to ensure proper structure.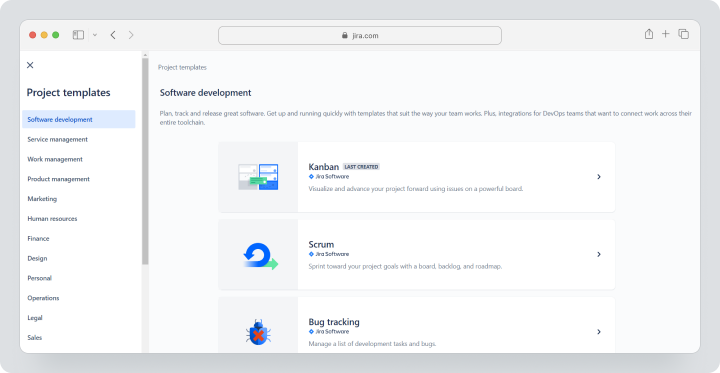
Step 4: Configure Project Settings
Enter the name of the project and a unique key that will be used as an identifier for issue tracking purposes. Specify the project owner. Customize settings such as default assignee and notification schemes to suit your team’s preferences.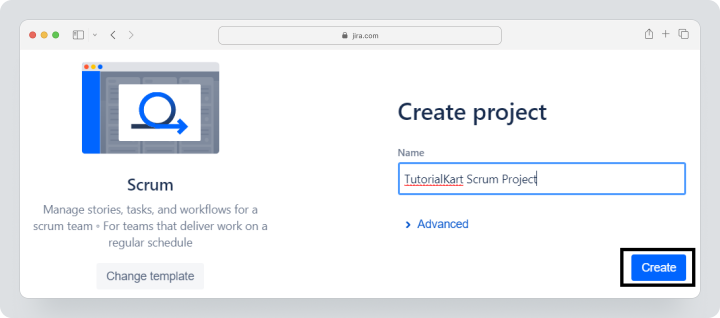
Step 5: Add Users and Define Roles
Define the project’s permissions scheme to control the level of access users have. Assign roles such as developers, testers, and viewers. Ensure that each team member has the appropriate permissions for their responsibilities.Pros and Cons of Creating Projects in Jira
Once you know how to create a new project in Jira, it’s important to understand all the pros and cons. That’s why we’ve prepared a short table for you.
| Pros | Cons |
| Highly customizable to suit various workflows. | Tough integration for non-technical users. |
| Excellent for tech organizations with complex needs. | Prices may be too high for teams with limited funds. |
| Robust issue tracking and reporting capabilities. | |
| Extensive integrations with third-party tools. | |
| Robust issue tracking and reporting capabilities. |
How to Create a Project in Asana
Asana’s flexibility and easy integration make it an excellent choice for teams of any size. Here’s a step-by-step guide on how to easily create a new project in Asana
Step 1: Go to app.asana.com
Log in to your Asana account. If you’re part of a team or organization, make sure you have the permissions you need to create projects in the workspace you’ve selected.
Step 2: Start a New Project
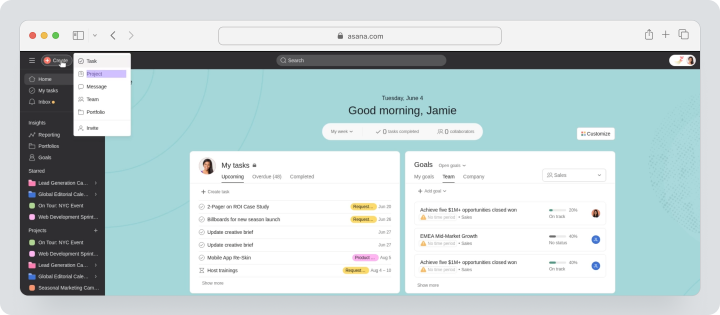
Click the “+” button next to New Project in the sidebar to start a new project. This will bring up a dialog box that prompts you to start a new project.
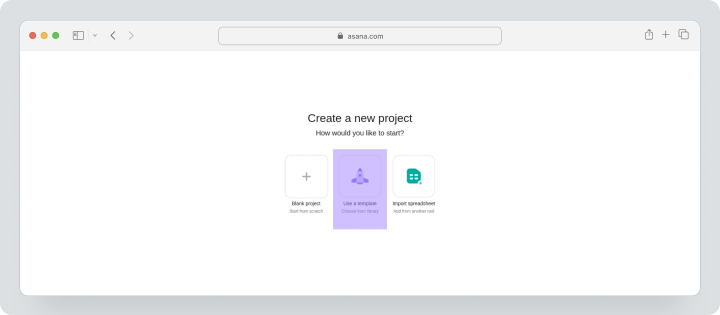
Step 3: Select Project Type (Template, Blank, etc.)
Asana offers several templates for common workflows, like marketing campaigns or product launches. Choose a template that fits the requirements of your project, or create a blank project to fully customize. You also have the option to import a spreadsheet.
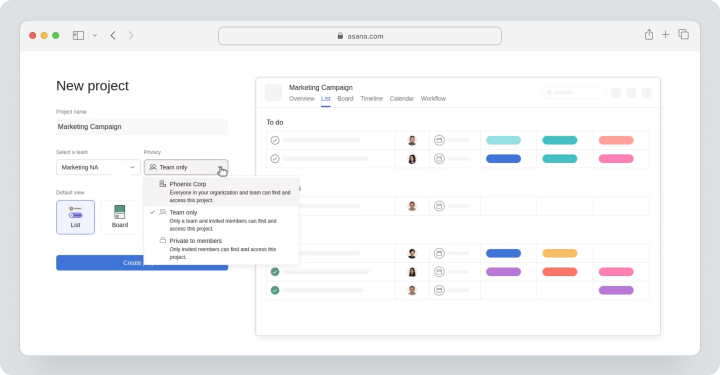
Step 4: Define Project Accessibility (Team or Organization)
Customize privacy settings. Decide whether to make your project available to the entire team, to specific individuals, or to the organization as a whole. This feature is critical for maintaining confidentiality when handling sensitive work processes.
Step 5: Finalize and Create Project
Add important details like task descriptions, due dates, and team assignments. Asana is versatile enough to meet your team’s needs, allowing you to organize tasks using boards, lists, or calendars.
Pros and Cons of Creating Projects in Asana
It is also essential to be aware of the positive and negative aspects of working with Asana, if you are only in the process of picking a service to use.
| Pros | Cons |
| User-friendly interface with minimal learning curve. | Pricing can be too high for teams on a tight budget. |
| Flexible views: list, board, and calendar. | Project management with timer available only on advanced plan |
| Real-time online collaboration and team communication tools. | |
| Suitable for large and medium-sized teams. | |
| Offers templates for quick setup. |
Comparing Project Creation Features in Worksection, Jira, and Asana
A project management tool that works with your workflow can benefit any business. These tools increase productivity, streamline task delegation, and improve visibility.
However, implementation is a challenge for many business owners. Complex set-ups and inadequate access controls can be a barrier to adoption, especially in the case of sensitive data. Issues such as these underscore the need for solutions that prioritize ease of use and robust privacy customization.
The following comparison evaluates Jira, Asana and Worksection against key criteria. It will help you choose the right project management tool to optimize your team’s workflow.
Feature Comparison Table
| Feature | Worksection | Jira | Asana |
| Ease of Setup | Quick onboarding with minimal learning curve. | Complex, designed for tech-heavy environments. | User-friendly with guided tutorials |
| Customization | Versatile, with intuitive status and tag settings | Highly configurable workflows and plugins | Wide, includes task templates |
| Collaboration Tools | Integrated communication features within task | Advanced issue tracking and comments | Real-time collaboration and messaging |
| User Roles | Clear hierarchy with adaptable account roles | Granular, tailored to advanced tech users | Simple role differentiation |
| Permissions | Adjustable, ideal for service and small businesses | Robust, supporting detailed restrictions | Team-level controls |
| Time Tracking | Built-in time tracking and reporting | Available with configuration | Available for advanced plan |
| Price | From $3.4 | From $8.15 | From $10.99 |
Jira, Asana, and Worksection each address different needs for managing workflow. With granular customization and robust permissions, Jira is ideal for tech-heavy environments. Asana simplifies project management with an easy-to-use interface and basic collaboration project management tools. Worksection strikes the right balance with a quick onboarding process, built-in time tracking, customizable roles, and cost-effective pricing.
Why Worksection is the Best Choice for Project Creation
Worksection’s application combines an intuitive dashboard, robust features, and user-friendly tools to streamline project creation and management. Designed with structured and transparent workflows in mind, Worksection organizes tasks within clearly defined projects. These can represent specific clients or departments, ensuring clarity across all levels of work. Each task can be detailed with sub-tasks, labels, and statuses, which help teams track progress and specifics efficiently.
The dashboard simplifies complex workflows by presenting all key details in one view, making monitoring seamless. For enhanced accountability, each task is assigned a responsible person, and team activities are automatically reflected in detailed reports.
Worksection’s role management system offers a clear distinction between administrative and user roles. This enables teams to control access, ensuring sensitive data remains secure while stakeholders have the visibility they need.
Communication is enhanced with built-in discussion fields for each task, fostering transparency and minimizing miscommunication. Additionally, privacy features, like customizable access levels, are crucial for maintaining security in collaborative environments.
| Key Features | Worksection |
| Ease of Setup | Quick and user-friendly with live tech support |
| Role Management | Flexible and customizable |
| Dashboard | Comprehensive and intuitive |
| Privacy Options | Advanced access controls |
| Time Tracking | Built-in, no extra setup |
| Communication | Transparent discussions within tasks |
| Affordability | Budget-friendly plans |
Worksection is a versatile solution tailored to meet the needs of businesses seeking efficient, structured, and transparent project management.
Final Thoughts: Selecting the Right Tool for Project Creation
Choosing a project management tool is all about matching features to the needs of your team. Worksection offers an intuitive interface, clear task structuring and robust privacy controls. Its built-in time tracking and low-cost plans make it an excellent choice for service-based teams and small to medium-sized businesses that value simplicity and efficiency.
For teams that require advanced customization, Jira offers powerful project management tools tailored to technical workflows. In contrast, Asana offers a simple, accessible solution for task-oriented teams that prioritize ease of use.
Ultimately, Worksection strikes a balance between functionality and affordability, making it a versatile and easy-to-use option for diverse organizations. By understanding your priorities, you can confidently choose the project management tool that best improves productivity and collaboration.