Hello Friends!
Please, welcome our first update in 2021 with the main goal of enhancing the efficiency of your teams using their working time.
We know that in modern teams, salary expenditure amounts up to 80%. Naturally, you want your employees’ precious time to be spent and paid for as efficiently as possible. To achieve this, you need to introduce regular time tracking in the team. The task is non-trivial, but it is necessary, especially if you work on an hourly model and sell your employees’ time at an hourly rate.
By using Worksection, your whole team can easily switch to an hourly basis. And then, at the end of a month, you will understand if your projects get regained, see the actual time your employees have worked, and the extent to which your team is efficient in general.
So, what is new:
Setting days-off, vacations and sick leaves
Many clients asked to add work schedules, vacations and sick leaves for their employees. We always listen carefully to our clients’ preferences and embrace them. All in all, we have done it;-)
From the user’s card, you can get into the setting of the user’s personal work schedule (provided you have administrative rights «Allow admin to manage people»).
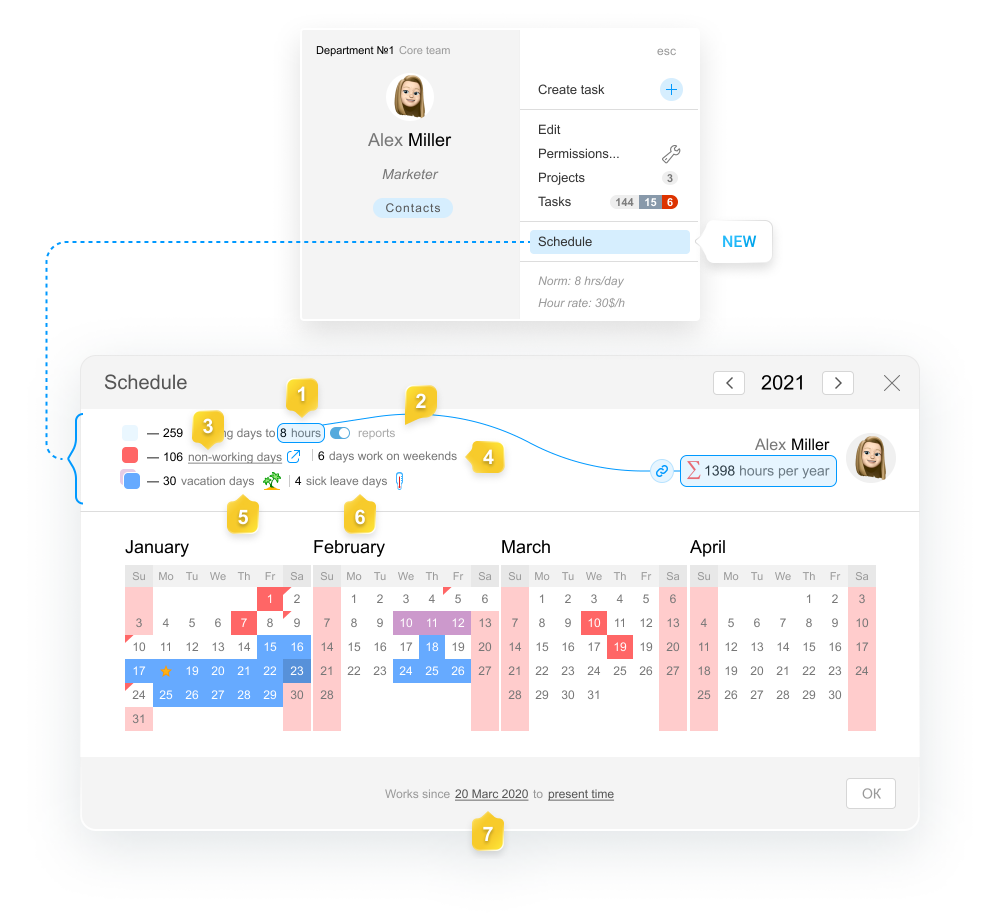
On the Work Schedule, you can:
- set the Standard working hours for an employee and see at once the number of their working hours in a year, adjusted for all holidays and weekends, vacations and sick leaves!
- switch off Reporting for a particular employee.
- see the total number of Non-working days in the account and switch to their setting (Account settings > Holidays).
- appoint a Working day for an employee on a common holiday (e.g. see January 9, the red corner).
- appoint Vacation days (blue color and palm tree icon) and see their total number.
- switch to the Sick leave mode (purple color and thermometer).
Note! days-off are not counted in the number of vacation and sick leave days.
What does it give?
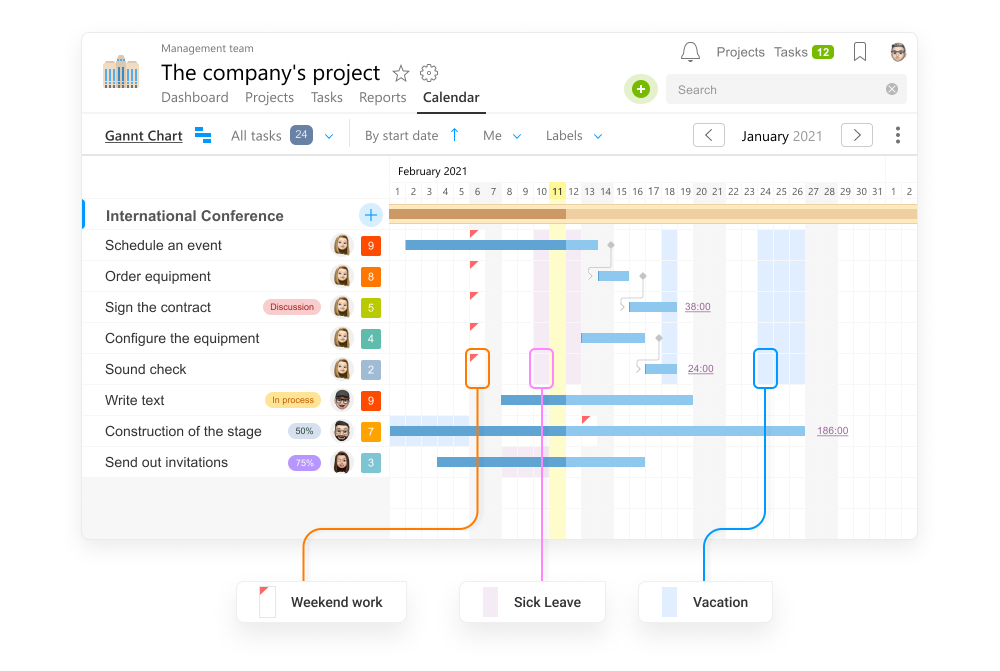
The executive’s Vacation or Sick leave are displayed upon Setting deadlines and on the Gantt chart, which allows you to schedule task fulfilment more precisely.
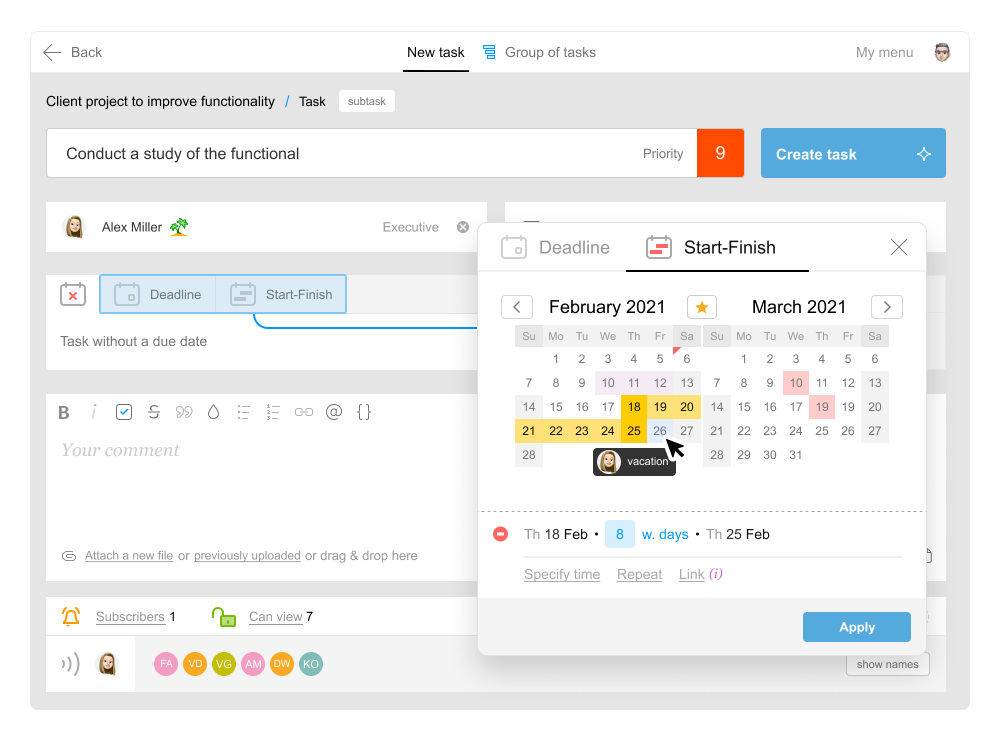
Once a task deadline is set on the calendar, the executive’s sick leave and vacation day will be displayed.
If you have forbidden to set task deadlines for non-working days in the account settings, the system will prevent you from setting a task for the vacation time by helping you to correctly calculate the duration of tasks in working days.
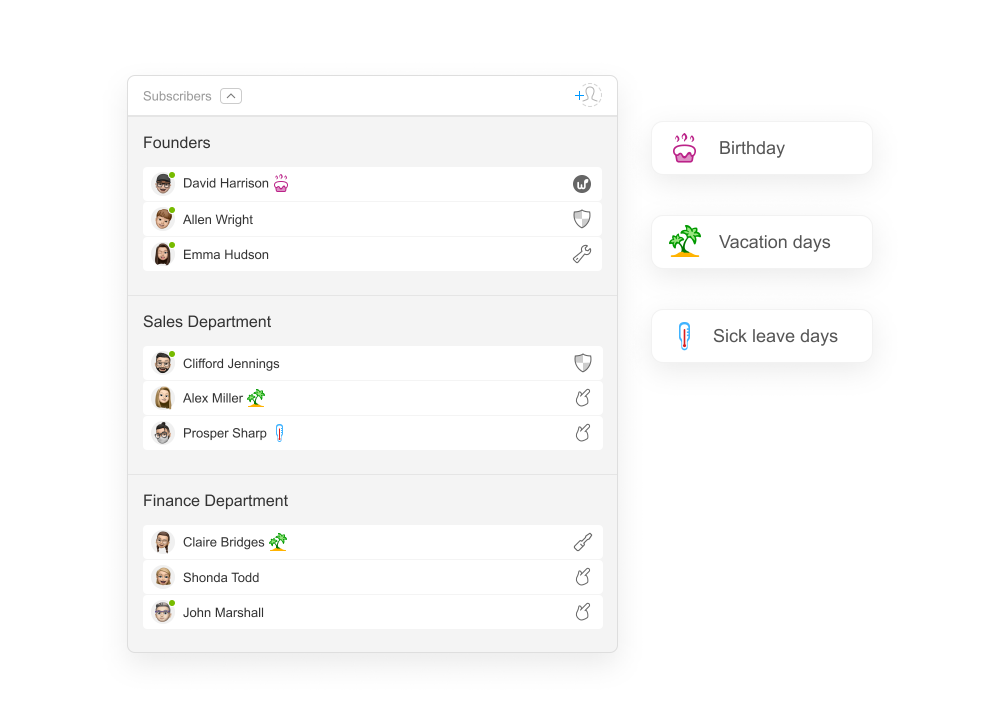
The information about your employees being on vacation or sick leave is visible for all project participants. It will facilitate communication in the team and will enable you to reschedule pressing tasks on a timely basis.
The main thing is that all such data facilitate calculating the Efficiency of working time consumption for any period!
Working time standard by PRO
Now you can set a standard of working hours per day for every employee of your teams. The default standard for an employee is 8 hours per day in working days, but you can change or fully disable it for a particular employee.
For non-working, vacation or sick leave days, the standard is zero.
Readers, users of client teams and dismissed employees have no standard.
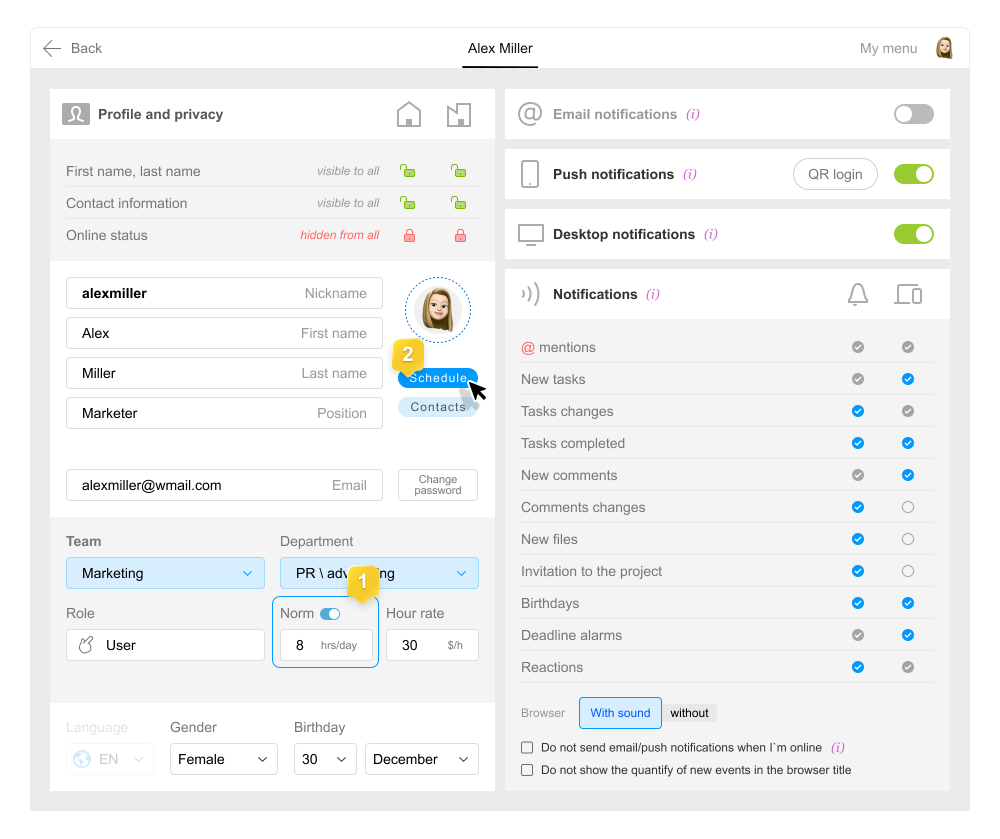
You can change or disable an employee’s Working time schedule in several places:
in the Profile 1 or on the Work schedule 2 new.
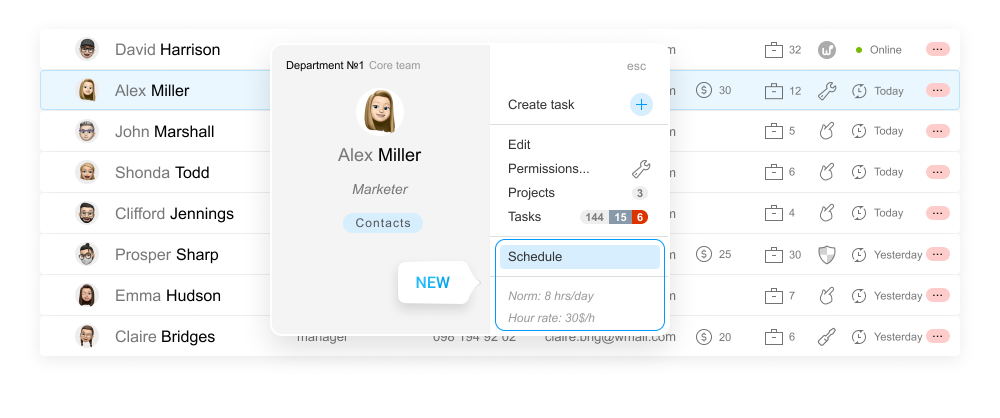
You can learn the current standard or rate, and quickly switch to an employee’s personal schedule directly from the user’s updated card.
You can massively change the standard immediately for several employees from the People section. Tag the users concerned and correct their standard through the massive operations menu.
Note! The standard is available only in PRO plans (Premium and Enterprise). If your account has another plan, but you are very interested in this functionality, contact us.
Report Novelties
The standard of working hours in the people-based report
In the Report «by people», we have added a circular diagram in front of each user, department and team to analyze the current efficiency. The current efficiency is calculated as a percentage of time consumption stated versus the standard number of working hours over the past period.
The diagram is not displayed for participants who have no standard (clients, readers, contacts), as well as for those with the standard disabled.
Note! To see the comparison to the Standard in reports, you need to disable the display of Estimates.
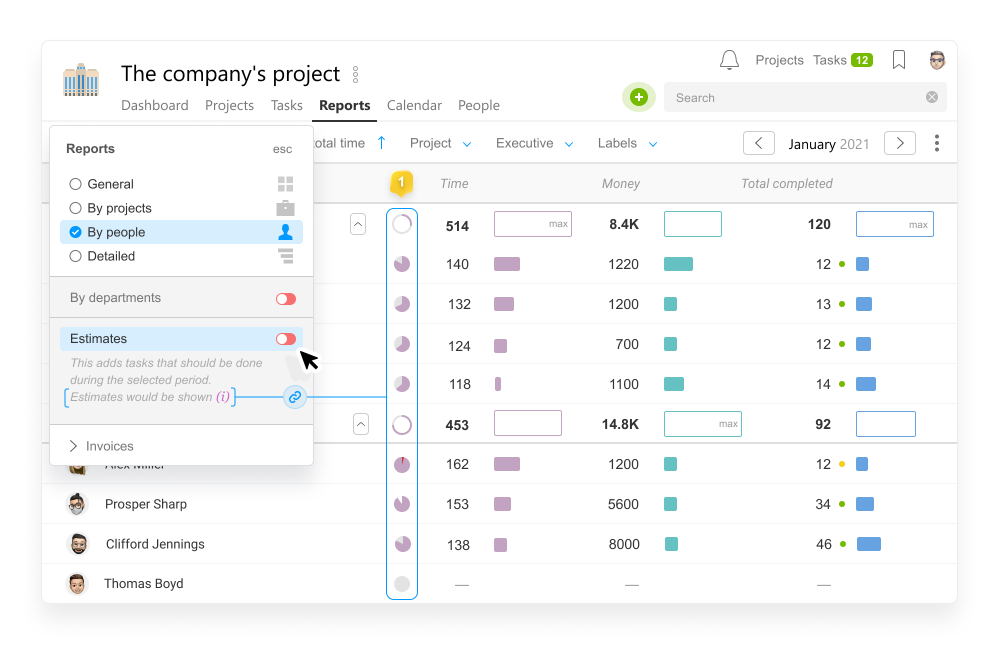
Then the people-based report will look as follows:
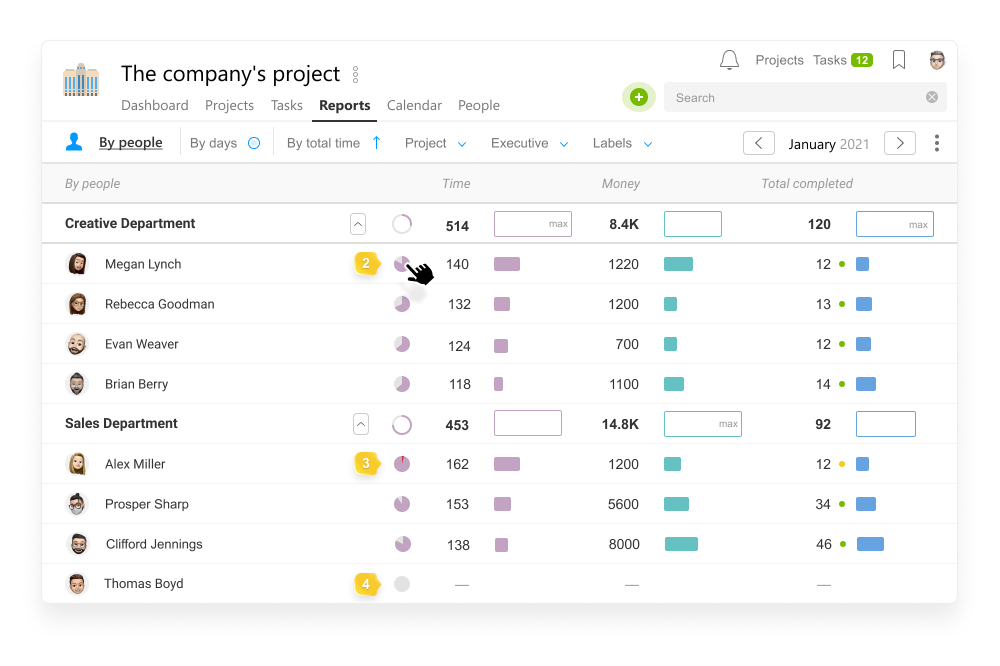
- Efficiency diagrams near each team / department / team member.
- If an employee tracks with a timer or manually enters 6.5 to 8 hours per day, their working time is efficiently used — the diagram will be colored purple by 80–100%. Lower meanings signify that an employee does not fully use time tracking, or he/she might «work not enough».
- If the time indicated exceeds the standard, the efficiency will exceed 100%, with the excess displayed red on the diagram. It could be an evidence of excess workload or data inaccuracy, which would require further analysis.
- If an employee does not enter any consumption, the diagram remains grey. It might be expedient to disable the standard for such employee to exclude them from reports.
If your report outlines a period covering the future dates, the efficiency percentage will be calculated based on the past days.
Let us imagine that it is the beginning of a month now, and only 2 business days have passed, over which the employee has successfully entered 8 hours from his 8-hour Standard. In the people report for the current month, such employee’s Efficiency will be 100%. Having pointed the mouse at the purple donut chart, you can also see the number of hours the employee has entered, and the number of hours he should work by his Standard over the whole period selected, the current month in our case.
Day-based reports
The day-based report will help you determine days when an employee worked well, when they worked not well, and when they indicated more hours than possible. For visibility, we chose a day-based background depending on actual costs. If the plan is fulfilled, the box will be fully filled in.
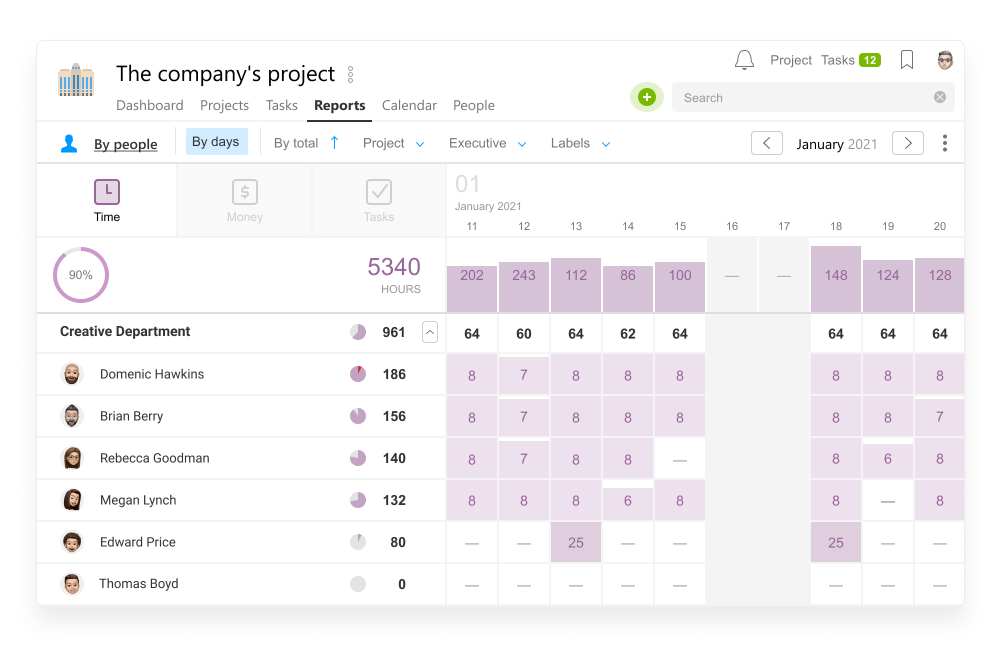
At the stage of introducing the «hourly rate», we recommend to check this report on a daily basis, to «cheer up» people who have forgotten to enter the time for today. Two weeks of regular checkups, and you will create a new useful habit in the company.
Team standard
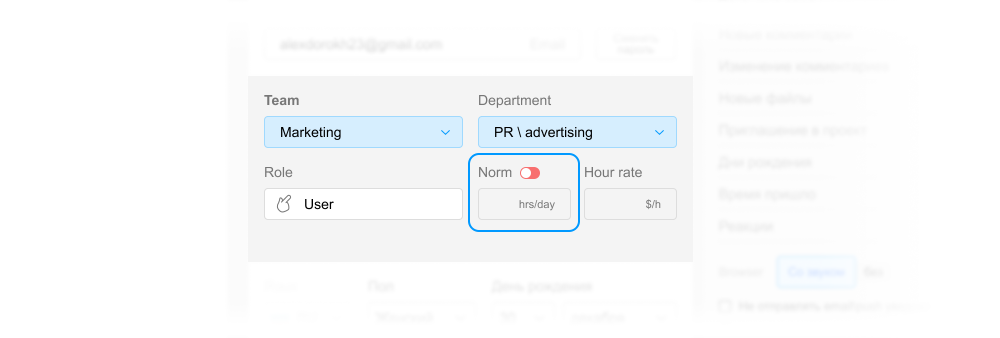
The team’s standard consists of its all employees’ standards summed up. If a part of your employees do not report their time consumed, set their status as «no reporting» for them not to be counted in the team’s aggregate standard. You can do it everywhere, where the Standard is edited, just disable it, and that person will not be included in Standard-based reports any more.
Changes in the logic of Reports
The Reports page in Worksection used to show the user and administrator only the data from projects and tasks to which they have access at a certain moment. It caused some difficulties — an employee could not see his time consumption for the past period if he had been excluded from the project, and the leader could not see his employee’s consumption parts, if he had not been invited to the project. And only the administrator of the entire account could see the overall picture.
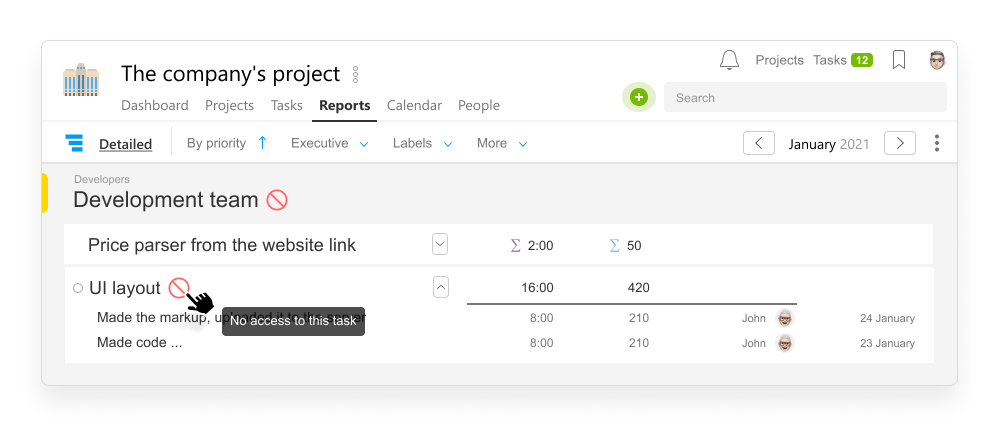
Now team administrators view their team’s costs from all projects and tasks, and users can see their time consumption, even if the access to the task has been denied.
Note the following! You do not get access to the project itself, to the task description and to additional details of such costs. You will see only part of the task name and your expenditure in it. If you need access, you may ask the administrator to open it.
In future, we plan to save and display costs even if the task or project have been removed.
Tasks with expenditure from «no access» projects look as follows:
Other corrections in reports
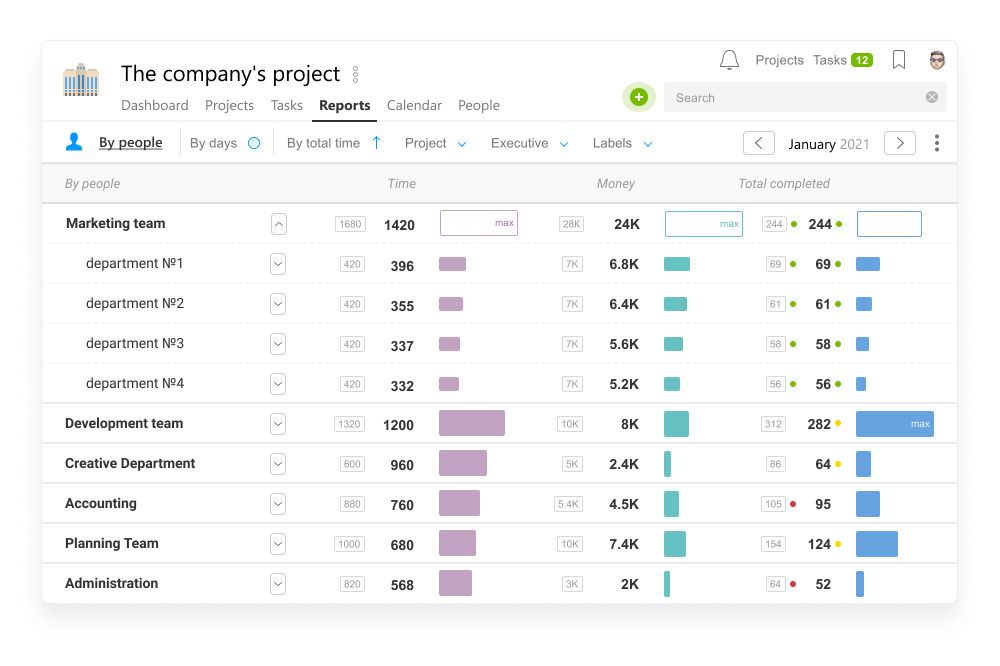
- we have added progress bars for comparison of projects and people between themselves
- we have reconsidered the existing sorting parameters and added a range of new ones
- in the mode of displaying estimates (may be enabled by selecting the report type) — we have outlined the plans with frames for you not to confuse them with the figures of actual expenses
- we have supported all report figures with ultimately clear pop-up hints
- we have improved the export function
New interface for indicating expenses
In a single window, you used both to enter expenditures and track the ones already indicated. It was rather unwieldy and complex for new users. We have divided these functions into two separate windows.
Now, once you have clicked the button for entering expenditures, nothing will distract you from the purpose of your visit ;-)
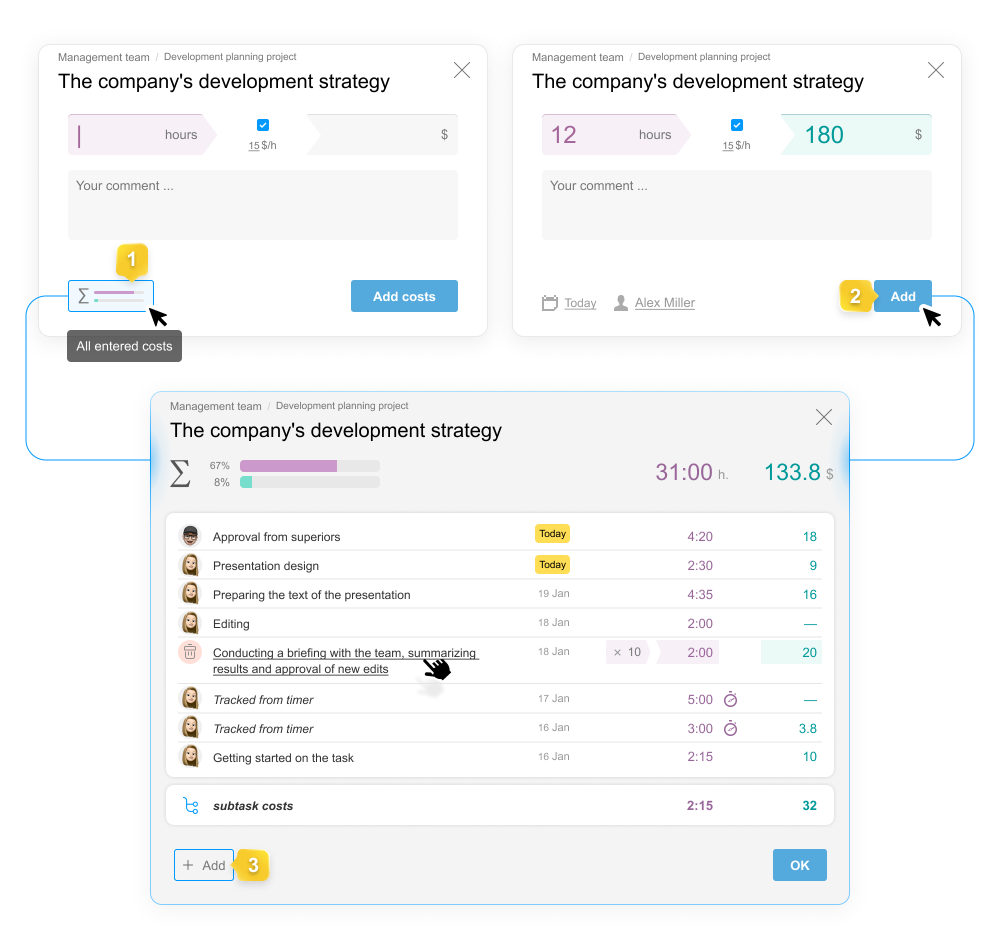
From the expenditure entering window, you can pass to viewing all expenditures entered directly through this button1 or after adding2. And from the view window, you can easily switch to adding new ones3.
Your comment to expenditures can take several lines now.
If a wrong date has been stated in entering expenditures, you can easily change it in the expenditure list.
Exporting the list of tasks and reports
For teams analyzing their data in detail, we have added more export possibilities.
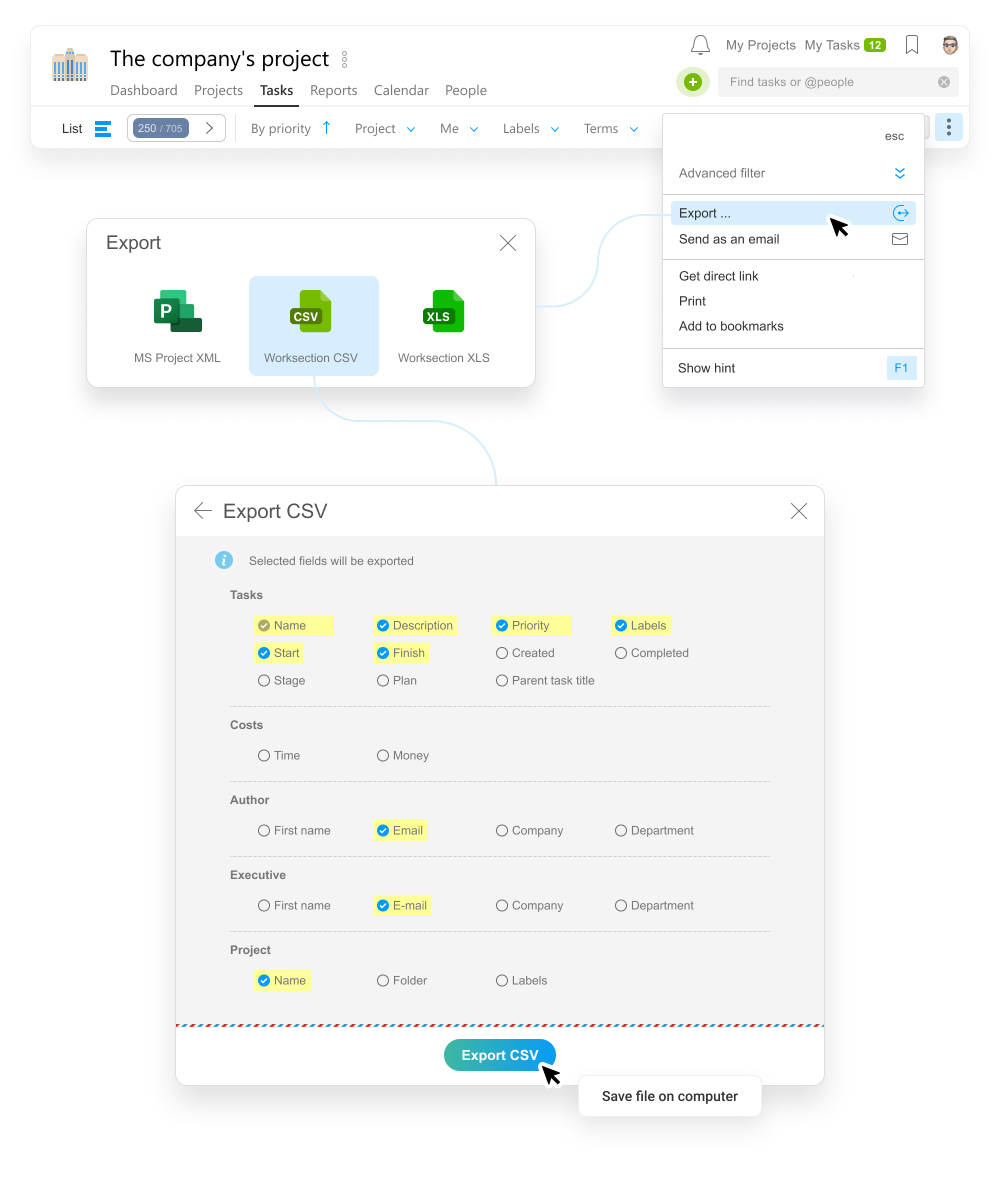
We have made it possible to export a task list in the MS Project, CSV, XLS formats with raw data. By using checkboxes, you can choose data to be included in the file to be exported.
Remember! You are able to receive any data from your account by using Worksection API.
In the export of the Detailed view of Reports, you will get raw data (in the CSV or XLS format) — the list of all expenses indicating tasks with work done in them. All other kinds of reports (By projects, By people, By days) will give you summary information, and the data will be grouped by the relevant criterion.
Contact labels PRO
To extend the «Simple CRM System» subject, we have enhanced the functionality of the Contacts page. We have got the possibility to set labels for your contacts. Now you are able not only to put contacts into folders, but also to tag them by certain criteria.
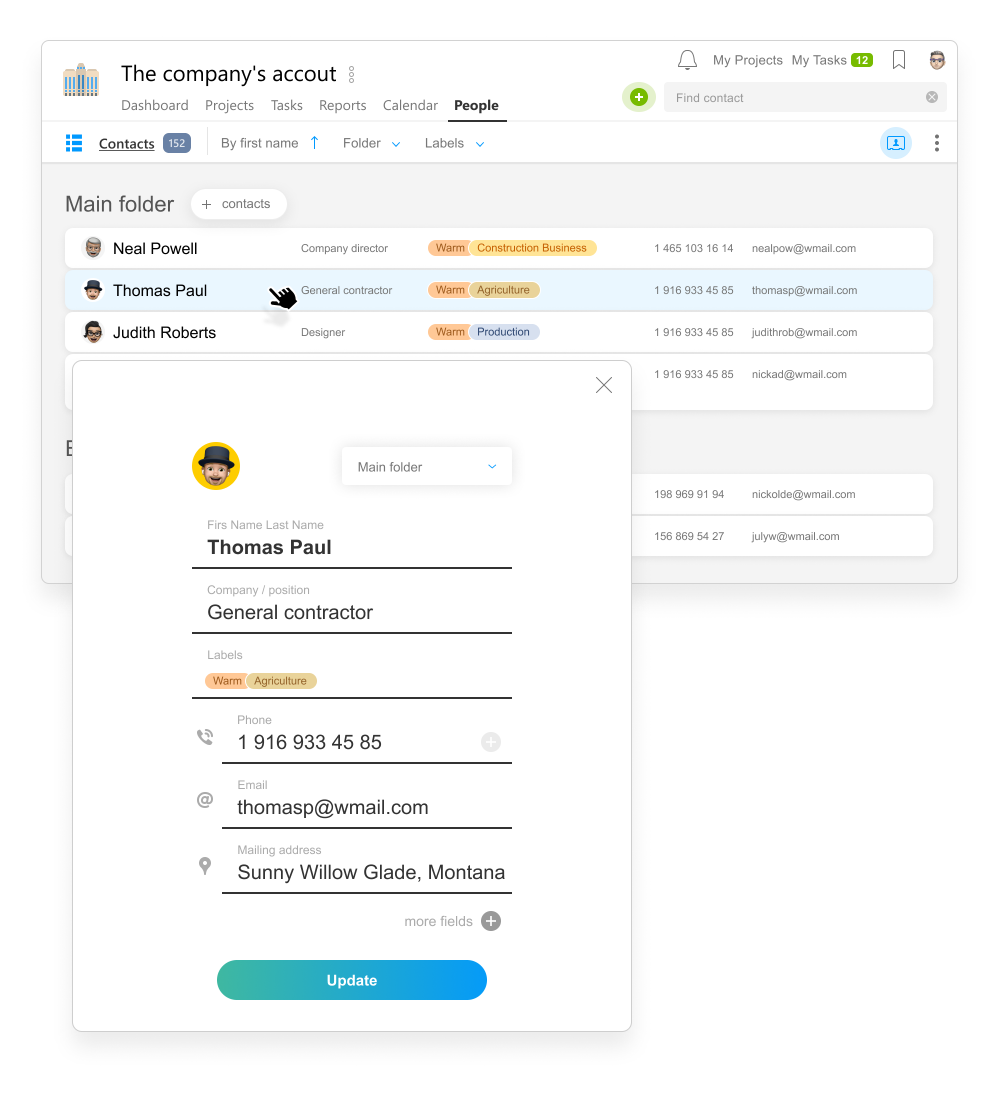
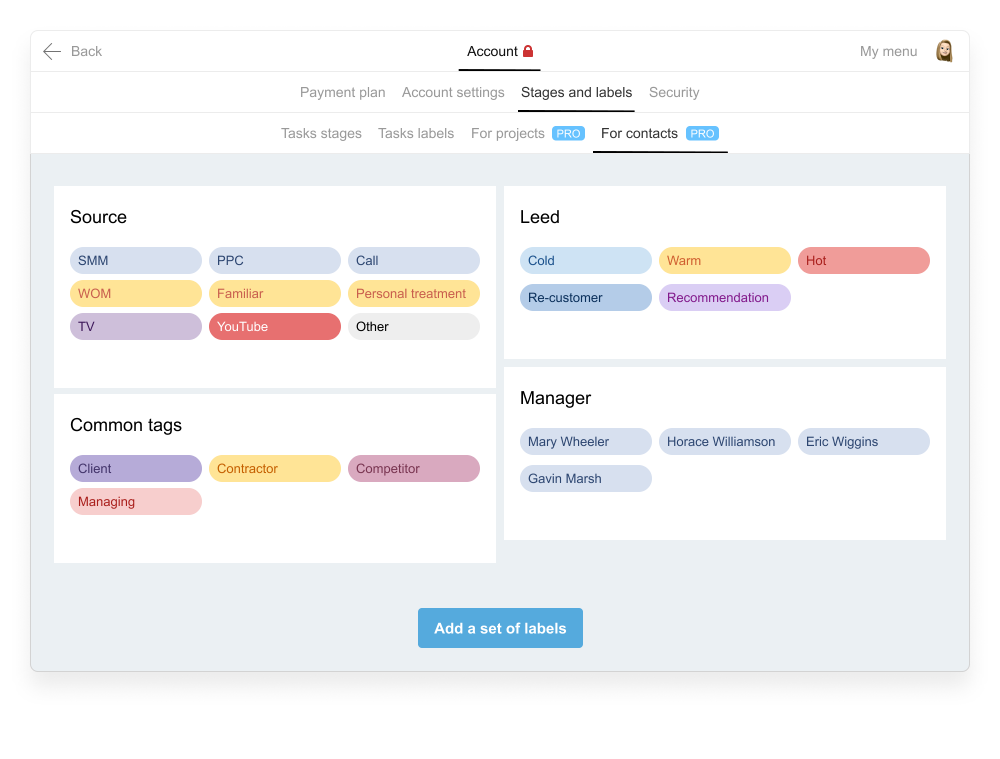
Traditionally, there are open groups of labels and those hidden from other teams.
Here you can add groups and create Contact labels that you need:
Account > Stages and labels > For contacts
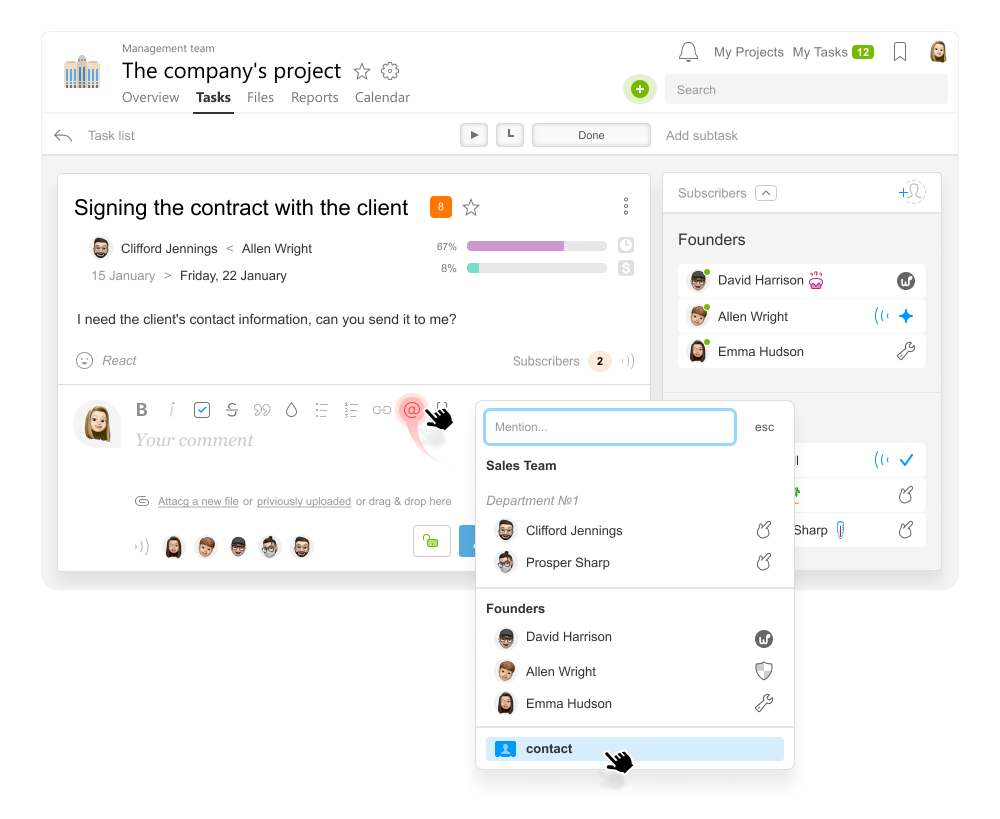
We remind you that the Contact from your basis is easily inserted into any comment or task text. To do so, choose the item with the «@» symbol, from the text formatting parameters, or put a blank, then enter the «@» symbol on the keyboard — in the bottom of the pop-up list of participants, there will be the Contact button.
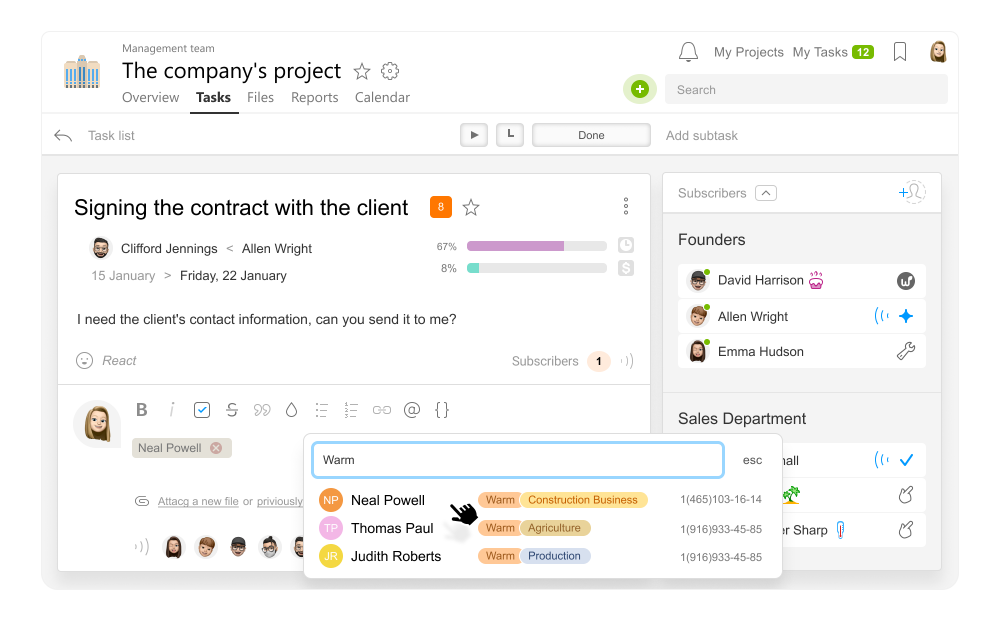
Now you can find our contact not only by a name or telephone number, but also by a label — just write its name and choose the suitable option.
Friends, this is all for now, we are looking forward to your feedback.
Thank you for using our product!
Succeed in your work!
Worksection team
