

Hello, friends! We continue to introduce you to our newbies.
We would like to point out right away that the Task or Subtask subscription is now absolutely independent, which means that one group of people can be subscribed to a task, while another group of people can be subscribed to just the sub-task. You asked us about it often, and we did it. And that’s only the beginning!
List of subscribers
Task or sub-task subscribers look approximately like this:
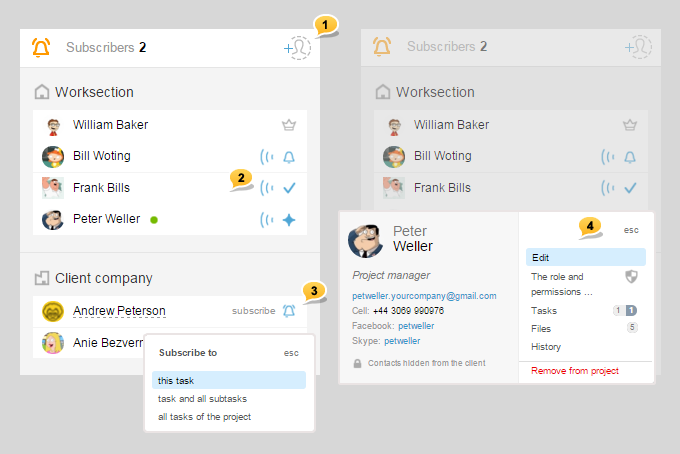
1 — You can invite new people to the project right from the list (if you have enough authority)
2 — It has become a little easier to identify the subscribers and their role in the task. It can be seen who is the author  , who is in charge
 , and who is the manager
  of the project
3 — Also, now with just one click on these icons you can: Subsrcibe/ Unsubsrcibe not only to/from one task but also all its subtasks as well as all the project’s subtasks
4 — By clicking on an employee’s name, not only you get the card with his/ her contact info but also a small User menu with the quick access to the profile editing, rights, history along with tasks this person has been in charge of and files he/she has downloaded. Besides, you can also exclude any participant from the project in here
Advice for the account’s owners and administrators with the full set of rights:
If you are disturbed by a project, just exclude yourself from there. You can still access this project from the Main page ⌘ alt+h and from the page Projets ⌘ alt+P, however, it will not be disturbing you in the My projects section alt+P and stand in the way from last overviews in the main page. If needed, you can always return yourself back to the team.
And, now, get ready for the most interesting part!
If previously in order to notify a person who is not subscribed, you had to first subscribe them «somewhere at the top of the page», and then continue to write a comment «somewhere at the bottom of the page »... and then, after the publication, unsubscribe «somewhere at the top of the page» again" please, forgive us! It is all different now ;-). Permanent subscription is not going away and works as before but now it is absolutely flexible, and a list of those who will receive a notification can be adjusted to one’s preferences simply on the fly.
Notification about your comment
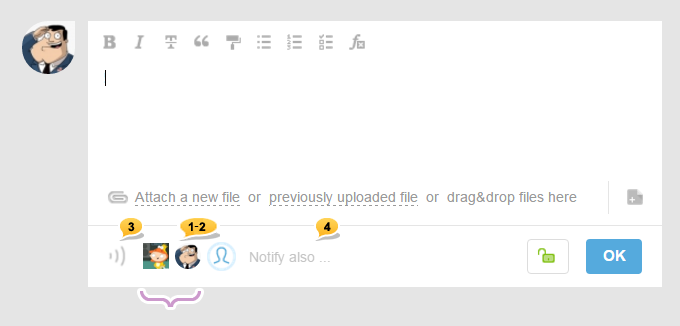
new 1 — Now when you write a comment, you always know for sure who will get the notification. By default, these are constant task and sub-task subscribers, and you can see their avatars.
new 2 — If you do not wish to notify one or several regular subscribers, then just click on the avatars of those who won’t need to be disturbed, and they will disappear. Notification about your comments will only be received by those whose avatars you can see.
new 3 — It is now an option to turn off a notification for everyone with one click on an icon.
new 4 The most important part! Not only you can narrow down a number of subscribers but also expand it with the non-subscribed member of the team. Click on icon Also notify: it is always the last one in the list.
The following menu will pop up:
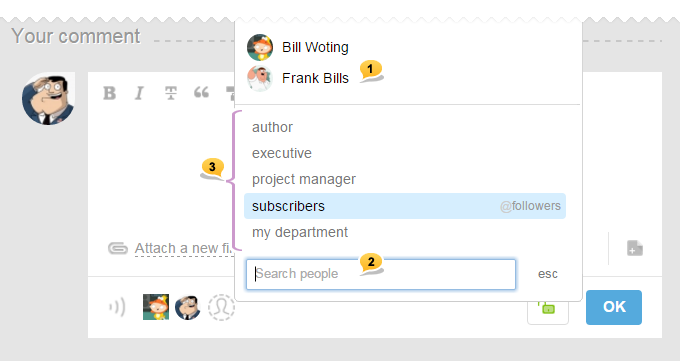
You can always easily locate a team member you need1. In case it is not working out, try using the search2. Besides, there is a number of pre-settings3 that help handle groups of people in a fast and prompt manner.
For example, you’ve decided to notify just your department and no one else about your comment. In this case, it is not quite convenient to add or unclick your colleagues one by one, it will be easier just to exclude all.
... and then choose Also notify... > My department
We also bring to your attention that now it is possible to navigate all of the drop-down lists with the help of keyboard, using up and down arrows and making the desired choice with the enter button.
Do not forget that all of these new options when writing a comment are single-natured and do not affect your regular subscribers.
After the comment (of which all or several subscribers have not been notified) has been published, it will be marked with the following crossed out bell. If the comment was edited, then a timer with the time of the last editing will appear as well.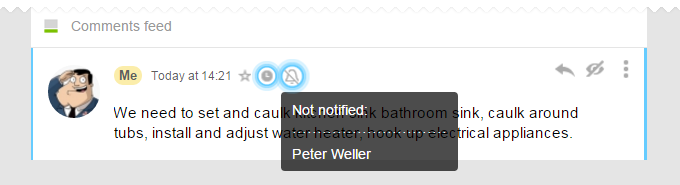
Do not forget that subscribers still play an important role when dealing with the task on the fly (change of priorities, timeframes, people in charge, etc.). Thus, in the new window of the priorities choice you can choose to notify or not notify the subscribers, whether all at once or no one at all.
Visibility restrictions
We changed the location of the ‘green lock" and now it is located right after the publication button.
Note that the lock is open by default. And that means that your comment will be seen by all the project’s participants (if the task itself is open for the whole team). If you need to place a private comment in the feed just for certain people, then close this lock.
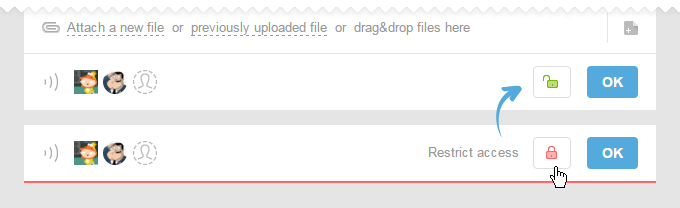
After that automatic visibility restriction is offered that follows the principle: subscribers will see, non-subscribers will not. Of course, you can manually set the restrictions: just click on those who needs to see it and who doesn’t.
Advice Turning on or turning off the whole company or a department is possible by clicking on the name.
If you changed your mind about hiding the comment, then click again on the lock that is located before the Add comment button: it’ll become green again. And that means that there are again no restrictions on comment visibility.
@mentions in the comments
A lot of you has asked us to do that, and we did! It works the same way as in Twitter or Facebook. If you need to address a certain person in your comment and you also need to make sure that this person will know about that being able to easily find the comment he/she has been mentioned in, then use @mentions.
In order to directly mention a person through @mentions, it does not matter whether this person is subscribed to the task or not: he/she will receive the notification. The addressee will receive the notification even if the whole project is in the dormant regime (without notifications). In other words, @mentions will break all the walls and will reach its addressee.
How can it be done?
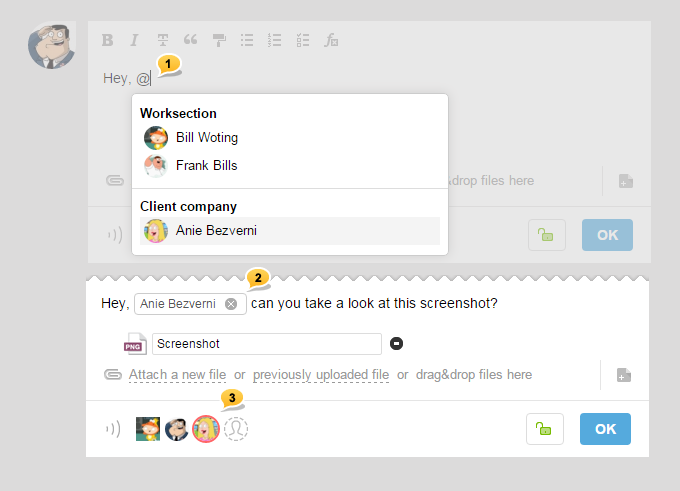
Just enter the symbol @ when writing a comment and enter the project member’s name.
Advice: no need to change to the English keyboard to use @mentions, just use the following combination Alt+2.

1 — choose a person with your mouse or with the enter button
2 — successfully inserted @mentions in the comment also is highlighted
3 — the person mentioned appears in the list of subscribers and is also highlighted.
Reminder! When an employee appears in the list after having been mentioned is only a single-nature event and does not affect the regular list of subscribers. In other words, Svetlana Rizhskaya will be notified only about this comment. And, if she was not subscribed to this task, she will still remain unsubscribed.
Notification in the «bell» about your being mentioned has its unique style.
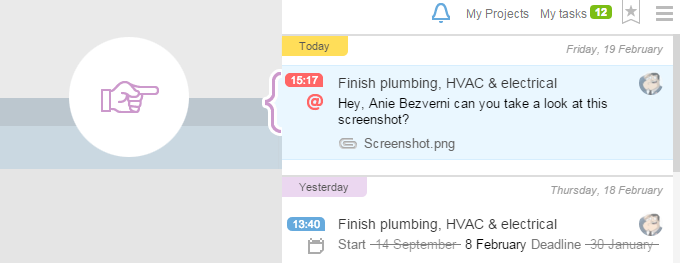
Besides, you can always easily find it in the comments feed thanks to the new fast filtering button @.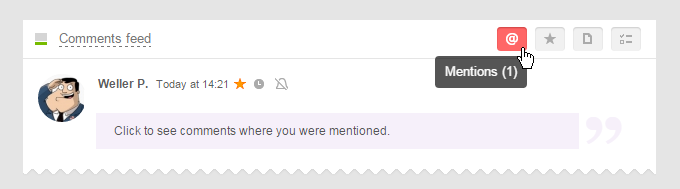
Click on it, and the feed will reflect only those comments that have @mentions.
Inviting employees to the project
Inviting new people to the project has become much easier and accessible. Besides the familiar project editing, this option is now available at any level of project task creation or in the list of subscribers in the existing task: look for the following icon  .
.
It can also be done in the new menu of the project that appeared in the header right after the name 
But, it is easier to just use hotkeys and simply click Alt+I :
- on the project’s pages it works as an invitation to the project;
- on shared pages of an account— as an invitation to the account.
The window where one can choose new people for the project looks like this. All you need to do is to simply click on new users or clients and press the button at the end. If you have a big company, then use the search.

If you have enough rights, you can invite a user to the project from a company that is not part of the project. Previously, you would have to invite the company and then include one of its employees. Now: you just indicate a person who needs to be granted access to the project! The rest is automatic.
Invitation to an account
Now looks like this:
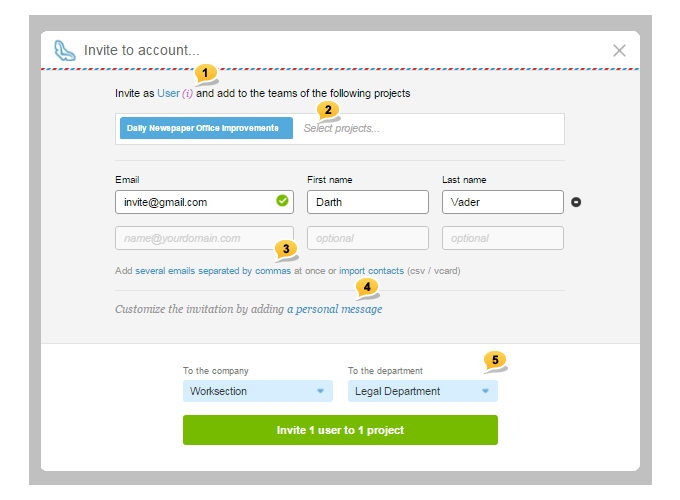
1 — By default, you invite everyone as a User. However, now right upon invitation you can change a role to a Guest or even Contact (when you need to add people to the contact list without an invitation and account access)
2 — Right on the invitation stage, you can add access to one or several projects. If previously you first needed to invite and then set access to the projects, now you can do it right away and all at once. Then, having accepted the invitation, a user will enter the account in which he/she will have access to one or several projects
3 — Now there’s an option of entering a bunch of email addresses separating them by a comma
4 — Add small personal text to the standard invitation
5 — If you need to invite people to the new company or new department that are not yet in the system, then they can be created on the fly right from these two drop-down menus