
Hello friends! We continue telling about freshly-made updates in the functionality of your account.
Rates
Companies that use hourly rates for payment can now significantly simplify and automate the process of tracking time spent and money earned. Using rates can help you do it all.
Turning on and setting up rates by default
For starters, let’s make sure that Rates are enabled in your account. Let’s have a look at your settings (Account > System settings).
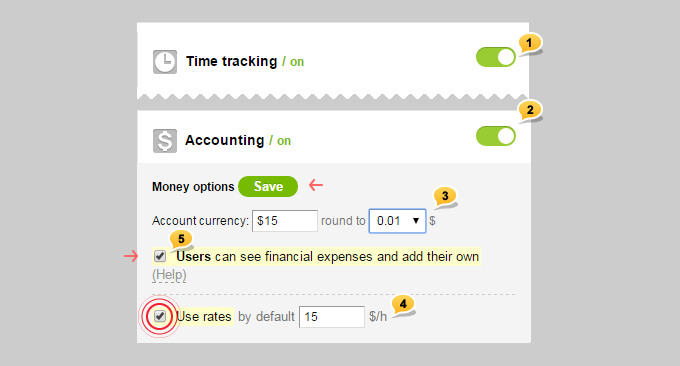
In order to use Rates, you need to turn on Time Tracking1 and Accounting2. After that, enter the currency of your company and choose parameters for rounding of the values3. Now you can activate Rates and set a default rate4.
If you do not have a default rate, leave this box empty. In this case, the system will use only rates set in the profiles of each user.
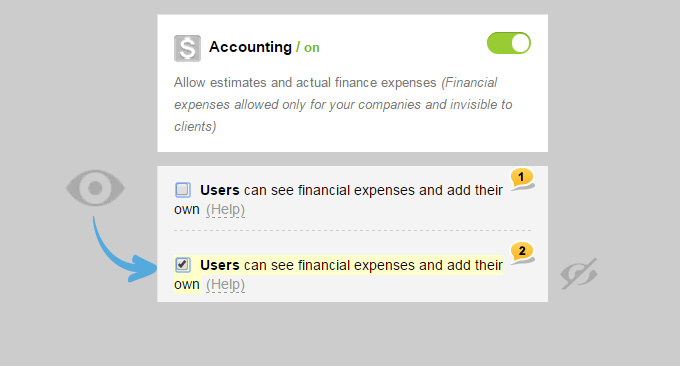
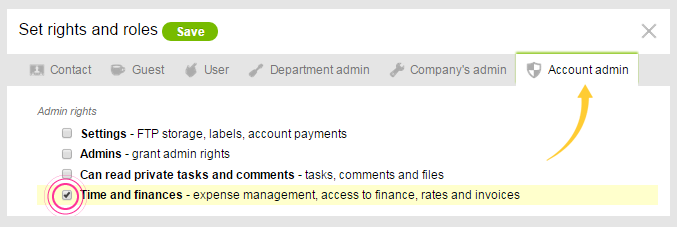
Do not forget about this important option5.
When it is enabled, your employees can see all the financial costs of their projects and tasks to which they have access. Besides, they can enter costs on their own behalf both in hours and in the currency of the account.
When it is disabled — users cannot enter financial costs and are not able to see them at all.
However, they can indicate their expenses in hours. Provided Rates are used, this time is automatically translated into money. Only the Account’s owner or Account’s Administrator with the Time and Finance rights has access to financial side of the costs and reports.
After everything has been configured, do not forget to press the green Save button.
Choosing the optimum scheme to work with the rates
Let’s have a look at three options by answering the following question:
— How often does your company us Rates?
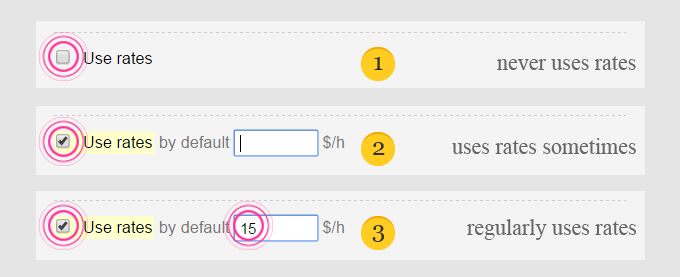
Never 1
Rates are not used by the company. Just turn off the Rates.
Sometimes2
Rates will be useful only to some employees but most people will work without them. For this, we activate Rates, and then the field By Default is left blank. As a result, automatic recalculation of time into money will only work for those employees who have their personal rate indicated in his or her profile.
Always3
The entire team works with Rates with a certain general or minimum rate. However, there are employees whose rates are above or below the baseline. For this, not only we activate Rates, but also specify the default rate, which will be considered the base for all employees of the company. If an employee’s personal rate differs from the base one, then it needs to be indicated in the profile.
Setting personal rates
After rates have been activated, each user has a field in his or her own profile to indicate personal rate. Setting personal rate is only needed when this rate is different from the default rate in the account settings.
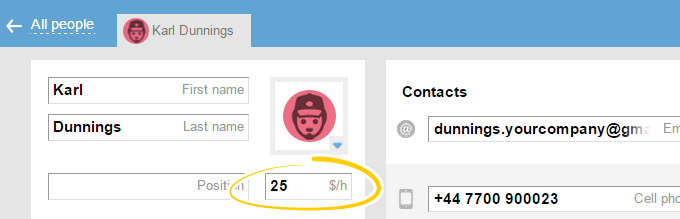
Note! Only administrators with People Managing rights can fill this field out. Users do not see this field and cannot set rates for themselves. Also, users cannot see each other’s rates.
Rates can be set en masse on the Team page or People page. Check cards of the members whose rates you want to change. In the bottom menu click on the Rates. Then enter the total value and apply.
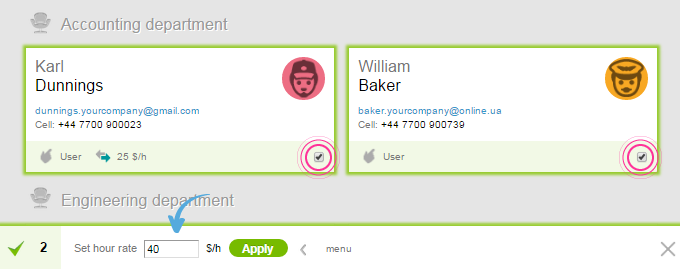
Personal rates are marked by the sign  and are visible on the employees’ cards.
All right, we have turned on and set the rates. Now, let’s see, how it has impacted our work.
Working with rates when entering expenses
If an account already has a default rate, or you have a personal rate, then you will see the following when entering the costs:
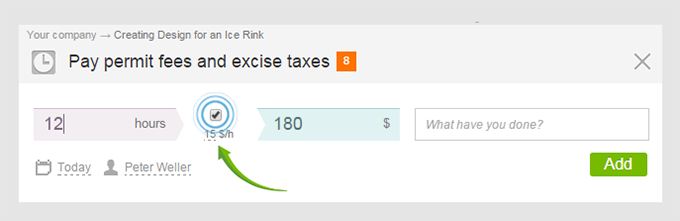
Entered hours will be immediately recalculated into money. Thus, both of these numbers are stored. Automatic recalculation can be waived by unchecking the box and filling in all the fields manually. In addition, if you have enough rights, you can change the rate «on the go» by simply clicking on its value.
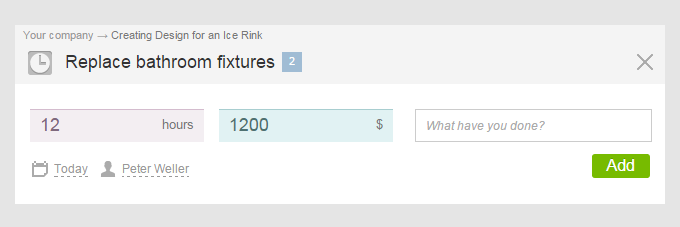
Note! If, according to the account settings users are not allowed to enter financial costs, then a similar window for them will look like this:
Recalculating expenses en masse
On the Reports page > By tasks there is now available an en masse expenses recalculation option by rates. Check tasks that need to be recalculated. Note that any line can be excluded from the list. In order to do that, expand the expenses details and uncheck the box from the line that is not needed in the recalculation (Design is used as an example).
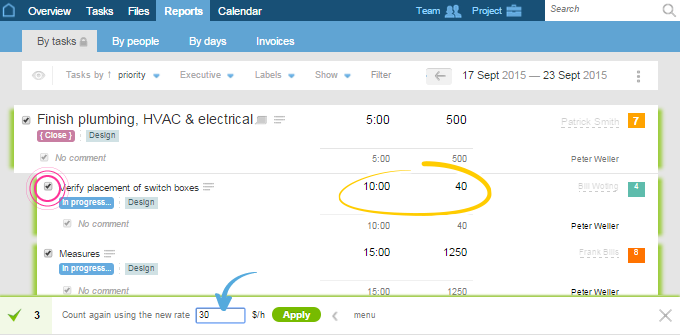
When all marked as needed, choose Rate in the bottom menu. Enter the value and apply. All money values will be recalculated anew from the time according to the new rate.
Summing it up
If your company has decided to activate the use of Rates, then the first thing to decide is which level of Rates and Finance access to choose. If everything is open, users are allowed to see their rates, enter expenses, and see entered expenses by other members — activate this feature in the settings of Accounting 1. If all financial information, including hourly rates, must be hidden from the members — disable the option2.
If the option2 is chosen, then access to expenses, finance, and rates will remain solely with the Administrator of the account with the Time and Finance rights or the Account’s owner.
They always can recalculate costs by the new rates and change the number of any financial costs manually canceling rates.
That is probably all that we wanted to share about rates. Now, let’s move on to a completely different section!
Reports > Invoices
Instead of the old «Billing» section, there is now a simpler one — «Invoices». It allows you to create invoices for tasks, reports, or even manually. Each invoice is tied to the project. On the page with all the reports there are invoices from all the projects, but they are grouped by major companies of the projects that are in.
There are three things that need to be noted:
This section is available only to Administrators with the Time and Finance rights and Account’s owners.
Work with the invoices does not affect tasks or reports. All changes in the Invoices section remain only there. So feel free to experiment.
This section is not intended for direct invoicing of the customers in its entire form. You will not find the details and parameters of the tax deductions. Table prepared in this section can be exported to XLS, and then sent as an XLS file to email or print.
How to create invoices
The easiest way to create a new invoice is to create one based on tasks or reports. In order to do this, mark lines that you want to include and press «into Invoice».
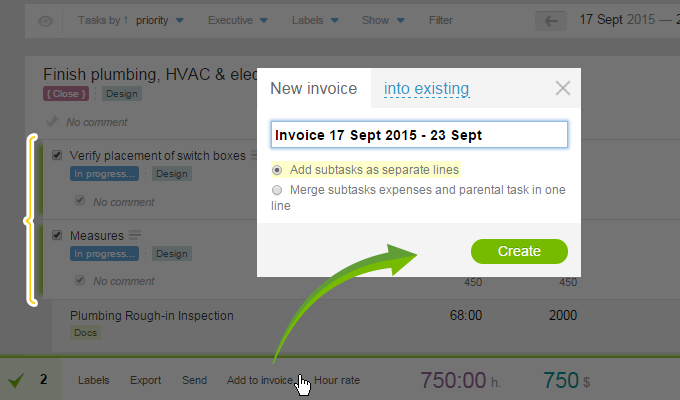
In the appeared window, you will be prompted to add the marked tasks in a new or an existing invoice. In the table of the invoice there is no hierarchy of lines, so when you create it from the subtasks, you need to consider that — do you want to add each subtask separately for a more detailed invoice or combine all their values in one line under the name of the parent task? In any case, you can combine the needed lines later as well.
This is how your account will look like with the current invoices:
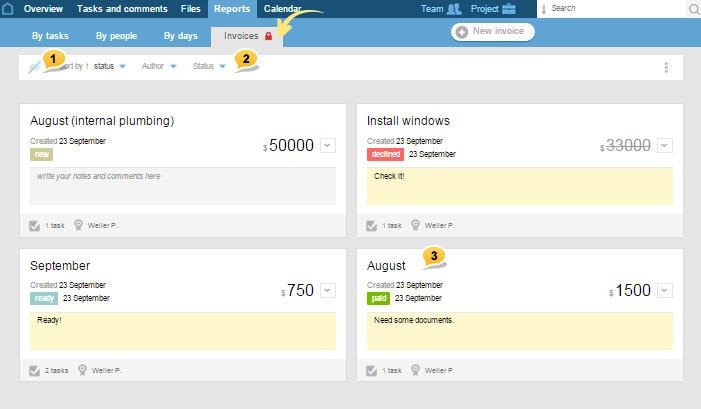
1 — Show/hide details of the account
2 — Invoice filtering and filtering by author and status
3 — Invoice card
There is also fast search option by the name of the invoice or the tasks it consists of.
Let’s have a closer look at an invoice card:

Status of an invoice can be changed to one of the preset ones right here. If you check the invoice, a menu of bulk operations appears. You can transfer them to another project, duplicate, or combine several invoices into one. Also, you can see the total amount of all the selected accounts to the right. Other actions with the invoice can be made on invoice’s detailed view page. To go to a detailed view of the invoice, just click on its name.
Work with Invoices
Detailed invoice looks like this:
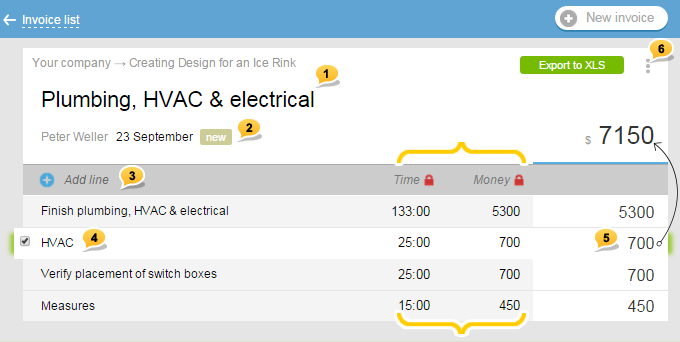
1 — Rename invoice
2 — Change status
3 — Add a line to an invoice
4 — Change any line of an invoice (with no back reaction)
5 — Change money field manually
6 — Export, send, print
Important! Only the right column reflects the total amount while columns with Time and Money locks serve as a constant reference point. Their values are recorded at the moment of entering funds to an invoice, they do not change, and never get into the export!
Work with lines in an invoice
The main function of this page is to fix the right-hand column with the final figures, which will get into the final export. You can do this manually; however, if your employees entered all the costs in good faith and in time, you can easily recalculate them for an invoice by a different rate. This will come in handy if your company uses different hourly rates for the payment of an employee and customer invoicing as well as when working with fixed margins.
To do this, select the line for the recalculation, and then choose Formula in the lower menu.
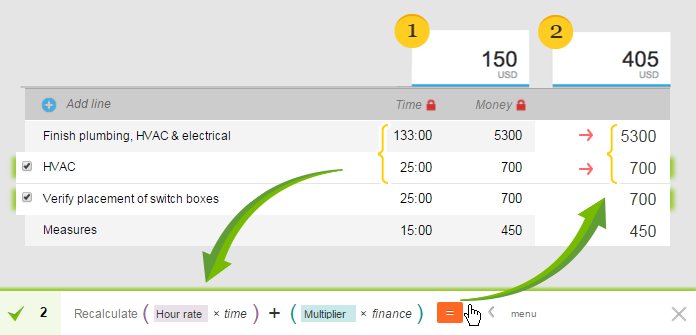
1 Before using the formula, the final amount of the invoice was 150 USD. Let’s say, we set hourly rate as 15 USD/hour on two top lines of an invoice.
2 We leave the index field as it is, which is why Column Money will not participate in the formation of the result. After recalculating by the formula, the result is written in the right-hand column and immediately affects the total amount of the account, making it equal to 405 USD.
Similarly, using the formula, all financial expenses can be recalculated with the 1.2 index and amount of 20% bigger can be obtained.
Rules of working with the Formula
- Blank Rate or Index field means that the corresponding column does not participate in recalculation. If both fields are empty — no conversion will happen.
- For the conversion of time by the new rate, just fill in the Rate field, leaving the Index field empty.
- To convert the money by the index, just fill in the index field, leaving the time field blank.
- Simultaneous entering of values in two fields of the formula will multiply the time by the new rate, and will then add money multiplied by the index to that.
- Zero inscribed in any of the fields of the formula will lead to a zero result at the output of the entire column.
Other ways of work with lines
In addition to the formula, with the help of the bottom menu you can combine all checked lines of an invoice into one (summing up all the values), move them up or down, or remove.
Note that after sending tasks to an invoice, they actually become static lines without any back correspondence to a task. Combine similar ones, removes excess ones, or do anything you want with them.
Practical advice
With the help of this section not only can you easily generate invoices for customers, but also take into account the costs and simultaneously generate salaries of employees. Moreover, when using rates this can turn into a matter of a few minutes.
Let’s imagine a situation, your employees regularly and diligently enter the time spent on tasks they work, because their salary will be affected by that. Also, let’s assume that your company is supporting a client in the long term. The tasks will remain open for many months. Thus, your company needs to do two things every month:
- Invoice the client
- Pay employees
Easy peasy! In the report by tasks, we choose a period — last month. Having highlighted everything there, it is being sent to an invoice. In the detailed view of an invoice a conversion formula with a rate of 20 is applied.
We go back to the report by tasks and add filtering by employee to the period of last month. We select all of that and send it to an invoice, which can be called a «Sergey’s salary for October.» When all lines are selected, they are being recalculated at the rate of 15.
Thus, in just several minutes and based only on the time entered, we formed an invoice for a client using one rate and salary for an employee using a slightly smaller rate.
Similar operations can be done with the field Money. For example, your employees working for certain rates see time and also money earned. Then, all that managers need to do to form an invoice for a client is to use a specific multiplying index.
TIPS & TRICKS: We do not forbid having invoices with the minus sign. If income is written down as usual while expenses with the minus sign, then after all of the lines are marked for a month — profit can be seen in the bottom-right part of the screen ;-)
+ Other news
Actual vs expected expenses
Now on the bottom of the Tasks page, you can see the amount of the expected expenses on tasks and compare it with the actual amount. The same information goes in the export.
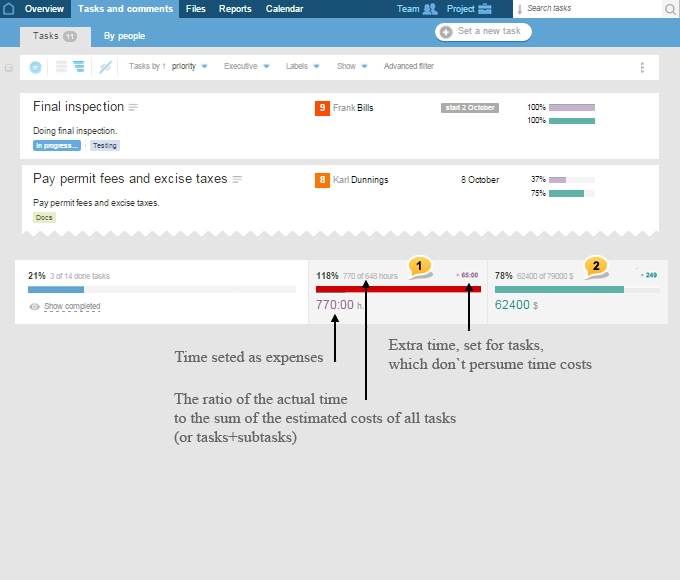
1 — data by the time spent
2 — financial performance
On the page Tasks by people you can see the amount of estimated costs for all tasks of the employees. This will allow to plan teamwork more accurately.
For a more accurate tracking of time and money, activate «Independent tracking of the costs by the task and its subtasks», this option is in the money settings. Otherwise, the actual expenses of the subtasks will be included in the expenses of a parent task and the entire amount is compared to the estimated costs of the task.
Note! In order to get the amount of expenses only on certain tasks — use an advanced filter.
New copying and task transfer
We redesigned the functionality of copying and transferring tasks and subtasks along with the change of their hierarchy:
- When moving to another project or task, there is now a way to correct the timeline and change the executives in the task and all the subtasks that are still being worked on.
- The system will tell you if the appointed executives of the task are not involved in the new project. You can easily change the executives or add them all into a project with one check (if you have the right to do so).
- The system will automatically subscribe all the executives into a copied task if they were subscribed earlier. In any case, we recommend to enable automatic subscription of the executives in the account settings.
- Also, when copying / transferring subtasks into a hidden task, Worksection automatically adds the permission for it to be visible to all the executives.
- Making
- task a subtask or vice versa, when subtask becomes a task, is now possible from the drop-down menu in the detailed view of the task.
Also...
Filters AutosaveFilters options are now saved automatically. You can filter the page to your liking and exit. After returning, you will see the filter settings intact. Moreover, extended filter settings are also saved. No more «puzzles», if you know what I am talking about...
Rounding
Now you can enable rounding of time obtained from the Timer and rounding of money configured by a rate or a formula.
Export
There are now unprintable columns with the tasks description and tags in the export section. They will allow you to work easier with the reports, but if you don’t need them — simply press Delete.
This is all for now, dear friends! As always, we are looking forward to hearing your admiring comments and constructive suggestions.
Good luck!
Worksection Team